5thGenRams Forums

Register a free account today to become a member! Once signed in, you'll be able to participate on this site by adding your own topics and posts, as well as connect with other members through your own private inbox!

Hard-wire Dash Cam Install

Le_Slacker

Ram Guru
Joined
Feb 3, 2020
Messages
648
Reaction score
617
Location
London, Ontario
I had a thinkware f200 pro front and back, all nicely wired through the headliner for the back and down a pillar to the fuse panel
was wired for parking monitor as well.

truck was broken into a week ago. bastard(s) ripped out all camera wiring and took both cameras. I'm sure it had decent footage!
Wiring it all up and hiding the wires was all nice and all that, but it caused damage when they didn't delicately remove it.....
 

jimothy

5thGenRams Supporter
Site Supporter
Joined
Dec 18, 2020
Messages
1,251
Reaction score
2,525
Location
Atlanta, GA metro
I had a thinkware f200 pro front and back, all nicely wired through the headliner for the back and down a pillar to the fuse panel
was wired for parking monitor as well.

truck was broken into a week ago. bastard(s) ripped out all camera wiring and took both cameras. I'm sure it had decent footage!
Wiring it all up and hiding the wires was all nice and all that, but it caused damage when they didn't delicately remove it.....
Grr, that makes me mad, and it’s not even my truck and cameras. Heck, people, if you’ve got to be a jerk and break into someone’s truck (don’t!), just disconnect the cameras from the wiring and take them. No need to jack up things even further.

I guess I’m not being reasonable expecting thieves to be considerate. Sorry this happened to you.
 

jimothy

5thGenRams Supporter
Site Supporter
Joined
Dec 18, 2020
Messages
1,251
Reaction score
2,525
Location
Atlanta, GA metro
I had a thinkware f200 pro front and back, all nicely wired through the headliner for the back and down a pillar to the fuse panel
was wired for parking monitor as well.

truck was broken into a week ago. bastard(s) ripped out all camera wiring and took both cameras. I'm sure it had decent footage!
Wiring it all up and hiding the wires was all nice and all that, but it caused damage when they didn't delicately remove it.....
I guess this is where the LTE module would come in handy: to transmit video in case the vehicle or cameras are stolen, which is when you would need the video the most.
 

Le_Slacker

Ram Guru
Joined
Feb 3, 2020
Messages
648
Reaction score
617
Location
London, Ontario
I guess this is where the LTE module would come in handy: to transmit video in case the vehicle or cameras are stolen, which is when you would need the video the most.

When I installed the camera, and the extra external gos antenna….. I had thought that they should design them differently…..

Right now all the brains are with the main camera. Rear tiny camera plugs into it. In my case another line in for the gps antenna. Made it look bulky right there at the back of the mirror. Memory card and all the buttons are there. And then I started thinking the front camera should be as small as the back one, and one wire down to the brains, which would be a separate unit that you can tuck under the dash. Would make for cleaner installs, and if the bastards take off with that camera, hopefully they don’t realize the brains with the memory is hidden and hopefully safer.
 

SKT Customs

5thGenRams Vendor
5thGenRams Vendor
Joined
Jun 14, 2018
Messages
1,213
Reaction score
1,619
Location
San Diego
I’m frustrated lol. I went to install my Blackvue 750x Plus today. Plugged my fuse taps in and the dashcam turned on, so I unplugged it so I could route my wires. Once I routed them I went to plug it back in and this time it wouldn’t turn on. Here’s the way I trouble shooted, please let me know if I missed anything!
1) Plugged into the 12v & it turned on, so the camera is good - the problem is wiring or fuses.
2) Played around with the fuses (I didn’t realize they had to go in a certain order) so I put the original 10amps closest to the fuse panel and the 5amp piggybacked on the outside.
3) Thought that maybe I blew the 5amp fuse from having it backwards, so I put in new 10amp fuses in their place (because I didn’t have more 5amps). Still no power.
4) Swapped actual fuse taps thinking maybe the wire in one of them was bad. No luck.
5) Cut off the standard crimp connections and added some heat shrink connections with solder in them. Still no power.
6) Made sure the ground was good. It sparks when I touch it so it must have current. Still no power.

So the only thing I can think of is:
1) do I have the actual fuses backwards in the fuse tap? Can someone post a pic of yours showing the numbers on the fuses to see if my #5 & 10 are upside down?
2) Possibly blew the fuses?
3) Somehow the actual wire harness supplied from Blackvue has a short in it?
Any help would be appreciated, thanks
 

grimreefer

U.S. Merchant Marine
Site Supporter
Joined
Nov 20, 2020
Messages
1,322
Reaction score
2,835
Location
Free State of Florida
I’m frustrated lol. I went to install my Blackvue 750x Plus today. Plugged my fuse taps in and the dashcam turned on, so I unplugged it so I could route my wires. Once I routed them I went to plug it back in and this time it wouldn’t turn on. Here’s the way I trouble shooted, please let me know if I missed anything!
1) Plugged into the 12v & it turned on, so the camera is good - the problem is wiring or fuses.
2) Played around with the fuses (I didn’t realize they had to go in a certain order) so I put the original 10amps closest to the fuse panel and the 5amp piggybacked on the outside.
3) Thought that maybe I blew the 5amp fuse from having it backwards, so I put in new 10amp fuses in their place (because I didn’t have more 5amps). Still no power.
4) Swapped actual fuse taps thinking maybe the wire in one of them was bad. No luck.
5) Cut off the standard crimp connections and added some heat shrink connections with solder in them. Still no power.
6) Made sure the ground was good. It sparks when I touch it so it must have current. Still no power.

So the only thing I can think of is:
1) do I have the actual fuses backwards in the fuse tap? Can someone post a pic of yours showing the numbers on the fuses to see if my #5 & 10 are upside down?
2) Possibly blew the fuses?
3) Somehow the actual wire harness supplied from Blackvue has a short in it?
Any help would be appreciated, thanks
Did you check the inline fuses of the hardwire kit?
 

securityguy

Legendary member
Joined
Feb 17, 2019
Messages
5,581
Reaction score
4,223
Location
North Florida
Did you check the inline fuses of the hardwire kit?
THIS^^^ There are two separate glass fuses on the hardwired kit in a black plastic cylindrical housing that snaps open. Either one has blown or, and I have found on a small batch of cameras that the wire attached to the glass fuse connector has come loose or fell out of its glass fuse holder socket. It can only be one or the other. I PM'd you with my cell as well in case you need my assistance.
 

SKT Customs

5thGenRams Vendor
5thGenRams Vendor
Joined
Jun 14, 2018
Messages
1,213
Reaction score
1,619
Location
San Diego
Looks to me like the wire going to that glass in-line fuse is loose because when I wiggled it the camera kept saying “parking mode on…parking mode off..” a dozen times haha. Not too sure how to secure that connection without getting a new fuse to crimp down on the wires though, since this one’s already crimped and still not making a solid connection.

Also for anyone wondering, the polarizing filter does not interact well with windshield tint. However it only distorts the sky, so I might keep it on for a bit to see if it helps with glare. A rainbow sky isn’t the end of the world if it makes license plates and stuff more clear. 6345B323-E50D-447B-ABBD-F1EAC67C37DC.png
 

Attachments

  • 747E64EC-82E1-41C5-86A6-0FC7E40FC965.jpeg
    747E64EC-82E1-41C5-86A6-0FC7E40FC965.jpeg
    117.2 KB · Views: 62
  • 11C56645-945A-4F82-8E4E-D25E7A62523B.jpeg
    11C56645-945A-4F82-8E4E-D25E7A62523B.jpeg
    117.9 KB · Views: 62

SKT Customs

5thGenRams Vendor
5thGenRams Vendor
Joined
Jun 14, 2018
Messages
1,213
Reaction score
1,619
Location
San Diego
Finally got my camera up and running and I think I got all the bugs worked out with help from @securityguy. Seriously, it’s rare to find a complete stranger willing to help so much as him. Super nice guy and very knowledgeable. I wish the forum had more people like him. Thanks. As for the camera, maybe I need to mess with the settings a bit because it seems very low resolution. I can’t even read license plates directly in front of me in daylight with no glare because it’s so fuzzy. Weird.
 

securityguy

Legendary member
Joined
Feb 17, 2019
Messages
5,581
Reaction score
4,223
Location
North Florida
Finally got my camera up and running and I think I got all the bugs worked out with help from @securityguy. Seriously, it’s rare to find a complete stranger willing to help so much as him. Super nice guy and very knowledgeable. I wish the forum had more people like him. Thanks. As for the camera, maybe I need to mess with the settings a bit because it seems very low resolution. I can’t even read license plates directly in front of me in daylight with no glare because it’s so fuzzy. Weird.
Happy to help my friend. Call me if you want help with your settings.
 

billybaloneey

Active Member
Joined
Apr 21, 2022
Messages
104
Reaction score
36
Picked up my 2022 Ram 1500 Lone Star a few days ago...looking to add some electronics...looking at the owners manual for the cabin fuse panel all it does is list the fuses...but does not show a graphic to match the fuses in the block. Anyone have or know where I can get a graphic...with fuse # positions?
 

grimreefer

U.S. Merchant Marine
Site Supporter
Joined
Nov 20, 2020
Messages
1,322
Reaction score
2,835
Location
Free State of Florida

Yuriyus

New Member
Joined
Jul 19, 2019
Messages
4
Reaction score
0
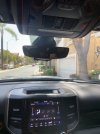
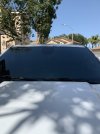
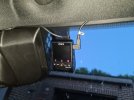
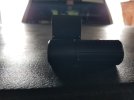
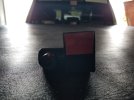
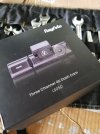
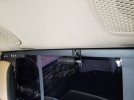
I had this setup on my F150 and just finished the install on my RAM. I run a Viofo A129 dual dash cam, with the rear cam mounted on the passenger side of the sliding rear window (cable tucked up inside the headliner on the passenger side.

Dash cam - https://www.amazon.com/gp/product/B07CTBB4R5/ref=ppx_yo_dt_b_search_asin_title?ie=UTF8&psc=1
Hard wire kit - https://www.amazon.com/gp/product/B07JQ1JYPJ/ref=ppx_yo_dt_b_search_asin_title?ie=UTF8&psc=1
Fuse Tap (not shown in below pics) - https://www.amazon.com/gp/aw/d/B077PBXGKQ/ref=ya_aw_oh_bia_dp?ie=UTF8&psc=1

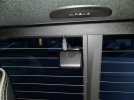
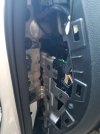
Looking at the owners manual, there is a fuse box located below the steering column, fuse F66 is unused, 10a and labelled as an accessory fuse. Fuses - Constant 12V is F33, switched 12V is F66.

u49d9UT.jpg


The dash panel below the steering column is held on by two bolts at the bottom and a bunch of clips, I used a non marring trim removal tool to help loosen those up. Once it's off, you'll have open access to the fuse block.

YIEylAX.jpg

J7oSsXk.jpg


Not pictured below is the fuse tap I used, the link above fits perfectly.

TxSzqku.jpg


The trim panel to the left of the instrument panel pops off with trim removal tools as well (a few clips holding it on). Use a phillips screwdriver to loosen up one of the screws enough to get the ground wire in place and mounted. A few zip ties to keep the wiring in place and from bouncing around as well.

J5aa3Z9.jpg


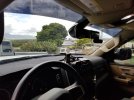
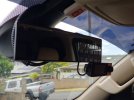
On my F150 I pulled off the A pillar trip piece to route the wiring up and into the front of the headliner, over to where I mounted the dash cam by the mirror. In the RAM, I was able to sneak it behind the A pillar trim without removing it.

pCJMpy4.jpg

qjOGswC.jpg


pEZQSs2.jpg

PklzaI0.jpg


Hope this helps!


***Edited - When I originally wrote this I had a G1W dash cam, I've since switched to the Viofo***
Your hard wire kit looks like is 3 wire. It seems that you ran red to the fuse, the black is ground, where did you connect yellow?
 

MannyN

Ram Guru
Joined
Apr 24, 2021
Messages
836
Reaction score
679

Yuriyus

New Member
Joined
Jul 19, 2019
Messages
4
Reaction score
0
Have a look here.
Thank you very much for that. That’s a very helpful diagram. However, I still do not know where to tap yellow wire!
 

Liquid Li0n

Well-Known Member
Joined
Jul 1, 2021
Messages
318
Reaction score
129
Location
Belgium
Thanks to the information here also tried the parking mode setup and went well. Happy with the results.

I have a Viofo A129 Plus duo and the hardware kit from Viofo.
 

Attachments

  • 20220612_222815.jpg
    20220612_222815.jpg
    125.1 KB · Views: 74
  • 20220612_222617.jpg
    20220612_222617.jpg
    145.5 KB · Views: 74

MikeyHo808

Ram Guru
Joined
Jun 1, 2021
Messages
913
Reaction score
801
Location
Hawaii
Thanks to this thread, I just completed install of my Fathers Day gift from my girls. A Rayfoto LS05D and hardwire kit.
Didnt want it on my windshield, instead mounted it to my clip on wide angle rear view mirror.
Ran the wires for the hard wire kit and rear view cam up through the mirror mount and head liner.
Again, this thread was very helpful in the install.
Routing the cables was super easy, plus having enough fuse taps made the install a breeze.
For the rear camera, I used a strip of ABS plastic, mounted the cam to that, then mounted that to the window frame with 3M tape, so it now sits below the frame.
Have watched videos of this Rayfoto cam, seems a decent dash cam. Havent taken it on the road yet, just ensured at this point of a clean, working install, and I can connect to it through the app on my Android and iPad.
Been wanting to get one for a while, so to get it for a gift, cool man! That makes it an awesome cam! 🤙

Ok, i may have thrown a hint or two...lol.
 

Attachments

  • 20220620_142746.jpg
    20220620_142746.jpg
    128.5 KB · Views: 94
  • 20220620_114732.jpg
    20220620_114732.jpg
    96.6 KB · Views: 93
  • 20220620_114728.jpg
    20220620_114728.jpg
    130.9 KB · Views: 97
  • 20220620_142720.jpg
    20220620_142720.jpg
    118.4 KB · Views: 98
  • 20220620_142701.jpg
    20220620_142701.jpg
    97.7 KB · Views: 99
  • 20220620_101754.jpg
    20220620_101754.jpg
    89.5 KB · Views: 99
  • 20220620_105102.jpg
    20220620_105102.jpg
    156.5 KB · Views: 101
  • 20220620_143038.jpg
    20220620_143038.jpg
    100 KB · Views: 100
  • 20220620_142822.jpg
    20220620_142822.jpg
    100.8 KB · Views: 96

Users who are viewing this thread

Site Vendors

https://www.jasonlewisautomotive.com/
Top