5thGenRams Forums

Register a free account today to become a member! Once signed in, you'll be able to participate on this site by adding your own topics and posts, as well as connect with other members through your own private inbox!

Hard-wire Dash Cam Install

Humer91

Active Member
Joined
Dec 25, 2021
Messages
46
Reaction score
37
so @securityguy , complete bonehead here. I can run a code blue, but wiring electronics is DEFINITELY not my strong suit. Installed a Viofo A129 Pro duo but want to wire it into my fuses.

IS this the right Viofo kit I should be using? https://www.amazon.com/Viofo-3-Wire...1CCZGL/ref=psdc_3248689011_t1_B07JQ1JYPJ?th=1

Next, I downloaded the awesome fuse layout PDF by HAL9001, which fuses should i be tapping into? 66 for ACC and 33 for Battery, or should I be looking elsewhere?

Finally, which voltage settings do you recommend? 11.8/23.6, 12.0/24.0, 12.2/24.4, or 12.4/24.8.

Thanks in advance!
 

securityguy

Legendary member
Joined
Feb 17, 2019
Messages
5,576
Reaction score
4,218
Location
North Florida
so @securityguy , complete bonehead here. I can run a code blue, but wiring electronics is DEFINITELY not my strong suit. Installed a Viofo A129 Pro duo but want to wire it into my fuses.

IS this the right Viofo kit I should be using? https://www.amazon.com/Viofo-3-Wire...1CCZGL/ref=psdc_3248689011_t1_B07JQ1JYPJ?th=1

Next, I downloaded the awesome fuse layout PDF by HAL9001, which fuses should i be tapping into? 66 for ACC and 33 for Battery, or should I be looking elsewhere?

Finally, which voltage settings do you recommend? 11.8/23.6, 12.0/24.0, 12.2/24.4, or 12.4/24.8.

Thanks in advance!
No worries my friend.

1. Yes, that kit will work just fine
2. F66 is switched IGNITION power
3. F33 is constant BATTERY (required for Parking Mode)
4. I would start with the 12.2/24.4 setting (if you go to 12.4, your Parking Mode may not function and 11.8-12.0 may be too low)

If you have any other questions, or need help during your install, feel free to PM me and I'll share my cell and can walk you through it.
 

Humer91

Active Member
Joined
Dec 25, 2021
Messages
46
Reaction score
37
No worries my friend.

1. Yes, that kit will work just fine
2. F66 is switched IGNITION power
3. F33 is constant BATTERY (required for Parking Mode)
4. I would start with the 12.2/24.4 setting (if you go to 12.4, your Parking Mode may not function and 11.8-12.0 may be too low)

If you have any other questions, or need help during your install, feel free to PM me and I'll share my cell and can walk you through it.
So f33 and F66 should be good to go?

Also, what are your thoughts on the OBD2 type power taps?
 

adm22

New Member
Joined
Jun 27, 2022
Messages
4
Reaction score
1
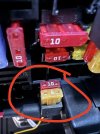
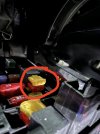
This thread has much more info than I could find on the TRX forum. I'm hoping someone can answer my question. I installed my Blackvue 650 2ch setup from my previous camera into the new truck. I used fuse locations 33 and 66 as recommended. I noticed some of the fuses are "upside down" which has to do with how the accy and battery side are connected to the fuse location. Is my orientation of the fuse taps and the fuses themselves correct in these pictures? I remember reading a comment somewhere in this thread from someone saying the F33 fuse tap needed to be swapped around on the pictures provided in the original post and now I can't find it. I'm wondering if the fuse tap is properly oriented in the fuse location, then the actual direction of the fuses in the tap won't matter. I could be way off though. Thanks!

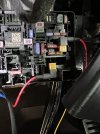
Here is the picture I was talking about. Both taps have the tail for the new circuit facing the same direction.
2018-11-03-14-30-21-jpg.15179


Here is how mine looks.
IMG_9285.jpeg

Fuse 66 tap and fuses.
IMG_9286.jpeg

Fuse 33 location and fuses.
IMG_9288.jpeg
 

securityguy

Legendary member
Joined
Feb 17, 2019
Messages
5,576
Reaction score
4,218
Location
North Florida
This thread has much more info than I could find on the TRX forum. I'm hoping someone can answer my question. I installed my Blackvue 650 2ch setup from my previous camera into the new truck. I used fuse locations 33 and 66 as recommended. I noticed some of the fuses are "upside down" which has to do with how the accy and battery side are connected to the fuse location. Is my orientation of the fuse taps and the fuses themselves correct in these pictures? I remember reading a comment somewhere in this thread from someone saying the F33 fuse tap needed to be swapped around on the pictures provided in the original post and now I can't find it. I'm wondering if the fuse tap is properly oriented in the fuse location, then the actual direction of the fuses in the tap won't matter. I could be way off though. Thanks!

Here is the picture I was talking about. Both taps have the tail for the new circuit facing the same direction.
2018-11-03-14-30-21-jpg.15179


Here is how mine looks.
View attachment 133667

Fuse 66 tap and fuses.
View attachment 133668

Fuse 33 location and fuses.
View attachment 133669
A fuse has no polarity so it can be installed right side up or up side down and won't matter in the slightest. To determine which side of the fuse panel socket is the LINE (supply) side and which side is the LOAD side, you can use a multimeter to see which side of the socket gives you power when the vehicle is both OFF and with the IGNITION on. You want the taps output (LOAD) side with the red wire coming out of the LOAD side of the fuse socket.

You can clearly see that F66 can only go one way as the other side is blocked. In reality, since the Blackvue cable is also fused for both yellow and red, in your case, it really doesn't matter at all how the fuse taps are installed.
 

adm22

New Member
Joined
Jun 27, 2022
Messages
4
Reaction score
1
A fuse has no polarity so it can be installed right side up or up side down and won't matter in the slightest. To determine which side of the fuse panel socket is the LINE (supply) side and which side is the LOAD side, you can use a multimeter to see which side of the socket gives you power when the vehicle is both OFF and with the IGNITION on. You want the taps output (LOAD) side with the red wire coming out of the LOAD side of the fuse socket.

You can clearly see that F66 can only go one way as the other side is blocked. In reality, since the Blackvue cable is also fused for both yellow and red, in your case, it really doesn't matter at all how the fuse taps are installed.
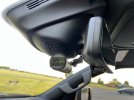
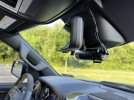
Great info. Thanks for the explanation. The only part that I haven't really figured out is what to do with the wires running between the headliner and the camera. Right now they are just bundled together with velcro wire ties. I tried to tuck them in the space between the plastic trim on the windshield but that wasn't working out too well as it was too tight of a space. Any thoughts?

IMG_9300.jpeg

IMG_9303.jpeg
 

securityguy

Legendary member
Joined
Feb 17, 2019
Messages
5,576
Reaction score
4,218
Location
North Florida
Great info. Thanks for the explanation. The only part that I haven't really figured out is what to do with the wires running between the headliner and the camera. Right now they are just bundled together with velcro wire ties. I tried to tuck them in the space between the plastic trim on the windshield but that wasn't working out too well as it was too tight of a space. Any thoughts?

View attachment 133685

View attachment 133686
I will PM you so you can call me. I have installed these in numerous RAM's and they all looked factory. The hint is to pop off that big black plastic shroud attached to the windshield. Only 4 clips that easily pop off. You can then route the wires up inside of it where the mirror stalk is protruding through and then up to the headliner and across It doesn't look like you left yourself enough slack so you'll have to pull a bit more wire up the A-Pillar and across the headliner. Sending you my cell number now.
 

adm22

New Member
Joined
Jun 27, 2022
Messages
4
Reaction score
1
I will PM you so you can call me. I have installed these in numerous RAM's and they all looked factory. The hint is to pop off that big black plastic shroud attached to the windshield. Only 4 clips that easily pop off. You can then route the wires up inside of it where the mirror stalk is protruding through and then up to the headliner and across It doesn't look like you left yourself enough slack so you'll have to pull a bit more wire up the A-Pillar and across the headliner. Sending you my cell number now.
Thanks. I might give it a shot tomorrow afternoon if I have time. I saw there is a small slot on the passenger side near the bottom of that assembly. When I was initially installing this I popped a trim removal tool in there and got most of it to pop off, but it was hung up near the mirror. I also had the Blendmount on the mirror stalk along with the camera so maybe that was holding it up from coming off.
 

securityguy

Legendary member
Joined
Feb 17, 2019
Messages
5,576
Reaction score
4,218
Location
North Florida
Thanks. I might give it a shot tomorrow afternoon if I have time. I saw there is a small slot on the passenger side near the bottom of that assembly. When I was initially installing this I popped a trim removal tool in there and got most of it to pop off, but it was hung up near the mirror. I also had the Blendmount on the mirror stalk along with the camera so maybe that was holding it up from coming off.
The blend mount needs to be removed. There is a middle piece directly above the stalk that has to also be removed to get the entire assembly out. Getting the mid-piece out is a bit tricky...on some they have just fallen out and others I played with it for 15 minutes. It will be well worth the time regardless to totally hide those wires. Once you get that mid-piece out, you may have to Dremel or groove the bottom out if you need additional room for the wires. I don't typically use a Blendmount for dash cams and mount them to the windshield. I use Blendmounts for radar detector installs. You have my number...call if you want to chat.
 

adm22

New Member
Joined
Jun 27, 2022
Messages
4
Reaction score
1
The blend mount needs to be removed. There is a middle piece directly above the stalk that has to also be removed to get the entire assembly out. Getting the mid-piece out is a bit tricky...on some they have just fallen out and others I played with it for 15 minutes. It will be well worth the time regardless to totally hide those wires. Once you get that mid-piece out, you may have to Dremel or groove the bottom out if you need additional room for the wires. I don't typically use a Blendmount for dash cams and mount them to the windshield. I use Blendmounts for radar detector installs. You have my number...call if you want to chat.
Thanks for the info and your number. I'll probably give it a shot sometime this week. If I run into any issues or have questions, I'll give you a call.

Thanks!
 

Humer91

Active Member
Joined
Dec 25, 2021
Messages
46
Reaction score
37
I did the fuse tap and while it worked both during driving and parking, I started getting errors with my automatic braking system. I restored the fuses to how they were originally and errors stopped, so I decided to forego the parking camera system and just installed using power from behind the mirror using a Dongar Technologies power adapter. I cut a tiny notch into the plastic shroud covering the mirror cables and ran the power and rear cam cords up through that and then the rear thru the headliner. With the exception of 2 cables exposed for about an inch into the shroud it looks flawless. Much cleaner and except for not having the parking camera system (I'm not heart-broken over it) I am extremely happy. Oh and I wish the cable for the rear camera was about 6 feet shorter, having to stuff all the excess down the c-pillar and then behind the rear seat liner is a PITA.
 

securityguy

Legendary member
Joined
Feb 17, 2019
Messages
5,576
Reaction score
4,218
Location
North Florida
I did the fuse tap and while it worked both during driving and parking, I started getting errors with my automatic braking system. I restored the fuses to how they were originally and errors stopped, so I decided to forego the parking camera system and just installed using power from behind the mirror using a Dongar Technologies power adapter. I cut a tiny notch into the plastic shroud covering the mirror cables and ran the power and rear cam cords up through that and then the rear thru the headliner. With the exception of 2 cables exposed for about an inch into the shroud it looks flawless. Much cleaner and except for not having the parking camera system (I'm not heart-broken over it) I am extremely happy. Oh and I wish the cable for the rear camera was about 6 feet shorter, having to stuff all the excess down the c-pillar and then behind the rear seat liner is a PITA.
If you were getting Parking Brake errors, then either you tapped the wrong fuses or you have a bigger issue. If you tap F33 and F66, you should have zero issues.
 

Humer91

Active Member
Joined
Dec 25, 2021
Messages
46
Reaction score
37
If you were getting Parking Brake errors, then either you tapped the wrong fuses or you have a bigger issue. If you tap F33 and F66, you should have zero issues.
I was tapped into 33 and 66, power worked correctly, both while the engine was on and when it was off, just kept getting errors related to the automatic braking system and also a traction control system error if i remember correctly. As soon as I pulled the taps and put the fuses back where they belong the problem resolved itself. That said, I'll be fine without the parking function and using the Dongar adapter has really cleaned up the wiring quite a bit
 

securityguy

Legendary member
Joined
Feb 17, 2019
Messages
5,576
Reaction score
4,218
Location
North Florida
I was tapped into 33 and 66, power worked correctly, both while the engine was on and when it was off, just kept getting errors related to the automatic braking system and also a traction control system error if i remember correctly. As soon as I pulled the taps and put the fuses back where they belong the problem resolved itself. That said, I'll be fine without the parking function and using the Dongar adapter has really cleaned up the wiring quite a bit
Again, you have something more going on there as tapping 33 and 66 should cause zero issues.
 
Last edited:

Another Money Pit

Active Member
Joined
Oct 15, 2021
Messages
173
Reaction score
107
Location
WI
I was tapped into 33 and 66, power worked correctly, both while the engine was on and when it was off, just kept getting errors related to the automatic braking system and also a traction control system error if i remember correctly. As soon as I pulled the taps and put the fuses back where they belong the problem resolved itself. That said, I'll be fine without the parking function and using the Dongar adapter has really cleaned up the wiring quite a bit
Did you have the cords facing the right way though. One went left one went right
 

Snowfox

New Member
Joined
Apr 6, 2022
Messages
4
Reaction score
3
Location
BC Canada
Installed my dashcam and V1G2 today. I must say this thread helped a ton, thanks to all who post here :)

I'm tackling it in stages, as I get aggravated with my back and the #@(@!$ mosquitos attacking me this morning while both my hands were busy. Main wiring is done, but I need to clean up the rear camera wire, and the wires around the mirror shroud at some point (I didn't remove it) after I see where I want the V1 to be long term.

One interesting note - most of the fatter (MCASE ?) fuses weren't entirely seated in the fuse block. All the micro2 ones were fine, but I went over the others and pressed them fully. I've not noticed any electrical gremlins, so they may have been fine, but I recall reading a bunch of horror stories on the Jeep forums about unseated fuses.
 

mesalum

New Member
Joined
Mar 23, 2022
Messages
4
Reaction score
6
Hello all. I am a new member. I bought a 2022 Ram 1500 Limited this last May. I had a Blackvue DR750S in my old vehicle, 2007 Acura MDX. I just finished installing the Blackvue DR750X 2ch in my new Ram. I must say many thanks to everybody that contributed to this thread. All the information contained in this thread helped a great deal. When I first started thinking about installing a dashcam in my new truck I was going to take it to someone. This thread convinced me to tackle the install myself. The install was very easy. In fact it was easier than the install in the MDX.

-- Jeff
 

Users who are viewing this thread

Top