securityguy
Legendary member
Yes sir...it is necessary for Parking Mode.Should I also get the Power Magic Pro? Probably should just PM these questions.
Yes sir...it is necessary for Parking Mode.Should I also get the Power Magic Pro? Probably should just PM these questions.
Should I also get the Power Magic Pro?...
Yes sir...it is necessary for Parking Mode.
You are correct! Maybe the optional power management module gives you finer grain control over when to cut power vs. a hard-coded setting on the camera that you wouldn't be able to adjust?Isn't this model dependent? The DR900X has integrated parking power management.
If you buy the DR...X, you do not need a PMP. All of the features of the PMP are built into the new Blackvue "X" models. If you have any other Blackvue or manufacturers camera, you need the PMP. Some like the separate PMP so you can manually turn off Parking Mode with the flip of a switch.Isn't this model dependent? The DR900X has integrated parking power management.
...a hard-coded setting on the camera that you wouldn't be able to adjust?
Yes...same settings as the hardwired PMP box.It's adjustable through the app on the DR900X, though not to the tenth of a volt. If I recall, there are three or four voltage cutoff menu choices.
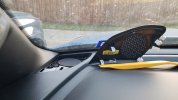
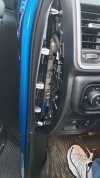
Great choice...excellent camera. I'll ve interested to see how you mounted the front and routed your wires. Hopefully you have looked through this thread on various dash cam installs and used the advice offered.Finished up my install of the BlackVue 750x earlier today. So far I’m very pleased with the setup. Ran the wire to the rear camera down the passenger a-pillar and along the floor and had to go back and find a little slack to make it reach even being offset to the passenger side of the rear window. I probably lost a few inches since I took the time to run it inside the factory wire channel along the floor and zip tied it to factory wiring wherever I could. I took a few photos along the way, I’ll get them posted over the weekend for anyone who might be interested in a similar setup.
I have indeed read most of this thread, and after seeing all the different options in it, I liked the way the Blackvue cams looked and felt they would work best for me overall with what I wanted to do.Great choice...excellent camera. I'll ve interested to see how you mounted the front and routed your wires. Hopefully you have looked through this thread on various dash cam installs and used the advice offered.
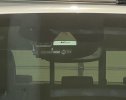
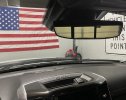
Absolutely awesome job...the way a dash cam should be installed. Looks fantastic my friend!As promised, here are some photos of the Blackvue 750X dash cam setup I installed this week.
Nice install.As promised, here are some photos of the Blackvue 750X dash cam setup I installed this week.
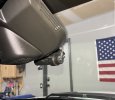
I wanted a camera that would allow me to get the lens centered on the windshield, below my toll pass, while not obstructing my view at all. As you can see from the 2 photos below, mission accomplished.
View attachment 81204
View from the driver's perspective:
View attachment 81209
From the passenger side, you can clearly see the camera, but I don't sit there, and it's actually not as intrusive as the photo makes it seem. Wires are run into the sensor cover through two tiny slots I made with a round file to keep things neat.
View attachment 81205
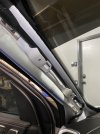
The wiring on the driver's side is run down the a-pillar and secured to the existing wiring, well out of the way of the airbag.
View attachment 81208
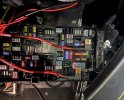
I tapped into the fuse panel using F66 for the switched power source, and F33 for the constant power to be able to utilize parking mode. Both have 5 amp fuses installed for the additional circuits as I didn't have any lower ones. F66 also provides the power to my front camera; no issues with having them both running off the 5 amp fuse. Extra wiring is bundled up and zip-tied to an existing harness behind the panel on the end of the dash.
View attachment 81207
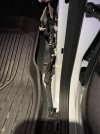
On the passenger side I opted to run it along the floor inside the factory wiring channel in lieu of trying to snake it through the headliner and around the airbags. It comes down the a-pillar just like the other side and then goes into the plastic channel all the way to the back where it then goes up behind the plastic on the c-pillar and over to the rear camera.
View attachment 81210
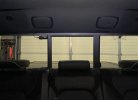
The rear camera is mounted on the passenger side portion of the rear window, with it flipped and moved over as close to the middle as I could get it. Looking at the videos from it, there is plenty of visibility to see to the rear as well as off to the sides a good bit. Eventually I may get an adapter that has a 90 degree end on it, but for now it's fine and really isn't that noticeable either from the driver's seat, or looking in from the outside.
View attachment 81214
My Viofo A129 Duo came with the tools.What pry tools do you guys use? Looking on Amazon and it's dizzying all the different sets there are...
Has pretty much everything.I used this set off Amazon and it has done everything I needed including de-pinning electrical connectors. But there are plenty of others that work the same for less.
19Pcs Trim Removal Tool,Car Panel Door Audio Trim Removal Tool Kit, Auto Clip Pliers Fastener Remover Pry Tool Set with Storage Bag https://www.amazon.com/dp/B07HRNKY8...abc_SC9DDYXS7X0YF3NPRAKZ?_encoding=UTF8&psc=1
I have used these for a few years now. very cheap and they are functional.What pry tools do you guys use? Looking on Amazon and it's dizzying all the different sets there are...
Exactly how my install went down to the location of the cams and cable routing, except I decided on the Viofo A129 Duo. I may be regretting getting the Viofo now only because the front cam is much more visible from my driving position. I wouldn't call it distracting at all but I like the idea of not being able to see it, very nice job on yours.As promised, here are some photos of the Blackvue 750X dash cam setup I installed this week.
