5thGenRams Forums

Register a free account today to become a member! Once signed in, you'll be able to participate on this site by adding your own topics and posts, as well as connect with other members through your own private inbox!

Hard-wire Dash Cam Install

I have the Viofo A119v3 and like it. I have the display turned off so it's not a distraction. My Viofo is just left of the mirror housing and it disappears from my view after I start driving. I do like the Viofo and the video quality is crystal clear.
 
Exactly how my install went down to the location of the cams and cable routing, except I decided on the Viofo A129 Duo. I may be regretting getting the Viofo now only because the front cam is much more visible from my driving position. I wouldn't call it distracting at all but I like the idea of not being able to see it, very nice job on yours.

Though out of pocket I am well under half the $ of the Blackvue. perhaps I will get all the goodie out of the Viofo and when it is time to replace I will loosen the purse strings a little and opt for the Blackvue.
I went back and forth between the Viofo and BlackVue for like a month before I decided. I could've gone with the cheaper BlackVue model, but I liked the integrated parking mode on this one and it didn't require ordering anything extra for it. The fact I could get it centered up front and not have it taking up more of the windshield than the giant sensor cover does was also a deciding factor.

The Viofo still looks like a great system, and it's definitely much better than having no camera.
Agreed. I have the Blackvue's in all of my cars, but decided to try the Viofo A129 4K Pro on my daughter's SUV since they received solid reviews. The Viofo is nice, but it's NOT a Blackvue and the quality of the camera is lacking a bit ;) I do not like that the connectors on the Viofo are on the top and interfere with the ability to get it close to the headliner on the front and rear glass. From a front camera perspective, I love the fact I can center the camera behind the rear view mirror and that it's nearly invisible while driving. Based on what Viofo you are looking at (and you should only buy an A129 series and nothing else), it's really not much more to step up to a Blackvue IMPO.
 
As promised, here are some photos of the Blackvue 750X dash cam setup I installed this week.

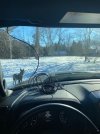
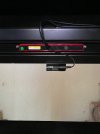
I wanted a camera that would allow me to get the lens centered on the windshield, below my toll pass, while not obstructing my view at all. As you can see from the 2 photos below, mission accomplished.

View attachment 81204

View from the driver's perspective:

View attachment 81209

From the passenger side, you can clearly see the camera, but I don't sit there, and it's actually not as intrusive as the photo makes it seem. Wires are run into the sensor cover through two tiny slots I made with a round file to keep things neat.

View attachment 81205

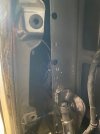
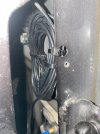
The wiring on the driver's side is run down the a-pillar and secured to the existing wiring, well out of the way of the airbag.

View attachment 81208

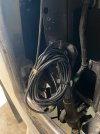
I tapped into the fuse panel using F66 for the switched power source, and F33 for the constant power to be able to utilize parking mode. Both have 5 amp fuses installed for the additional circuits as I didn't have any lower ones. F66 also provides the power to my front camera; no issues with having them both running off the 5 amp fuse. Extra wiring is bundled up and zip-tied to an existing harness behind the panel on the end of the dash.

View attachment 81207

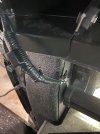
On the passenger side I opted to run it along the floor inside the factory wiring channel in lieu of trying to snake it through the headliner and around the airbags. It comes down the a-pillar just like the other side and then goes into the plastic channel all the way to the back where it then goes up behind the plastic on the c-pillar and over to the rear camera.

View attachment 81210

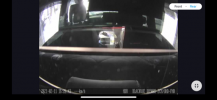
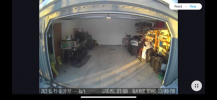
The rear camera is mounted on the passenger side portion of the rear window, with it flipped and moved over as close to the middle as I could get it. Looking at the videos from it, there is plenty of visibility to see to the rear as well as off to the sides a good bit. Eventually I may get an adapter that has a 90 degree end on it, but for now it's fine and really isn't that noticeable either from the driver's seat, or looking in from the outside.

View attachment 81214
So the wiring goes from the front camera up into the visor cover, then along the headliner to the left, down the driver's A-pillar to the fuse panel? I'm not sure yet where the fuse panel is, but it looks like it's above the driver footwell?

And the rear camera, that goes to the right from the visor cover, down the passenger's A-pillar and across the floor then up and over at the rear?

So far it looks like for you and an earlier poster that there isn't much extra cable for the rear camera.

Earlier SecurityGuy said I could run rearward above the headliner but adjacent to the panoramic sunroom as an alternative. You said you wanted to avoid airbags, but are there any up there?

I'm assuming your (+) leads went in the fuse taps. What about your grounds?

And the fuse taps hold 2 fuses, one to replace the fuse you pull in order to install the tap, and the other to fuse the accessory you're adding, right? Is it obvious which slot is for the pre-existing circuit?

I've taken off A-pillar covers and door sill covers before in my Dakota, they never fit back as well as they were originally, especially the door sill trim.
 
(and you should only buy an A129 series and nothing else),
I disagree with this. The A129 is lesser quality than the A119v3. The A129 Duo is good for 2 camera requirements, but the 1080p resolution of the A129 is not as clear and crisp as the 1440p of the A119v3.
 
Earlier SecurityGuy said I could run rearward above the headliner but adjacent to the panoramic sunroom as an alternative. You said you wanted to avoid airbags, but are there any up there?

I'm assuming your (+) leads went in the fuse taps. What about your grounds?

And the fuse taps hold 2 fuses, one to replace the fuse you pull in order to install the tap, and the other to fuse the accessory you're adding, right? Is it obvious which slot is for the pre-existing circuit?

I've taken off A-pillar covers and door sill covers before in my Dakota, they never fit back as well as they were originally, especially the door sill trim.
1. You can certainly run it up in the headliner with no issues interfering with any side air bags
2. There is an excellent ground right where the plastic panel is that gets removed below the steering column to access the fuse panel (2 screws and some clips)
3. Correct on the fuse tap question...the fuses installed for the camera circuit of the fuse taps should be no greater than 2-3A.
4. Yes, it is very obvious as the wire coming off the tap is in line with the fuse for the camera
5. The A-Pillar removal and reinstall is ZERO issue and super easy with no refitment issues...trust me on this one ;)
 
So the wiring goes from the front camera up into the visor cover, then along the headliner to the left, down the driver's A-pillar to the fuse panel? I'm not sure yet where the fuse panel is, but it looks like it's above the driver footwell?

And the rear camera, that goes to the right from the visor cover, down the passenger's A-pillar and across the floor then up and over at the rear?

So far it looks like for you and an earlier poster that there isn't much extra cable for the rear camera.

Earlier SecurityGuy said I could run rearward above the headliner but adjacent to the panoramic sunroom as an alternative. You said you wanted to avoid airbags, but are there any up there?

I'm assuming your (+) leads went in the fuse taps. What about your grounds?

And the fuse taps hold 2 fuses, one to replace the fuse you pull in order to install the tap, and the other to fuse the accessory you're adding, right? Is it obvious which slot is for the pre-existing circuit?

I've taken off A-pillar covers and door sill covers before in my Dakota, they never fit back as well as they were originally, especially the door sill trim.

Correct, the wiring is run up under the headliner to the a-pillar on each side and then down, out of the way of the airbags. It's simple to tuck it up behind the headliner just using a plastic trim tool. The fuse panel is located behind the cover that sits under the steering wheel/in front of your knees. There's 2 screws on the bottom edge and then it's just held in by clips.

I just didn't want to mess with getting the headliner loose enough to get something in there to pull the wire through. The curtain airbags just run along the edge of the headliner, like you see on the a-pillar, so as long as the wire is a few inches from the edge, and isn't tucked right up under the little molding strip on the edge it should be fine. I just prefer not to mess with the headliner if possible.

There wasn't a lot of slack in the cable, and I had to go back and pull a few inches more from the slack I had left up front. Without going through the hassle of pulling it through the factory wiring channel there would probably be a little more slack, but I ended up with about 2" to spare where the rear is mounted. As long as you mount the camera the way I did and then rotate the image in the app there is enough cable to work with.

The fuse taps are pretty obvious when you look at them which fuse is for the original circuit, and which is the additional one. My grounds are secured to a factory screw on the metal framework that is behind the cover on the end of the dash, the same area I have the extra power cable secured.

I've had the door sills and pillar covers off both sides several times now, and as long as you take your time they come out pretty easily and snap back in just fine.
 
Why not tap into one of the wires in the mirror housing?
 
Why not tap into one of the wires in the mirror housing?
You probably could. I know there was someone on the site that had created a usb dongle with factory connectors on it to "t" into the harness up there. Would be simple enough to create your own with power and ground leads by sourcing the factory connectors and terminals. It's simple enough to just run the wires down to the fuse panel though, and then you don't have to worry about having an inline fuse hidden somewhere or having excess wire to hide behind the cover.
 
Why not tap into one of the wires in the mirror housing?
There is a lot of info on the forum as to why that's not such a great idea. As has been stated multiple times, it is so FRICKIN' EASY to run wires in this truck, take the extra 5-10 minutes and do it right ;)
 
Any idea where to land a 2/3 amp micro2 fuse from? Smallest I can find is 5 amps.
It looks like micros only go down to 5...mini's come in 2 and 3. I would just use the 5 and never anything larger. If doing a dash cam AND radar detector, you should put them on the same fuse tap as a single circuit as the two combined will never draw more than 2 amps anyway.
 
Agreed. I have the Blackvue's in all of my cars, but decided to try the Viofo A129 4K Pro on my daughter's SUV since they received solid reviews. The Viofo is nice, but it's NOT a Blackvue and the quality of the camera is lacking a bit ;) I do not like that the connectors on the Viofo are on the top and interfere with the ability to get it close to the headliner on the front and rear glass. From a front camera perspective, I love the fact I can center the camera behind the rear view mirror and that it's nearly invisible while driving. Based on what Viofo you are looking at (and you should only buy an A129 series and nothing else), it's really not much more to step up to a Blackvue IMPO.
I currently use Garmin Mini, they are small and the quality is just fine. Just wondering, in case of an accident with the Viofo, how can you access the footage if you needed them?
My understanding is that the Viofo does not have WiFi or phone app that you can access the footage when you need them.
 
I currently use Garmin Mini, they are small and the quality is just fine. Just wondering, in case of an accident with the Viofo, how can you access the footage if you needed them?
My understanding is that the Viofo does not have WiFi or phone app that you can access the footage when you need them.
On a VIOFO, you can either view it on the screen of the device or remove the SD card and connect it to your computer and download all of the videos saved on the card. The A129 does have WiFi and an app as well.
 
The bed cap was causing a really bad glare on my rearview dash cam and also making it pointless so I ordered a new mount and a 49ft cable (which was more than needed) and installed it today, now my rearview dash cam is mounted in the bed cap but I can still move it back when I am driving without the cap.

IMG_0172.PNGIMG_0173.jpgIMG_0175.jpgIMG_0177.jpgIMG_0178.jpgIMG_0180.jpgIMG_0182.jpgIMG_0183.PNG
 
It looks like micros only go down to 5...mini's come in 2 and 3. I would just use the 5 and never anything larger. If doing a dash cam AND radar detector, you should put them on the same fuse tap as a single circuit as the two combined will never draw more than 2 amps anyway.
I forgot the Blackvue already has the inline fuses in their hardwire kit, so the fuse taps will be fine with the 5's. (y)
 
I had this setup on my F150 and just finished the install on my RAM. I run a Viofo A129 dual dash cam, with the rear cam mounted on the passenger side of the sliding rear window (cable tucked up inside the headliner on the passenger side.

Dash cam - https://www.amazon.com/gp/product/B07CTBB4R5/ref=ppx_yo_dt_b_search_asin_title?ie=UTF8&psc=1
Hard wire kit - https://www.amazon.com/gp/product/B07JQ1JYPJ/ref=ppx_yo_dt_b_search_asin_title?ie=UTF8&psc=1
Fuse Tap (not shown in below pics) - https://www.amazon.com/gp/aw/d/B077PBXGKQ/ref=ya_aw_oh_bia_dp?ie=UTF8&psc=1

Looking at the owners manual, there is a fuse box located below the steering column, fuse F66 is unused, 10a and labelled as an accessory fuse. Fuses - Constant 12V is F33, switched 12V is F66.

u49d9UT.jpg


The dash panel below the steering column is held on by two bolts at the bottom and a bunch of clips, I used a non marring trim removal tool to help loosen those up. Once it's off, you'll have open access to the fuse block.

YIEylAX.jpg

J7oSsXk.jpg


Not pictured below is the fuse tap I used, the link above fits perfectly.

TxSzqku.jpg


The trim panel to the left of the instrument panel pops off with trim removal tools as well (a few clips holding it on). Use a phillips screwdriver to loosen up one of the screws enough to get the ground wire in place and mounted. A few zip ties to keep the wiring in place and from bouncing around as well.

J5aa3Z9.jpg


On my F150 I pulled off the A pillar trip piece to route the wiring up and into the front of the headliner, over to where I mounted the dash cam by the mirror. In the RAM, I was able to sneak it behind the A pillar trim without removing it.

pCJMpy4.jpg

qjOGswC.jpg


pEZQSs2.jpg

PklzaI0.jpg


Hope this helps!


***Edited - When I originally wrote this I had a G1W dash cam, I've since switched to the Viofo***
LOL that camera is junk... they seen u coming for that price.
 
LOL that camera is junk... they seen u coming for that price.
Wow. Two posts and this is how you use the second one? Your opinion is worthless as many people are running these cameras and are happy with them.

You could provide some detail as to why "that camera is junk", but just making the statement the way you did is worthless.
 
Wow. Two posts and this is how you use the second one? Your opinion is worthless as many people are running these cameras and are happy with them.

You could provide some detail as to why "that camera is junk", but just making the statement the way you did is worthless.
The Viofo cameras are a good quality camera for the price. Certainly not a Blackvue or Thinkware, but a solid camera nonetheless. I would say that I sure hope folks do NOT follow those installation instructions provided in the pics.

1. Use a fuse tap and don't ever jam the wire between the fuse and the fuse socket
2. NEVER just hide the wire in the A-pillar behind the rubber door gasket. There is an air bag in that A-pillar and, if the wiring is not routed and tied out of the way properly, it could create issues when the air bag deploys which could be cost you your life.

Just my 2 cents :)
 
Anyone know the trick to removing the cover on housing behind rear view mirror? Not sure it pulls up or out, trying not to pull to hard on it after reading someone on forum cracking there windshield.
67a4235b8791ee253dd4388f75dfd32a.jpg


Sent from my GM1917 using Tapatalk
 

Users who are viewing this thread

Members online

Back
Top