5thGenRams Forums

Register a free account today to become a member! Once signed in, you'll be able to participate on this site by adding your own topics and posts, as well as connect with other members through your own private inbox!

Hard-wire Dash Cam Install

Crappy video, doesn't show removing the plastic around the rear view, hooking up the fuses, nothing of substance.
If anyone on this forum wants to know how to do a radar detector and/or dash camera install correctly, just PM me and we can chat via phone and I can walk you through this easily. These trucks are super easy to remove plastic pieces (like the rear mirror section and the A-pillar) and wires can be run in a matter of minutes. It really is much easier than most folks think and my motto has always been "if you're not going to do it right, then don't do it at all" or just hire a professional.
 
Just a quick FYI for those looking for the right fuses to tap on the interior fuse panel:

F66 is for ACCESSORY power (switched so off when truck is off and on when truck is on)
F33 is for constant power or BATTERY (only use this for a dash cam's PARKING MODE connection, not a radar detector or dash cam)

If tapping into a fuse panel, please purchase the following (not necessarily from this vendor but this type of tap):


You will also want a MAX fuse size of 5A (a 3A is recommended if you can find one) for the Radar / Dash Cam circuit and you can run both the radar detector and dash cam off a single fuse tap for accessory power.
 
Last edited:
If anyone on this forum wants to know how to do a radar detector and/or dash camera install correctly, just PM me and we can chat via phone and I can walk you through this easily. These trucks are super easy to remove plastic pieces (like the rear mirror section and the A-pillar) and wires can be run in a matter of minutes. It really is much easier than most folks think and my motto has always been "if you're not going to do it right, then don't do it at all" or just hire a professional.
That’s what I did. Hired a professional. Why?
On a brand new vehicle with warranty, I want someone to be liable if the truck burns down.
 
Just a quick FYI for those looking for the right fuses to tap on the interior fuse panel:

F66 is for ACCESSORY power (switched so off when truck is off and on when truck is on)
F33 is for constant power or BATTERY (only use this for a dash cam's PARKING MODE connection, not a radar detector or dash cam)

If tapping into a fuse panel, please purchase the following (not necessarily from this vendor but this type of tap):


You will also want a MAX fuse size of 5A (a 3A is recommended if you can find one) for the Radar / Dash Cam circuit and you can run both the radar detector and dash cam off a single fuse tap for accessory power.
I will be updating the video with this info. It's very valuable. Sorry you didn't like my video. I admit, I was rushing a little as I had to do it at night due to a cross country drive the next morning.
 
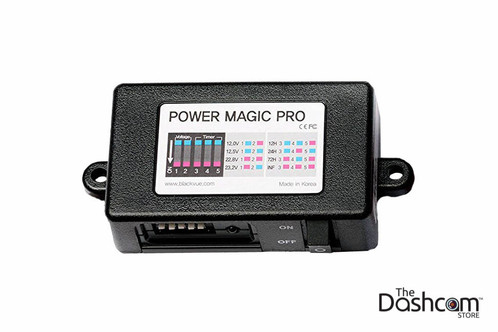
In order to establish PARKING MODE, you typically need a device like in the link below. The device connects to the fuse panels BATTERY and ACCESSORY feeds and ground. The camera then attaches to the output of the device monitoring the battery voltage and shutting the camera down when that voltage is reached. Some of the newer upper-tier camera, like my Blackvue DR750X, have this device built into the camera now to simplify installation. The installation of a Power Magic Pro is super easy and highly recommended.

Interesting, I did not know this even existed. I do remember when setting up the dashcam I used, there is a setting that monitors the battery level similar to this device. I may try that option before adding this.
 
i was headed there but i got rained out...20210124_142604.jpg
boss whats the quickest way from here to the front left bottom corner of dash/windshield area where that speaker grille is? for a radar detector behind the sticker.


and just for the kids to see what we do on the plymouth
fuseblock.jpg
 
i was headed there but i got rained out...
boss whats the quickest way from here to the front left bottom corner of dash/windshield area where that speaker grille is? for a radar detector behind the sticker.
If you want to talk via cell, PM me and give me your number. You always want to start running wires from up top from the headliner and then down to the fuse panel so you wrap up the slack and tidy her up nice.
 
i got fishtape if this is surgery...

i thought i saw the driver side dash piece pops off loose pretty easy maybe?

does the speaker grille just click on?
 
I will be updating the video with this info. It's very valuable. Sorry you didn't like my video. I admit, I was rushing a little as I had to do it at night due to a cross country drive the next morning.
Joe, you don't owe me an apology my friend. You're not the first person to post an electronics-based video that I had heartburn over. I just like to make sure that folks know the flaws in a video and share with them ways to make it better. I am not a mechanic, so I can't give advice on motors or brakes, etc. But, I am an expert on car electronics and running and hooking up wires to just about anything you can think of. Radar detectors and dash cams are the most common today. Years ago, it was musical horns and Pioneer/Alpine/Kenwood car audio decks :) If I can help someone make their install look like it came from the factory, and ensure it is wired and fused properly for safety, that gives me great pleasure. You would also be amazed that some folks run wires around side airbags and that, in itself, can be fatal😮
 
i got fishtape if this is surgery...

i thought i saw the driver side dash piece pops off loose pretty easy maybe?

does the speaker grille just click on?
What are you installing that you need to remove the speaker grill?
 
bro
"boss whats the quickest way from here to the front left bottom corner of dash/windshield area where that speaker grille is? for a radar detector behind the sticker."
 
bro
"boss whats the quickest way from here to the front left bottom corner of dash/windshield area where that speaker grille is? for a radar detector behind the sticker."
There is a side plastic piece on the dash that pops off. Remove the rubber door gasket from that area up to the top of the windshield. Remove the two bolts in the A-pillar hidden behind two plastic pop on panels. You have straight access across the under dash, through the opening you'll see once you remove the side dash piece and then up the pillar.
 
Last edited:
There is a side plastic piece on the dash that pops off. Remove the rubber door gasket from that area up to the top of the windshield. Remove the two bolts in the A-pillar hidden behind two plastic pop on panels. You have straight access across the under das, through the opening you'll see once you remove the side dash piece and then up the pillar.
you sir are the man
 
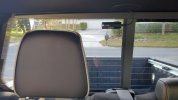
I Installed the BlackVue DR900X-2CH today. I ended up not using the bracket from TheDashCam Store. I removed the door sill plates and much of the surrounding trim to cleanly route and conceal the cable running to the rear camera. But as I feared, routing the cable down the pax A-pillar, under the sill plates and up the C-pillar comes up about 8"-10" short of what's needed to place the camera in the center of the window.

I thought about rerouting the cable above the pax doors, but I really didn't like the idea of tucking the wire without really knowing whether or not it would be in conflict with the side curtain airbags. I removed the A-pillar trim, so while routing the cables in that location, I was sure they were positioned behind the airbags.

I also thought about doing as SecurityGuy had suggested earlier in this thread and attempting to fish the cable between the headliner and the roof. But in the end, I wasn't sure what kind of can-of-worms might be opened by trying to fish across the headliner and I suppose I figured the offset camera position was "good enough."

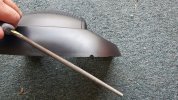
I used a round file to create a small relief in the plastic mirror trim for the cables to pass through. While I was mocking things up, I noticed it was a little difficult to reinstall the plastic cover. Upon closer look, I noticed the factory had pinched one of the small harnesses in one of the clips. In the picture below, I had already pulled it clear, but you can kind of see the little divot in the harness that was a result of the harness being pinched under the clip.

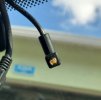
As I was trying to plug the cable that runs between cameras into the front camera, it didn't seem like it wanted to seat. The little voice in the back of my head said "if it doesn't want to go, don't force it." But the connector is so freakin' small, my vision is years past being able to clearly see what I was dealing with. So, I took a pic and lo and behold, you can see the connector was slightly deformed, right out of the box. A little massaging with a small pair of needle nose pliers and we're back in business.

I formatted the SD card on my PC and also downloaded the latest firmware. I got it all powered up and was surprised to hear voice status prompts. It appears the firmware updated from the SD card on initial boot-up, as I'd hoped it would.

I downloaded the BlackVue app onto my phone and was able to connect the app to the camera through the camera's Wifi. I drove around the block and both cameras seem to function properly. It's a little wonky having the rear camera offset but I think it's adequate.

I also tried to use the BlackVue Downloader app available in the Microsoft store which is intended to connect to the camera while it's in the driveway in parking mode and download the video data. But I'm either not configuring something properly of more likely, the signal from the BlackVue is too weak to reach my router.

Lastly, I set the shutdown voltage in the app to 12.5V. I travel for weeks at a time and the last thing I want is to come home to a dead or weak battery.

A few people had commented that their add-a-fuse taps wouldn't seat properly because of interference from the adjacent fuses. I used these and seemingly had no problem. The smallest Micro2 fuses I could find were 5 amps. I would have preferred 2 amp fuses but I couldn't find any locally.

Thanks for all of the great advice and tips!

Where the harness was pinched from the factory
Dash Cam (1).jpg


Filed a small relief for the cables.
Dash Cam (2).jpg

Connector bent out of the box. This thing is tiny. I couldn't get a clear look at it with the naked eye.
Dash Cam (3).jpg

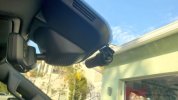
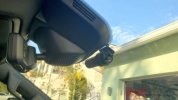
Front camera mounted under large plastic windscreen trim cover. The lens is centered in the windscreen. In hindsight, if I'd positioned it an inch or two further to the right, the camera would be fully concealed by the mirror as viewed from the driver's seat. But no big deal.
Dash Cam (6).jpg

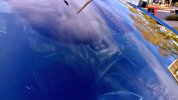
It's hard to get a good picture from the outside.
Dash Cam (4).jpg

That rear cable keeps wanting to fall from the headliner. It's since been retucked. Hopefully, it'll stay concealed.
Dash Cam (5).jpg
 

Attachments

  • Dash Cam (6).jpg
    Dash Cam (6).jpg
    72 KB · Views: 37
Last edited:
I Installed the BlackVue DR900X-2CH today. I ended up not using the bracket from TheDashCam Store. I removed the door sill plates and much of the surrounding trim to cleanly route and conceal the cable running to the rear camera. But as I feared, routing the cable down the pax A-pillar, under the sill plates and up the C-pillar comes up about 8"-10" short of what's needed to place the camera in the center of the window.

I thought about rerouting the cable above the pax doors, but I really didn't like the idea of tucking the wire without really knowing whether or not it would be in conflict with the side curtain airbags. I removed the A-pillar trim, so while routing the cables in that location, I was sure they were positioned behind the airbags.

I also thought about doing as SecurityGuy had suggested earlier in this thread and attempting to fish the cable between the headliner and the roof. But in the end, I wasn't sure what kind of can-of-worms might be opened by trying to fish across the headliner and I suppose I figured the offset came was "good enough."

I used a round file to create a small relief in the plastic mirror trim for the cables to pass through. While I was mocking things up, I noticed it was a little difficult to reinstall the plastic cover. Upon closer look, I noticed the factory had pinched one of the small harnesses in one of the clips. In the picture below, I had already pulled it clear, but you can kind of see the little divot in the harness that was a result of the harness being pinched under the clip.

As I was trying to plug the cable that runs between cameras into the front camera, it didn't seem like it wanted to seat. The little voice in the back of my head said "if it doesn't want to go, don't force it." But the connector is so freakin' small, my vision is years past being able to clearly see what I was dealing with. So, I took a pic and lo and behold, you can see the connector was slightly deformed, right out of the box. A little massaging with a small pair of needle nose pliers and we're back in business.

I formatted the SD card on my PC and also downloaded the latest firmware. I got it all powered up and was surprised to hear voice status prompts. It appears the firmware updated from the SD card on initial boot-up, as I'd hoped it would.

I downloaded the BlackVue app onto my phone and was able to connect the app to the camera through the camera's Wifi. I drove around the block and both cameras seem to function properly. It's a little wonky having the rear camera offset but I think it's adequate.

I also tried to use the BlackVue Downloader app available in the Microsoft store which would connect to the camera while it's in the driveway in parking mode and download the video data. But I'm either not configuring something properly of more likely, the signal from the BlackVue is too week to reach my router.

I also set the shutdown voltage in the app to 12.5V. I travel for weeks at a time and the last thing I want is to come home to a dead or weak battery.

A few people had commented that their add-a-fuse taps wouldn't clear fully the adjacent fuses. I used these and seemingly had no problem. The smallest Micro2 fuses I could find were 5 amps. I would have preferred 2 amp fuses but I could find any locally.

Thanks for all of the great advice and tips!
You are welcome my friend. You made me proud :) You worried too much, the headliner would have been a great option...there is nothing up there you can mess up. I cut a notch in my mirror housing as did you so it looks OEM. Great job and I am happy it's working well. Let me know if you have any more questions.
 
You are welcome my friend. You made me proud :) You worried too much, the headliner would have been a great option...there is nothing up there you can mess up. I cut a notch in my mirror housing as did you so it looks OEM. Great job and I am happy it's working well. Let me know if you have any more questions.

Thanks again. I can always redo the rear cable routing. I'll leave as is for a bit and see if any good reason to reposition the camera presents itself.

There's lots of minutia in the app settings. I'll have to do some reading. This is my first dash cam so of lot of the settings are a bit ambiguous.
If you want any guidance, just PM me and we can chat my friend.
 
Thanks again. I can always redo the rear cable routing. I'll leave as is for a bit and see if any good reason to reposition the camera presents itself.

There's lots of minutia in the app settings. I'll have to do some reading. This is my first dash cam so of lot of the settings are a bit ambiguous.
If you look at my post #316 on page 16, I linked a 90 degree cable and mounting bracket I used to mount the rear camera so its centred but doesn't get in the way of the sliding window and the cable doesn't stick out and loop up like that. Might be something you'd like.
 
If you look at my post #316 on page 16, I linked a 90 degree cable and mounting bracket I used to mount the rear camera so its centred but doesn't get in the way of the sliding window and the cable doesn't stick out and loop up like that. Might be something you'd like.


Thanks. I saw you post and referenced it earlier in this thread.

I ordered the bracket but didn't use it.

FYI, if you click a post number, you can copy the URL and link directly to the post.
 

Users who are viewing this thread

Back
Top