
You didn’t have to trim those bolts?
5thGenRams Forums
You are using an out of date browser. It may not display this or other websites correctly.
You should upgrade or use an alternative browser.
You should upgrade or use an alternative browser.
What did you do to your Ram today???
- Thread starter 19BlkRam
- Start date
Patsy1099
Spends too much time on here
- Joined
- Jan 5, 2019
- Messages
- 2,333
- Reaction score
- 1,297
- Points
- 113
- Location
- People’s Republic of New Jersey
Picked up the Mopar bed divider/extender part# 68027145AE from eBay for $300 in practically brand new condition. Seems (kind of) worth it for that price but couldn’t justify spending double that (or more!) for it new (moparamerica about $600 after 5% discount). It is sturdier than I imagined but still lightweight enough to move around. It’s fits right into the slats in the bed for a secure fit. I now have my bed partitioned into thirds since I also have my cargo keeper ratcheting bar so I now have smaller compartments but these two are easily removed to allow for full bed access.
The other reason I really like this bed divider/extender vs the new one is that it’s not fixed in a rounded “extended” position so it can easily be moved, flattened, stored, etc so it’s not taking up room.
Very happy with the purchase if you can pick one up at a good price.
The other reason I really like this bed divider/extender vs the new one is that it’s not fixed in a rounded “extended” position so it can easily be moved, flattened, stored, etc so it’s not taking up room.
Very happy with the purchase if you can pick one up at a good price.
ders0
Active Member
- Joined
- Dec 11, 2018
- Messages
- 73
- Reaction score
- 40
- Points
- 18
- Age
- 37
Picked up the Mopar bed divider/extender part# 68027145AE from eBay for $300 in practically brand new condition. Seems (kind of) worth it for that price but couldn’t justify spending double that (or more!) for it new (moparamerica about $600 after 5% discount). It is sturdier than I imagined but still lightweight enough to move around. It’s fits right into the slats in the bed for a secure fit. I now have my bed partitioned into thirds since I also have my cargo keeper ratcheting bar so I now have smaller compartments but these two are easily removed to allow for full bed access.
The other reason I really like this bed divider/extender vs the new one is that it’s not fixed in a rounded “extended” position so it can easily be moved, flattened, stored, etc so it’s not taking up room.
Very happy with the purchase if you can pick one up at a good price.
I want that bar, but just can't do it. I think I'm just going to go non-OEM cargo bar off amazon or something instead. Doesn't solve the extension issue, but I would use the bar more as a divider than extender anyway. When I first quoted the OEM bar from the dealer I almost feel out of my chair. It was something like 1100 and they made sure to put the clause on the quote that, that was "installed". Oh thanks you're going to set my bed divider into the bed and call that an install? I assume they were talking about the hooks that make it act like an extender that they were "installing", but I still found that humorous. And I'm pretty sure they're not even supposed to install those hooks anymore per Mopar based on the other thread about the BUG group.
Tarheel14
Active Member
I cleaned up Derby. Did some spray wax. Got some turtle wax spray wax from a buddy and some meguiar's leather conditioner. Its supposed to rain the next few days so I wanted to get some wax on my truck. I plan on going snowboarding this weekend anyway so its gonna get dirty. But I love this midnight blue color.


MattF
Active Member
- Joined
- Aug 20, 2018
- Messages
- 123
- Reaction score
- 139
- Points
- 43
- Age
- 68
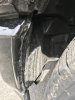
Looks amazing - would love those on my Laramie Sport - hard DIY?Added these matte black tow hooks last night when I got home from the dealership (had them check something out, which turned out to be nothing thankfully). Now just to wait for MOPAR to sell the fuel tank skid plate separately, and I will be able to complete the unavailable (at the time I purchased) protection group to my Laramie Sport. I installed the front skid plate, and x-fer case skid plate last week.
Thanks
Matt
SacRebel
Well-Known Member
That blue looks great tarheel.
Looks amazing - would love those on my Laramie Sport - hard DIY?
Thanks
Matt
Not a bad DIY once you see how it all goes in/out. My second side went in easier than the first since I learned things the hard way. Definitely take off the lower wheel well liner in the picture here. Just five bolts and only 3 need total removal to get it out. Then turn your wheels so as to make more space.
Attachments
Trfnj74
Well-Known Member
Recalibrated my speedo today.. The rough country read that I had 2 codes... C0077 -One for low tire pressure (which might have been from when I had my tires swapped and the other was for B1298-25 parking assist. I cleared both and updated my tire size.


LNDRCKT
Active Member
No trimming. There is plenty of space on the back side of the wheels I have for room.You didn’t have to trim those bolts?

danielle2019
Ram Guru
As an engineer and drone pilot, I find myself in the field quite a bit! Today, I took Blue out to a pump station to capture images with a DJI Inspire 2. The images were used to process a 3D point cloud and orthomosaic of the site for an upcoming engineering project. When I zoom into the lower corner of the model, I found that I had captured Blue as well. So, here is my digital model of a Ram!

Papa Bear 24
Member
Cmerkert
Ram Guru
As an engineer and drone pilot, I find myself in the field quite a bit! Today, I took Blue out to a pump station to capture images with a DJI Inspire 2. The images were used to process a 3D point cloud and orthomosaic of the site for an upcoming engineering project. When I zoom into the lower corner of the model, I found that I had captured Blue as well. So, here is my digital model of a Ram!
View attachment 19671
You should get a spray and bed liner and put the landing pad x on it. Lol
danielle2019
Ram Guru
Would work even better when I have the cover on!You should get a spray and bed liner and put the landing pad x on it. Lol
securityguy
Legendary member
As an engineer and drone pilot, I find myself in the field quite a bit!
WOW...an Engineer and a Drone Pilot...are you married???

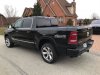
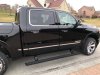
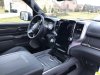
Wooohooo....truck finally arrived. Dealership good enough to let me take her home before giving them my trade (2014 F150 that served me well and I still like but the interiors do not compare) so I can get it ready for the elements. I am going to ceramic coat it so I started last night with Iron-X and followed up with a good wash and clay bar. Will buff and polish it up tonight and start the ceramic tomorrow. Fuel Assault wheels will be put on next week.
Last pic is of my F150 I am parting with.
Last pic is of my F150 I am parting with.
Attachments
-
 EAEFCBE3-8659-4DAB-97B7-9B24584ED643.jpeg190.7 KB · Views: 182
 -
 861A727A-9733-4F88-A7DA-3D4FEAEE0DAA.jpeg171.2 KB · Views: 178
 -
 1A8F74D2-5A69-4669-B54C-3556DF8474B2.jpeg173.9 KB · Views: 191
 -
 FC529ABD-38D8-442D-92FD-C32EE9CC3A9A.jpeg140.4 KB · Views: 188
 -
 62D9CA41-A786-4D4B-AC21-2C73056C38B3.jpeg181.7 KB · Views: 214
 -
 6BBE9D62-CCB6-40BF-9EA5-EE68A5530510.jpeg134.5 KB · Views: 206
BeauxXL1200
Ram Guru
- Joined
- Jan 12, 2019
- Messages
- 665
- Reaction score
- 511
- Points
- 63
- Age
- 68
Wooohooo....truck finally arrived. Dealership good enough to let me take her home before giving them my trade (2014 F150 that served me well and I still like but the interiors do not compare) so I can get it ready for the elements. I am going to ceramic coat it so I started last night with Iron-X and followed up with a good wash and clay bar. Will buff and polish it up tonight and start the ceramic tomorrow. Fuel Assault wheels will be put on next week.
Last pic is of my F150 I am parting with.
Georgeous Ram. And that Ford looks sharp too. Post pics of the Ram with the ceramic coating. She’ll be shining like a new dime.
danielle2019
Ram Guru
I was once. Now it’s just me and my doggie Dixie. And my Charger and my RamWOW...an Engineer and a Drone Pilot...are you married???
")
securityguy
Legendary member
Very perdy truck!
Patsy1099
Spends too much time on here
- Joined
- Jan 5, 2019
- Messages
- 2,333
- Reaction score
- 1,297
- Points
- 113
- Location
- People’s Republic of New Jersey
Update: I mounted the hardware today and noticed that the removal of the plastic trim covering the mounting holes leaves a gap in the top area of tailgate forward towards the bed and a little sideways towards the tonneau. I might find some closed cell foam and glue it in there to block water intrusion into the back of the bed. I suppose I might also look at drilling holes in the trim to accommodate the mounts, but this could create some interference in the fitment of the extender. Don't know. I will update after I resolve this.
I’m confused. Can you take some pics? This is to mount the bed extender? I just popped out the two plugs and screwed in the pegs and handles. Didn’t leave any gaps in trim.
Site Vendors


Members online
- Luket8806
- Lwile
- RAM REAPER MAN
- Rebellion is Duty
- Randys Truck
- AP16K12477
- Finn5033
- Ramboy13
- Doc33
- skyhawk42
- Richard320
- Quacking_duck
- Threesuns1
- KrustyKush
- BayouBengal
- mikeru82
- Undrta2d
- dodge360
- Lrobison
- SavageSammich
- Go.nolan
- bgreene75013
- Beltman
- 2019_Ram
- Greeksteel
- Namelama
- Ram8472
- JKLRAM15
- 2019rams
- kt4hx
- CZmenghe_Team_John
- Loudram
Total: 2,368 (members: 33, guests: 2,335)