Unknown1007
New Member
- Joined
- Jul 28, 2019
- Messages
- 1
- Reaction score
- 0
- Points
- 1
- Age
- 45
Anyone have pictures on 2019 Ram 1500 where they ground the wired?
Search this thread, it's back in one of the first posts.Anyone have pictures on 2019 Ram 1500 where they ground the wired?
Here you go.Search this thread, it's back in one of the first posts.


Try plugging the hardwire straight into the camera. The GPS mount (which has it's own usb connector) could be bad.Needed some help, wasn't intending to resurrect a stale thread, and I did read this whole thing...more an electrical putz question. Looking for the easy win, hardwire kit won't turn camera on. I suspect it is my ground placement, I tried to move it around, jiggle it, etc., still not turning on. I used the location neurobit used. Any quick ways to figure out there is power and it is the ground causing an issue? Where should I put the multimeter and what to check if all my wires are working fine and supplying power (do I also need to check power at the power tip to see if there are cable issues). I am using the GPS mount to power through, and have to because I have already predrilled measured holes in the rear view mirror trim for a cleaner look and want to continue using the hole that was centered above the GPS mount usb port location.
And since I'm on this thread, the A129 dual camera is the by far the best camera I have had. My negatives are really minor. USB cable is fat to the rear camera, while I did get everything tucked nicely, I was afraid of the bends and curves compromising the cable. They need a more lower profile connector to the rear camera. It is "stiff" for about an inch and half meaning that to give enough bend and play to have the cable come from the headliner, around the plastic trim, and back to the window, you have to have either a 90 bend on the side to give more cable play, move the camera lower (but filling more of your picture with useless truck bed) or use a custom fab mount that puts the camera farther from the window...or, drill a hole in the plastic trim above the window to route straight down to the camera.
But, at less than $200 on Amazon for the entire kit which includes rear view cam, 2 polarizing filters, hardwire kit, and GPS mount, that could not be beat. I'm sure this will be even cheaper on Black Friday as all dash cams tend to be, but I couldn't wait. My next purchase for this will be a San Disk High Endurance card (newer high temp rated edition), 128 GB, again that price can't be beat.
Try plugging the hardwire straight into the camera. The GPS mount (which has it's own usb connector) could be bad.
Try plugging the hardwire straight into the camera. The GPS mount (which has it's own usb connector) could be bad.
Sweet. Glad to hear.Well I’m a dufus. Turns out the tap kit requires me to put in two fuses to complete the circuit. So I put in the existing 10a fuse and used the supplied 5a fuse in the tap. Works in parking mode and normal mode now!
The ground used by Neurobit works perfectly!
Thank you. Great to know. Hooking up an escort radar passport. Going to hard wire it. Thanks. I love this truck!I had this setup on my F150 and just finished the install on my RAM. The dash cam is powered up when the truck is on and off when it's off. I won't go into the reviews of this dash cam or setup, but I've had it for two years and no complaints. Great video quality as well.
Dash cam - https://www.amazon.com/gp/product/B00OQSXWUM/ref=oh_aui_search_detailpage?ie=UTF8&psc=1
Hard wire kit - https://www.amazon.com/gp/product/B00MH4ZVHO/ref=oh_aui_search_detailpage?ie=UTF8&psc=1
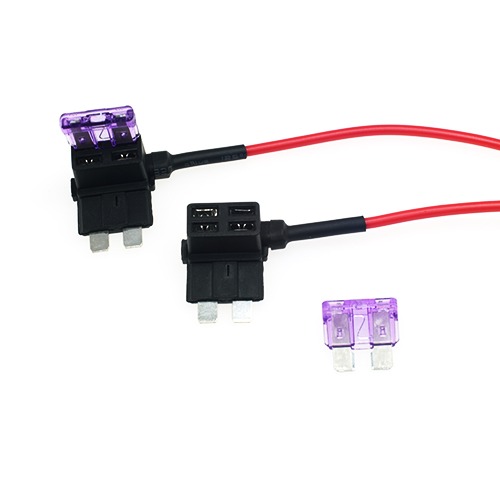
Looking at the owners manual, there is a fuse box located below the steering column, fuse F66 is unused, 10a and labelled as an accessory fuse. Perfect for what I'm trying to do.

The dash panel below the steering column is held on by two bolts at the bottom and a bunch of clips, I used a non marring trim removal tool to help loosen those up. Once it's off, you'll have open access to the fuse block.


With my F150, a add-a-fuse setup would barely fit, so I just wrapped the hot wire around a fuse and plugged it back in. Since the fuse is unused in the RAM, that sounded good as well.

The trim panel to the left of the instrument panel pops off with trim removal tools as well (a few clips holding it on). Use a phillips screwdriver to loosen up one of the screws enough to get the ground wire in place and mounted. A few zip ties to keep the wiring in place and from bouncing around as well.

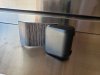
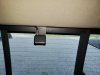
On my F150 I pulled off the A pillar trip piece to route the wiring up and into the front of the headliner, over to where I mounted the dash cam by the mirror. In the RAM, I was able to sneak it behind the A pillar trim without removing it.


Hope this helps!
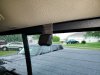
***As a quick update - I now run a Viofo A129 dual dash cam, with the rear cam mounted on the passenger side of the sliding rear window (cable tucked up inside the headliner on the passenger side. Fuses - Constant 12V is F33, switched 12V is F66. No issues and really like the dual cam setup.***
I had this setup on my F150 and just finished the install on my RAM. The dash cam is powered up when the truck is on and off when it's off. I won't go into the reviews of this dash cam or setup, but I've had it for two years and no complaints. Great video quality as well.
Dash cam - https://www.amazon.com/gp/product/B00OQSXWUM/ref=oh_aui_search_detailpage?ie=UTF8&psc=1
Hard wire kit - https://www.amazon.com/gp/product/B00MH4ZVHO/ref=oh_aui_search_detailpage?ie=UTF8&psc=1
Looking at the owners manual, there is a fuse box located below the steering column, fuse F66 is unused, 10a and labelled as an accessory fuse. Perfect for what I'm trying to do.
The dash panel below the steering column is held on by two bolts at the bottom and a bunch of clips, I used a non marring trim removal tool to help loosen those up. Once it's off, you'll have open access to the fuse block.
With my F150, a add-a-fuse setup would barely fit, so I just wrapped the hot wire around a fuse and plugged it back in. Since the fuse is unused in the RAM, that sounded good as well.
The trim panel to the left of the instrument panel pops off with trim removal tools as well (a few clips holding it on). Use a phillips screwdriver to loosen up one of the screws enough to get the ground wire in place and mounted. A few zip ties to keep the wiring in place and from bouncing around as well.
On my F150 I pulled off the A pillar trip piece to route the wiring up and into the front of the headliner, over to where I mounted the dash cam by the mirror. In the RAM, I was able to sneak it behind the A pillar trim without removing it.
Hope this helps!
***As a quick update - I now run a Viofo A129 dual dash cam, with the rear cam mounted on the passenger side of the sliding rear window (cable tucked up inside the headliner on the passenger side. Fuses - Constant 12V is F33, switched 12V is F66. No issues and really like the dual cam setup.***
Thanks for posting. Been wanting to hard wire valentine 1. Do you thank the 10 amp fuse can handle dash camera and valentine 1 radar detector?I had this setup on my F150 and just finished the install on my RAM. The dash cam is powered up when the truck is on and off when it's off. I won't go into the reviews of this dash cam or setup, but I've had it for two years and no complaints. Great video quality as well.
Dash cam - https://www.amazon.com/gp/product/B00OQSXWUM/ref=oh_aui_search_detailpage?ie=UTF8&psc=1
Hard wire kit - https://www.amazon.com/gp/product/B00MH4ZVHO/ref=oh_aui_search_detailpage?ie=UTF8&psc=1
Looking at the owners manual, there is a fuse box located below the steering column, fuse F66 is unused, 10a and labelled as an accessory fuse. Perfect for what I'm trying to do.
The dash panel below the steering column is held on by two bolts at the bottom and a bunch of clips, I used a non marring trim removal tool to help loosen those up. Once it's off, you'll have open access to the fuse block.
With my F150, a add-a-fuse setup would barely fit, so I just wrapped the hot wire around a fuse and plugged it back in. Since the fuse is unused in the RAM, that sounded good as well.
The trim panel to the left of the instrument panel pops off with trim removal tools as well (a few clips holding it on). Use a phillips screwdriver to loosen up one of the screws enough to get the ground wire in place and mounted. A few zip ties to keep the wiring in place and from bouncing around as well.
On my F150 I pulled off the A pillar trip piece to route the wiring up and into the front of the headliner, over to where I mounted the dash cam by the mirror. In the RAM, I was able to sneak it behind the A pillar trim without removing it.
Hope this helps!
***As a quick update - I now run a Viofo A129 dual dash cam, with the rear cam mounted on the passenger side of the sliding rear window (cable tucked up inside the headliner on the passenger side. Fuses - Constant 12V is F33, switched 12V is F66. No issues and really like the dual cam setup.***
Thanks for posting. Been wanting to hard wire valentine 1. Do you thank the 10 amp fuse can handle dash camera and valentine 1 radar detector?
Installed the 750 blackvue just now, took me no more then an hour.
Thank you to everyone that said to use Fuse 33 and 66. Worked like a charm.
Word of advice, i used one of the screws on the left side of the dash where the panel comes off. My hardwire wouldnt turn on and i thought it was my wiring. Turned out the ground for some odd reason wasnt actually grounding. I went ahead and loosened the screw and the wiring kit came to life but flicked back off.
Comepletely unscrewed it, readjusted the ground and tightened it back up to the point where i got a steady green light on the kit. Mine try somewhere else to ground if it continues to give me problems.
Also, how did you guys hide all the extra wiring without it coming out from the bottom
 www.blackvue.com
You need a Micro2 adapter. I used a 5 AMP fuse. Here is what I bought: https://www.amazon.com/gp/product/B07SR71LPP/ref=ppx_yo_dt_b_asin_title_o05_s01?ie=UTF8&psc=1Which fuse did you need to go with? Or any for that matter. Just bought my '19 Rebel and lost some wiring from my trade in. Looking at getting something like this, but not sure which fuse to order.
Power Magic Pro Fuse Tap - BlackVue Dash Cameras
Fuse Tap for Power Magic Pro with 3 options.
Most dash cams have a power saving mode... really shouldn’t ever be an issue unless you go several weeks. In which case you should be using a tender anyways.
I don't think it works that way my friend. The main battery is charged off the alternator. Get a Power Magic Pro and set it to 12V and call it a day.Hoping the 48v batter keeps the 12v battery charged letting the cams work for a much longer period of time.
I don't think it works that way my friend. The main battery is charged off the alternator. Get a Power Magic Pro and set it to 12V and call it a day.