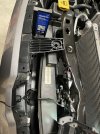
5thGenRams Forums
You are using an out of date browser. It may not display this or other websites correctly.
You should upgrade or use an alternative browser.
You should upgrade or use an alternative browser.
Adding OEM Front Camera?
- Thread starter chucka
- Start date
Csjumper2003
Active Member
Assume this is a 22 not 21? As I see Uconnect 5 ? Is that right?I forgot to mention, I had to cut the white wire on my front camera for correct picture orientation.
Sent from my iPhone using Tapatalk
Also I understand where to connect the red at fuse panel , but where do you connect it behind the radio?
Assume this is a 22 not 21? As I see Uconnect 5 ? Is that right?
Also I understand where to connect the red at fuse panel , but where do you connect it behind the radio?
Yes, this is a 22, not a 21. It is Uconnect 5.
You don’t connect it behind the radio. You need to put insulation on it. It’s intended as a trigger.
Sent from my iPhone using Tapatalk
atattn
New Member
Would it be possible to use this single input into the cargo cam as a surround view system? https://www.amazon.com/Weivision-De...efix=weivision+360,aps,100&sr=8-4-spons&psc=1
Csjumper2003
Active Member
Can anyone say if the pins for 21 with Uconnect 4 are the 21 and 22 pins? Also I see this plug is plugged into the back of the u connect module. He one that is mounted behind the screen? Anyone that added the aux plug I know there was 2 different sets of pins people mentioned. If someone can let me know.
I don’t have it in front of me, but I’m pretty sure it’s different pin numbers and am sure they’re different molex connectors between versions.Can anyone say if the pins for 21 with Uconnect 4 are the 21 and 22 pins? Also I see this plug is plugged into the back of the u connect module. He one that is mounted behind the screen? Anyone that added the aux plug I know there was 2 different sets of pins people mentioned. If someone can let me know.
ramButz
Ram Guru
might help


esquare
Active Member
- Joined
- Sep 17, 2022
- Messages
- 40
- Reaction score
- 15
- Points
- 8
- Age
- 57
For those that used the
Which of the 3 shims/gaskets did you use to get the best angle?
NATIKA Backup/Front View Camera,IP69K Waterproof Great Night Vision HD and Super Wide Angle Metal OEM Style Reverse Rear View Backup Camera for Cars Pickup Trucks SUVs RVs Vans (Black)
https://www.amazon.com/dp/B07H852D4...2J59H?_encoding=UTF8&affid=5thgenrams-20&th=1Which of the 3 shims/gaskets did you use to get the best angle?
On my ‘21, I didn’t use any and liked how it looked. I have another sitting for my ‘22 that I haven’t decided if I’ll install, but my guess is I’ll use no shims on that either. My mount point was/will be the bottom center of the RAM logo.For those that used the
NATIKA Backup/Front View Camera,IP69K Waterproof Great Night Vision HD and Super Wide Angle Metal OEM Style Reverse Rear View Backup Camera for Cars Pickup Trucks SUVs RVs Vans (Black)
https://www.amazon.com/dp/B07H852D4...2J59H?_encoding=UTF8&affid=5thgenrams-20&th=1
Which of the 3 shims/gaskets did you use to get the best angle?
esquare
Active Member
- Joined
- Sep 17, 2022
- Messages
- 40
- Reaction score
- 15
- Points
- 8
- Age
- 57
Thanks, I plan on installing under the A in RAM like has been done by others. I'd hate to get it in there and have to change the shim as others have said how difficult it is to get your arm behind the grill if not completely removing it.On my ‘21, I didn’t use any and liked how it looked. I have another sitting for my ‘22 that I haven’t decided if I’ll install, but my guess is I’ll use no shims on that either. My mount point was/will be the bottom center of the RAM logo.
I didn’t pull the grill, so it was very difficult. I put the nut on and started the threads with a long magnet pick up tool, which was a pita. I couldn’t reach it by hand.Thanks, I plan on installing under the A in RAM like has been done by others. I'd hate to get it in there and have to change the shim as others have said how difficult it is to get your arm behind the grill if not completely removing it.
esquare
Active Member
- Joined
- Sep 17, 2022
- Messages
- 40
- Reaction score
- 15
- Points
- 8
- Age
- 57
The magnet is a good ideaI didn’t pull the grill, so it was very difficult. I put the nut on and started the threads with a long magnet pick up tool, which was a pita. I couldn’t reach it by hand.
esquare
Active Member
- Joined
- Sep 17, 2022
- Messages
- 40
- Reaction score
- 15
- Points
- 8
- Age
- 57
Wow, that's tight. Looks like whichever shim or none I decide to go with is going to be the right one because I won't be going back in to change it LoLI just went back and found a pic. I used an engineered wood floor pulling block made of nylon to wedge the top of the grill open enough to work in the area. Notice one of the grill mounts- it only gave me an extra 1.5-2” clearance.
View attachment 145229
Transworldmoto
Member
- Joined
- Jan 24, 2021
- Messages
- 6
- Reaction score
- 3
- Points
- 3
- Age
- 38
@Jimmy07
Just curious, but I was able to install the digital rearview mirror on my ‘22 2500 with the dual camera CHMSL (fakra to fakra). The cargo cam also looks to be digital (fakra female) and there are inputs on the Uconnect 5 module that are fakra female. Would simply going fakra to fakra from the cargo cam to UC5 module work on these newer trucks, along with enabling the CHMSL with Alfa obd?
Just curious, but I was able to install the digital rearview mirror on my ‘22 2500 with the dual camera CHMSL (fakra to fakra). The cargo cam also looks to be digital (fakra female) and there are inputs on the Uconnect 5 module that are fakra female. Would simply going fakra to fakra from the cargo cam to UC5 module work on these newer trucks, along with enabling the CHMSL with Alfa obd?
- Joined
- Apr 11, 2019
- Messages
- 2,567
- Reaction score
- 3,115
- Points
- 113
No. In order to get that particular cargo camera to work, you would have to install the entire surround view camera system.@Jimmy07
Just curious, but I was able to install the digital rearview mirror on my ‘22 2500 with the dual camera CHMSL (fakra to fakra). The cargo cam also looks to be digital (fakra female) and there are inputs on the Uconnect 5 module that are fakra female. Would simply going fakra to fakra from the cargo cam to UC5 module work on these newer trucks, along with enabling the CHMSL with Alfa obd?
Transworldmoto
Member
- Joined
- Jan 24, 2021
- Messages
- 6
- Reaction score
- 3
- Points
- 3
- Age
- 38
No. In order to get that particular cargo camera to work, you would have to install the entire surround view camera system.
Beat me to it. I was just reading through another forum post and found what you wrote about that. Bummer, they could have made this so much easier using readily available fakra connectors.
I'm just adding the application spec for the '22's connector. I needed to de-pin my plug too.For the 2022+ trucks with Uconnect 5,
Another member had posted a link to a Mopar Connection Repair Kit site, Mopar Connection Repair Kit
I looked up a 2022 truck and got this pinout:
View attachment 138795
Hopefully, we can connect an analog video signal to VIDEO SIGNAL 1 / VIDEO COMMON 1.
The connector is a Molex sTAK50h, https://www.molex.com/molex/products/family/stak50h_unsealed_connection_system
On my truck, there are three of these sTAK50h headers, a green, blue, and purple. Only the green and blue are populated. I'll take a look and see if these cavities are populated or not. If they are, hopefully they match this pinout.
I've also ordered some terminals for this. TE and Molex make them.
Molex: TAK50 Terminal, available in a 0.13 (~26AWG) and 0.35 (~22AWG) mm2 wire.
TE: NanoMQS Gen 50 terminal, 22 AWG: 2272196-2 : Generation 50 Automotive Terminals
NOTE: There's also a 26 AWG version of the NanoMQS.
I found some NanoMQS Gen 50 22 AWG terminals from Newark in the UK, so I should have those soon.
Once I get the parts and tools in, I'll share my findings here.
Attachments
I started the installation today and I wasn't so sure of these details for the '22.
Parts used:
- The two auxiliary video inputs are on the blue plug.
- Both were already populated, so I de-pinned channel 1.
- RTFM I posted above
 . It has the necessary details to work the plug features properly.
- I tapped into F66 under the steering wheel for the 12VDC trigger and connected it to the red power lead at the video jack.
- I connected the ground in the engine compartment.
- The sockets for '22s are different than earlier MYs.
I got all the easy stuff done with the wiring and cable routing in the cab, now I have to mount the camera and route the cable under the hood.
The picture with the front-camera below is just a powered test with it hanging over the grill. It's not mounted yet.
I have 90+ sockets left. If any one wants a few, just message me and I can send some your way.
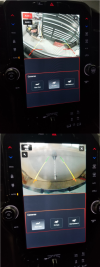
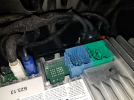
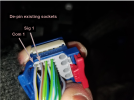
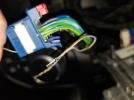
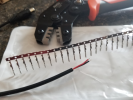
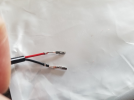
Parts used:
- The two auxiliary video inputs are on the blue plug.
- Both were already populated, so I de-pinned channel 1.
- RTFM I posted above
- I tapped into F66 under the steering wheel for the 12VDC trigger and connected it to the red power lead at the video jack.
- I connected the ground in the engine compartment.
- The sockets for '22s are different than earlier MYs.
I got all the easy stuff done with the wiring and cable routing in the cab, now I have to mount the camera and route the cable under the hood.
The picture with the front-camera below is just a powered test with it hanging over the grill. It's not mounted yet.
I have 90+ sockets left. If any one wants a few, just message me and I can send some your way.


Rebellion Ram Qatar
New Member
- Joined
- Dec 24, 2022
- Messages
- 3
- Reaction score
- 2
- Points
- 3
- Age
- 25
Hi All,
I have the same Natica camera installed and the setup is enabled through the Cargo Cam input on my 2019 5th Gen Rebel. It works But, I had two issues with it.
1st, being simply annoying and that is that the camera resolution does not match that of the 12inch screen so basically the image is almost 20% to 30% chopped off on the right. I am simply not getting the full horizontal viewing angle and I feel even diagonally I am not getting the full benifit as I feel even the image is also chopped off the screen.
2nd, being the reason I disconnected the camera from the power supply as I noticed it started flickering after running the truck for about 15 to 20 minute and when I reached to the camera's quick connect cable to confirm it is not loose, I was shocked how overheated it was and I disconnected it.
due to the two issues aforementioned, I tried two other cameras but the same exact issues remained so, I have not had the camera connected since almost 4 months as I didn't want to risk burning my truck.
I am wondering if any of you faced the any or both issues.
Users who are viewing this thread
Total: 2 (members: 0, guests: 2)

