5thGenRams Forums

Register a free account today to become a member! Once signed in, you'll be able to participate on this site by adding your own topics and posts, as well as connect with other members through your own private inbox!

Adding OEM Front Camera?

toyboy1980

Well-Known Member
Joined
Sep 7, 2020
Messages
205
Reaction score
205
Location
Nashville, TN
Awesome! Thanks! Already have the tazer so just need to get the other parts. And all you had to do was pull the radio and run the camera wire? Anything overly challenging or any gotchas to be aware of?
Realized I left out what I ordered to tap the fuse for power, but it’s just a micro2 fuse tap. You can get one at most auto parts stores, or get one on Amazon. I ordered the little set linked below just to have some extras. You want to tap into position F66 (10A fuse) for switched accessory power.

BioFuse Micro2 17 Piece Automotive Fuse Assortment and Holders Pack (2 Add-a-Circuit Fuse Tap Adapters, 14 Blade Fuses + Fuse Puller) 5A 7.5A 10A 15A 20A 25A 30A https://www.amazon.com/dp/B08HPKJFZ2/ref=cm_sw_r_cp_api_fabc_kMrWFbQ61NZTS?_encoding=UTF8&psc=1

The most challenging part is the physical mounting of the camera. I didn’t wanna take my entire grill off, and I managed to get it done without doing that. I basically just loosened up the top part of the grill so I could wedge my arm between it and the radiator, and get done what I needed to get done. For reference, I did everything up until 1:12 in this video, then stopped. The last thing you see is him sort of unhook the grill and it falls slightly forward. That’s what I worked with.


It was VERY tight to work in and I bruised/scratched my arm up a little bit squeezing in and out of there, but again, I didn’t wanna take the whole grill off. If you ARE willing to take it all the way off, it will certainly make it easier to work.

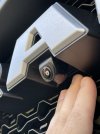
Also, I did a bunch of messing around with the actual mounting position, angle, etc. Tons of back and forth looking at the screen. I started out with a grill mounting spot underneath the A, but I ultimately wound up mounting it to the bottom of the A in the RAM logo. Drilled up through the bottom of it for the mounting post on the camera. The A is hollow, so you can pull the wire through and also have room to tighten up the nut on the backside of it. Again it’s crazy tight working back there, but it can be done. I wanted an angle that still showed the top of the bumper for positional reference, but with basically the same ratio of bumper-to-rest-of-image that the back camera has. Mounting it here achieved that. Picture below for reference.

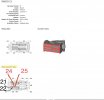
Taking the head unit out and doing the pins was probably the easiest part of the whole thing. To give you details, my truck is a 2020 Rebel, and it was indeed pins/positions 21 and 22. 21 being signal, and 22 being ground. I included a picture below showing those positions. There are plenty of videos showing how to remove the headunit, but you basically remove the two screws under the mat by your 12v port on top of the dash, and just yank firmly forward. It’s easier to work if you unhook the connectors from the back of the screen module and get it out of the way. You’ll then unscrew the silver brain module (4 screws), and the harness you need to access for pins is on the back of that.

Regarding running wires through the firewall, there is actually an extra/empty pass through spot available to use. Check this thread for details...

Hope this helps. Happy to answer any other questions/details that I might have left out.
 

Attachments

  • E9D62117-ABC1-48CC-ABB4-626051BB8FEF.jpeg
    E9D62117-ABC1-48CC-ABB4-626051BB8FEF.jpeg
    70.5 KB · Views: 463
  • 1228EFA2-D458-4590-94BE-9BC4F53D5473.jpeg
    1228EFA2-D458-4590-94BE-9BC4F53D5473.jpeg
    96.8 KB · Views: 451

PHFT

Active Member
Joined
Jan 27, 2020
Messages
98
Reaction score
303
Realized I left out what I ordered to tap the fuse for power, but it’s just a micro2 fuse tap. You can get one at most auto parts stores, or get one on Amazon. I ordered the little set linked below just to have some extras. You want to tap into position F66 (10A fuse) for switched accessory power.

BioFuse Micro2 17 Piece Automotive Fuse Assortment and Holders Pack (2 Add-a-Circuit Fuse Tap Adapters, 14 Blade Fuses + Fuse Puller) 5A 7.5A 10A 15A 20A 25A 30A https://www.amazon.com/dp/B08HPKJFZ2/ref=cm_sw_r_cp_api_fabc_kMrWFbQ61NZTS?_encoding=UTF8&psc=1

The most challenging part is the physical mounting of the camera. I didn’t wanna take my entire grill off, and I managed to get it done without doing that. I basically just loosened up the top part of the grill so I could wedge my arm between it and the radiator, and get done what I needed to get done. For reference, I did everything up until 1:12 in this video, then stopped. The last thing you see is him sort of unhook the grill and it falls slightly forward. That’s what I worked with.


It was VERY tight to work in and I bruised/scratched my arm up a little bit squeezing in and out of there, but again, I didn’t wanna take the whole grill off. If you ARE willing to take it all the way off, it will certainly make it easier to work.

Also, I did a bunch of messing around with the actual mounting position, angle, etc. Tons of back and forth looking at the screen. I started out with a grill mounting spot underneath the A, but I ultimately wound up mounting it to the bottom of the A in the RAM logo. Drilled up through the bottom of it for the mounting post on the camera. The A is hollow, so you can pull the wire through and also have room to tighten up the nut on the backside of it. Again it’s crazy tight working back there, but it can be done. I wanted an angle that still showed the top of the bumper for positional reference, but with basically the same ratio of bumper-to-rest-of-image that the back camera has. Mounting it here achieved that. Picture below for reference.

Taking the head unit out and doing the pins was probably the easiest part of the whole thing. To give you details, my truck is a 2020 Rebel, and it was indeed pins/positions 21 and 22. 21 being signal, and 22 being ground. I included a picture below showing those positions. There are plenty of videos showing how to remove the headunit, but you basically remove the two screws under the mat by your 12v port on top of the dash, and just yank firmly forward. It’s easier to work if you unhook the connectors from the back of the screen module and get it out of the way. You’ll then unscrew the silver brain module (4 screws), and the harness you need to access for pins is on the back of that.

Regarding running wires through the firewall, there is actually an extra/empty pass through spot available to use. Check this thread for details...


Hope this helps. Happy to answer any other questions/details that I might have left out.
This is exactly what I needed, every time I've been off road and I'm coming over a hill or around corner I say "this is why I need a front camera, why the f*ck wasn't this included in the Rebel, its meant for off roading?!" I think my gf is getting tired of hearing me say that, and asking her to get out and check the trial haha
Thanks a lot for this!
 

toyboy1980

Well-Known Member
Joined
Sep 7, 2020
Messages
205
Reaction score
205
Location
Nashville, TN
This is exactly what I needed, every time I've been off road and I'm coming over a hill or around corner I say "this is why I need a front camera, why the f*ck wasn't this included in the Rebel, its meant for off roading?!" I think my gf is getting tired of hearing me say that, and asking her to get out and check the trial haha
Thanks a lot for this!
Yeah man. It’s SUPER useful to have. Let me know if you have any questions. It’s all pretty straightforward as long as you have your ducks in a row. And WELL worth the effort.
 

ReLLIK75

Active Member
Joined
Dec 6, 2019
Messages
123
Reaction score
105
Thanks for the detailed write-up. That part from the mouser link—the connector for the ends of the RCA pigtails is out of stock. Were you able to find that same part anywhere else? What’s it called? Maybe I can find one locally?
 

Jimmy07

Honorary Site Supporter
Site Supporter
Joined
Apr 11, 2019
Messages
2,000
Reaction score
2,185

toyboy1980

Well-Known Member
Joined
Sep 7, 2020
Messages
205
Reaction score
205
Location
Nashville, TN
Thanks for the detailed write-up. That part from the mouser link—the connector for the ends of the RCA pigtails is out of stock. Were you able to find that same part anywhere else? What’s it called? Maybe I can find one locally?
Looks like Jimmy found you an alternative. That’s crazy though. There were like 40,000 of them in stock the other day when I ordered. Somebody went all-in on some connectors. Haha.

Side note: I bought 4, just to have extra in case I messed something up.
 

bskubon

Active Member
Joined
Apr 20, 2020
Messages
96
Reaction score
46
Anyone know exactly which pins are for the 2020 Limited with the 12" display? Also, anyone mount on the front other than below the A in the grill? i.e. didn't know if there was an easier place to mount.
 

dts828

Ram Guru
Joined
Dec 28, 2019
Messages
876
Reaction score
498
Location
Atlanta, GA
Anyone know exactly which pins are for the 2020 Limited with the 12" display? Also, anyone mount on the front other than below the A in the grill? i.e. didn't know if there was an easier place to mount.
Post#203 in this thread says 20 limited was on pins21/22.

Sent from my GM1917 using Tapatalk
 

toyboy1980

Well-Known Member
Joined
Sep 7, 2020
Messages
205
Reaction score
205
Location
Nashville, TN
Anyone know exactly which pins are for the 2020 Limited with the 12" display? Also, anyone mount on the front other than below the A in the grill? i.e. didn't know if there was an easier place to mount.
It seems like 21/22 are gonna be your best first try, based on everyone’s posts who’ve done it. That has been correct for the majority, including me.

I messed with a few other spots on the grill, but the angle and viewing area wasn’t quite right. I guess that’s why the factory one is in that same spot as well. The only other spot I didn’t mess with was the bottom/lower grill area, but that would be too low for me. All you would see would be the actual road/ground, with no reference for where your bumper is in relation to it.
 

1500DFW

Active Member
Joined
Nov 1, 2020
Messages
176
Reaction score
74
On my ‘19 Laramie it’s pins 24 & 25 FYI.


Sent from my iPhone using Tapatalk
 

bskubon

Active Member
Joined
Apr 20, 2020
Messages
96
Reaction score
46
Was wondering another thing - being an engineer I would envision that RAM only powers up that front camera when called up - if so, than ya would think there’s a 12v power pin somewhere. Anyone know if this true or not? I.e. how does the factory front camera get powered?
 

Jimmy07

Honorary Site Supporter
Site Supporter
Joined
Apr 11, 2019
Messages
2,000
Reaction score
2,185
Was wondering another thing - being an engineer I would envision that RAM only powers up that front camera when called up - if so, than ya would think there’s a 12v power pin somewhere. Anyone know if this true or not? I.e. how does the factory front camera get powered?
The factory front camera is digital, and is run through the Central Vision Processing Module via a coax cable. These are analog cameras being added, so they are always powered when the ignition is on, just waiting to show its image when the radio is switched to that input screen.
 

Brennanb82

New Member
Joined
Dec 11, 2019
Messages
3
Reaction score
0
Does that mean if my truck has factory rear view camera does it already have the central vision processing module and I can just add the 360 cameras
 

Jimmy07

Honorary Site Supporter
Site Supporter
Joined
Apr 11, 2019
Messages
2,000
Reaction score
2,185
Does that mean if my truck has factory rear view camera does it already have the central vision processing module and I can just add the 360 cameras
Nope. In fact, the digital rear view camera on a non-surround view truck will not work as the rear view camera for the surround view system, because the CVPM can’t process the image, only the radio module can.
 

PHFT

Active Member
Joined
Jan 27, 2020
Messages
98
Reaction score
303
Well had great weather today and tomorrow is supposed to be a big snow storm, so I got the camera installed and wired up, just waiting on the TazerDT now, thanks @toyboy1980 and everyone else for these write ups!

IMG_9682.jpg
 

1500DFW

Active Member
Joined
Nov 1, 2020
Messages
176
Reaction score
74
How are y’all passing those fat connections through that tiny grommet hole in the firewall? For the camera wiring?


Sent from my iPhone using Tapatalk
 

Users who are viewing this thread

Top