5thGenRams Forums

Register a free account today to become a member! Once signed in, you'll be able to participate on this site by adding your own topics and posts, as well as connect with other members through your own private inbox!

Adding OEM Front Camera?

dts828

Ram Guru
Joined
Dec 28, 2019
Messages
876
Reaction score
498
Location
Atlanta, GA
How are y’all passing those fat connections through that tiny grommet hole in the firewall? For the camera wiring?


Sent from my iPhone using Tapatalk
There is grommet on the firewall by the brake pedel that is approximately 1-1/2" diameter.

Sent from my GM1917 using Tapatalk
 

PHFT

Active Member
Joined
Jan 27, 2020
Messages
98
Reaction score
303
Nice man! Did you wind up taking the grill off, or just squeezing in there?
Tired squeezing and it worked for the most part (scrapped my arms up good) but I couldn't get the nut tight enough so I just took the grill off, figured I might as well take the time and do it right.
 

bskubon

Active Member
Joined
Apr 20, 2020
Messages
96
Reaction score
46
Did you have the camera hole, or did you purchase the new bezel? If ya got the new bezel - couple questions, can ya still replace that bezel without removing the whole grill? Also, any trick to getting the chrome RAM letters off and onto the new bezel?
 

toyboy1980

Well-Known Member
Joined
Sep 7, 2020
Messages
205
Reaction score
205
Location
Nashville, TN
How are y’all passing those fat connections through that tiny grommet hole in the firewall? For the camera wiring?


Sent from my iPhone using Tapatalk
See my write up here for a pdf description of the grommet I used. I did have to make a small cut and open the hole up just a bit to get everything through. But my main method was taping the RCA end of the cable to a metal rod (something like a straightened out clothes hanger might work) good and securely, and using that to help fish it through. Also, I put liquid dishwashing soap on the grommet hole, and on the rod/cable to help lube things up a bit. Definitely makes it easier. Just be careful not to pull on that wire too aggressively if it’s not budging. It will rip. Don’t ask me how I know...

Post in thread 'Adding OEM Front Camera?'
https://5thgenrams.com/community/threads/adding-oem-front-camera.2571/post-365661
 

toyboy1980

Well-Known Member
Joined
Sep 7, 2020
Messages
205
Reaction score
205
Location
Nashville, TN
Did you have the camera hole, or did you purchase the new bezel? If ya got the new bezel - couple questions, can ya still replace that bezel without removing the whole grill? Also, any trick to getting the chrome RAM letters off and onto the new bezel?
No camera hole or new bezel for me. Drilled up into the bottom of the “A” for mounting the camera. The back of the “A” is hollow, so there’s room for the camera mounting post, wiring to pass through, and to tighten up the nut to secure the camera.

I would assume you’d need to remove the grill to replace the entire bezel.
 

toyboy1980

Well-Known Member
Joined
Sep 7, 2020
Messages
205
Reaction score
205
Location
Nashville, TN
Tired squeezing and it worked for the most part (scrapped my arms up good) but I couldn't get the nut tight enough so I just took the grill off, figured I might as well take the time and do it right.
Gotcha. Yeah through some sort of wizardry, I was able to get a wrench down behind the A and actually get it tightened up. I did ding my arm up pretty good though. Haha. It’s still slightly bruised. But worth it!
 

1500DFW

Active Member
Joined
Nov 1, 2020
Messages
176
Reaction score
74
Anybody else had an issue after they installed the front camera the truck will not turn any cameras on? When I press either the backup or cargo camera buttons it just beeps at me. Even when I put it in reverse no image comes up. They both worked just fine. When I put all the panels and everything back now they just do nothing.


Sent from my iPhone using Tapatalk

Also the power button for the screen no longer works.


Sent from my iPhone using Tapatalk
 

PHFT

Active Member
Joined
Jan 27, 2020
Messages
98
Reaction score
303
Anybody else had an issue after they installed the front camera the truck will not turn any cameras on? When I press either the backup or cargo camera buttons it just beeps at me. Even when I put it in reverse no image comes up. They both worked just fine. When I put all the panels and everything back now they just do nothing.


Sent from my iPhone using Tapatalk
So I just removed my screen and put it back on today and had a "Enter anti theft code" pop up and after starting it went away but then my reveres camera and travel link apps were gone and it would not work in reveres, after panicking I came inside and searched the issue it said it will go away after a few on/off cycles and some time. So I sat and had a beer to relax, after an hour or so I went back out and started up the truck and everything was back to normal.
 

toyboy1980

Well-Known Member
Joined
Sep 7, 2020
Messages
205
Reaction score
205
Location
Nashville, TN
Anybody else had an issue after they installed the front camera the truck will not turn any cameras on? When I press either the backup or cargo camera buttons it just beeps at me. Even when I put it in reverse no image comes up. They both worked just fine. When I put all the panels and everything back now they just do nothing.


Sent from my iPhone using Tapatalk
I did not experience any of that. Looks like @PHFT experienced something similar-ish, and a little bit of time passing was the answer. Keep us posted.
 

ReLLIK75

Active Member
Joined
Dec 6, 2019
Messages
123
Reaction score
105
Just got my camera! Since it seems like just getting the camera installed at the bottom of the A is the most difficult part of the entire process I'm going to start on that tomorrow while I wait for the rest of the parts to arrive.
 

ReLLIK75

Active Member
Joined
Dec 6, 2019
Messages
123
Reaction score
105
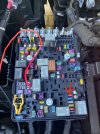
Realized I left out what I ordered to tap the fuse for power, but it’s just a micro2 fuse tap. You can get one at most auto parts stores, or get one on Amazon. I ordered the little set linked below just to have some extras. You want to tap into position F66 (10A fuse) for switched accessory power.

BioFuse Micro2 17 Piece Automotive Fuse Assortment and Holders Pack (2 Add-a-Circuit Fuse Tap Adapters, 14 Blade Fuses + Fuse Puller) 5A 7.5A 10A 15A 20A 25A 30A https://www.amazon.com/dp/B08HPKJFZ2/ref=cm_sw_r_cp_api_fabc_kMrWFbQ61NZTS?_encoding=UTF8&psc=1

The most challenging part is the physical mounting of the camera. I didn’t wanna take my entire grill off, and I managed to get it done without doing that. I basically just loosened up the top part of the grill so I could wedge my arm between it and the radiator, and get done what I needed to get done. For reference, I did everything up until 1:12 in this video, then stopped. The last thing you see is him sort of unhook the grill and it falls slightly forward. That’s what I worked with.


It was VERY tight to work in and I bruised/scratched my arm up a little bit squeezing in and out of there, but again, I didn’t wanna take the whole grill off. If you ARE willing to take it all the way off, it will certainly make it easier to work.

Also, I did a bunch of messing around with the actual mounting position, angle, etc. Tons of back and forth looking at the screen. I started out with a grill mounting spot underneath the A, but I ultimately wound up mounting it to the bottom of the A in the RAM logo. Drilled up through the bottom of it for the mounting post on the camera. The A is hollow, so you can pull the wire through and also have room to tighten up the nut on the backside of it. Again it’s crazy tight working back there, but it can be done. I wanted an angle that still showed the top of the bumper for positional reference, but with basically the same ratio of bumper-to-rest-of-image that the back camera has. Mounting it here achieved that. Picture below for reference.

Taking the head unit out and doing the pins was probably the easiest part of the whole thing. To give you details, my truck is a 2020 Rebel, and it was indeed pins/positions 21 and 22. 21 being signal, and 22 being ground. I included a picture below showing those positions. There are plenty of videos showing how to remove the headunit, but you basically remove the two screws under the mat by your 12v port on top of the dash, and just yank firmly forward. It’s easier to work if you unhook the connectors from the back of the screen module and get it out of the way. You’ll then unscrew the silver brain module (4 screws), and the harness you need to access for pins is on the back of that.

Regarding running wires through the firewall, there is actually an extra/empty pass through spot available to use. Check this thread for details...


Hope this helps. Happy to answer any other questions/details that I might have left out.

How long would you say it took you to mount the camera including the partial removal of the grill? I need my truck in the evenings so have to plan my time after work. I’d hate to get things taken apart under the hood and run out of time.

I want to do this in two stages with the first being mounting the camera. Second stage will be pull/hook up the wires.
 

ReLLIK75

Active Member
Joined
Dec 6, 2019
Messages
123
Reaction score
105
A few more questions.

What fuse box did you use? The one under the hood or under the steering wheel? Which fuse location for the actual wire?

How did you route the cable after you pulled it through the hole by the brake pedal? Did you just route it up behind the steering wheel to the radio compartment?
 

PHFT

Active Member
Joined
Jan 27, 2020
Messages
98
Reaction score
303
I would plan for a couple of hours incase you run into any issues, for the fuse box I used the one under the hood, I don't know the exact fuse but I just tested the ones that turned on when the truck did and picked this one marked by the red arrow (the other fuse connector is for running lights) I ran my wire through the firewall hole by the break pedal and then once you pull the screen off you'll be able to see where to run the wire up and in behind it.
 

Attachments

  • IMG_8772.jpg
    IMG_8772.jpg
    191.2 KB · Views: 244

1500DFW

Active Member
Joined
Nov 1, 2020
Messages
176
Reaction score
74
I did not experience any of that. Looks like @PHFT experienced something similar-ish, and a little bit of time passing was the answer. Keep us posted.

I waited about 2 hours and went for a drive and everything is back to working normally. Thanks info on helping me be patient. Nothing like thinking you just broke a $50k truck.


Sent from my iPhone using Tapatalk
 

Chippy

Ram Guru
Joined
Nov 16, 2018
Messages
551
Reaction score
609
I’m not planning to mess around trying to get that nut on and tightening. I’m gonna drill hole as small as possible and put a piece of 3m body moulding tape cut to shape of base of camera and call it done. I won’t even need to pull grill of a bit just feed the wires back. 3m tape is super strong the nut is just overkill for this install.
 

toyboy1980

Well-Known Member
Joined
Sep 7, 2020
Messages
205
Reaction score
205
Location
Nashville, TN
How long would you say it took you to mount the camera including the partial removal of the grill? I need my truck in the evenings so have to plan my time after work. I’d hate to get things taken apart under the hood and run out of time.

I want to do this in two stages with the first being mounting the camera. Second stage will be pull/hook up the wires.
Hey man. Time for camera mounting: I’d say give yourself 3 hours for camera mounting process, just to be generous. It really shouldn’t take that long though. I’d say realistically, probably like 2 hours at the most.

I tapped into the fuse box under the dash. Position/fuse #F66, which is switched accessory power on a 10A fuse. I included a PDF that should help you make sense of that fuse box.

I routed the RCA pigtail out the back of the headunit, and over to the area right behind that fuse box, where I sort of rallied everything together and did some strategic zip-tie-ing and tidying up of extra cable lengths, etc. I felt it made more sense in my case, to tap into power at that fuse box. I ran the power ground wire underneath an available screw in that general area.
 

Attachments

  • POWER-DISTRIBUTION-CENTER---INTERIOR-LAYOUT.pdf
    505.9 KB · Views: 169
Last edited:

toyboy1980

Well-Known Member
Joined
Sep 7, 2020
Messages
205
Reaction score
205
Location
Nashville, TN
I’m not planning to mess around trying to get that nut on and tightening. I’m gonna drill hole as small as possible and put a piece of 3m body moulding tape cut to shape of base of camera and call it done. I won’t even need to pull grill of a bit just feed the wires back. 3m tape is super strong the nut is just overkill for this install.
That’ll probably be fine. I just had the nut, and the opportunity to use it, so I went with it. Haha. Even though historically I’ve had great success with 3M tape, it would bother me knowing that I could’ve put a nut on and didn’t. But again, I’m sure the tape will do just fine as long as it gets a good bond.
 

dts828

Ram Guru
Joined
Dec 28, 2019
Messages
876
Reaction score
498
Location
Atlanta, GA
I tried but couldn't do without taking the grill off, kudos to you. It would be much easier if the one grill bracket on top was over a little. Not that much more to take the grill off but on the Rebel you also need to remove fender flares, like 10 bolts on each side. Lol...

Sent from my GM1917 using Tapatalk
 

Users who are viewing this thread

Top