Chris VB
Active Member
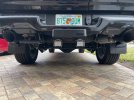
Fun little “RAM” hitch cover for my RAM! Hahaha
View attachment 82816
Lol that’s hideous
Sent from my iPhone using Tapatalk
Fun little “RAM” hitch cover for my RAM! Hahaha
View attachment 82816


Small budget upgrades today. Borrowed the velcro on the center console idea from a previous post. Nice place to mount my nitecore 1200lm light, airlift controller, and a knife and spring loaded glass breaker just in case (growing up here in ag country I’ve seen far too many people stuck in their cars after driving into a full canal). Mounted a trash bag on the passenger side to keep stuff out of the console and floorboard. Mounted my new black and chrome flag emblems. After a ton of moving to different spots with a magnet I ended up going with my first idea and putting just above the ram logo on either door. Love the emblems and pictures don’t do them justice.


Sent from my iPhone using Tapatalk
Got this blueridge overland roll-up dump pouch that I had simply been using the open ITW GrimLoc clip to hang over the edge of the console side cubby. Worked decently, but would slide all over the place and occasionally fall off. Thought I could make use of the velcro surfaces and add some hook-side velcro beneath cubby opening to keep it secure. After more thought, realized it would make more sense to get a nice wide strip of the loop side and run it the full length so that I could attach any velcro backed organization items I wanted (since they usually all have hook side on back).
Found some good 4" wide stuff on amazon that claims heat resistance up to 90 +- 5* Celsius (185--203* Fahrenheit) and doesn't leave traces when peeled off. With seats all the way back, a 12" strip will take you just behind seat to end of cubby opening. Prepped surface by cleaning with isopropyl alcohol then applied the loop side to both driver and passenger side. To support the BROG dump pouch I double sided some hook surface to create two patches that I could put on either side for holding the dump pouch. Keeping it on passenger side now and it works great!
Even had an unused Maxpedition mag holder that I had on bottom of rear seats for baby gear organization (was gonna roll up diapers in the loops but unfortunately too small haha), that I now use on driver side for my survival knife (has glass breaker and cord/seat belt cutter). So many options for velcro organization in general, I'm gonna have some fun! Will report back on whether the adhesive survives the upcoming 105* TX summer weekend.
I really like that Velcro idea for the flashlight and knife...what’s loops did you use?
Sent from my iPhone using Tapatalk

I just quoted the original post. I bought the same Velcro and mag holders.
Sent from my iPhone using Tapatalk
Perfect. Thank you. Maxpedition makes solid stuff.
Sent from my iPhone using Tapatalk
Thanks. Fuel Torque 18x9 -12 offset wrapped in Yoko Geolander M/T G003 295/70R18Looks great, whats the specifics on the wheels/tires setup?
at what speed did you travel? And how many miles do you have on the truck? And do you have the 3.21 or 3.92? I've only driven cross country once, a couple weeks ago when I first picked up my truck. I did over 500 miles and got less than 16mpg, but I also passed through the mountains of Appalachia. I'm really, really hoping my fuel economy improves. I'm under 1000 miles at the moment.First road trip about 240 miles up north. Was a comfortable ride, got good use of the Adaptive CC, averaged 18.6 mpg, and wife and kids didn’t complain about the new muffler so a win for me.
Why are they controversial? I've only heard a little chatter about how many and at what spacing. While they're not much more than aesthetic, I do like them. The little splash of color in the wheels, those lights, and the hooks sets off the truck nicely.
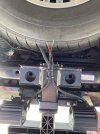
Okay, so, SG...you have TWO lights there, but the CURT has only one flat 5 connector, into which you applied the additional connector leaving you with flying leads. So my question is, how did you connect wires from a pair of lights to the one set of leads?Just finished prepping my truck for the rear bumper reverse flood lighting I purchased. All wiring was done with a CURT harness and all wiring has been installed in split loom tubing. Once the mounting bracket arrives, I'll finish her up and post pics!
UPDATE: OK...off to a great start being that it rained on and off today and my hitch bracket just came about an hour ago. I have the bracket installed; the lights mounted; the CURT harness connected up to the truck; the 5-pin extension cable wired up; and all wiring is in a split-loom jacket. If the weather holds out tomorrow (calling for more rain), I plan to get everything wired up and functional. Pics so far:
View attachment 82774View attachment 82775
at what speed did you travel? And how many miles do you have on the truck? And do you have the 3.21 or 3.92? I've only driven cross country once, a couple weeks ago when I first picked up my truck. I did over 500 miles and got less than 16mpg, but I also passed through the mountains of Appalachia. I'm really, really hoping my fuel economy improves. I'm under 1000 miles at the moment.
Because the Ford Raptor has it.Why are they controversial? I've only heard a little chatter about how many and at what spacing. While they're not much more than aesthetic, I do like them. The little splash of color in the wheels, those lights, and the hooks sets off the truck nicely.
Why are they controversial? I've only heard a little chatter about how many and at what spacing. While they're not much more than aesthetic, I do like them. The little splash of color in the wheels, those lights, and the hooks sets off the truck nicely.
Man, I have a Kawasaki ZX-12R, from the early 00's, but still one of the fastest out there. We regularly denigrate the Suzuki Hayabusa. So I guess I've joined another rivalry then. Honestly, I like the Raptor. If I add that 160HP supercharger I read about, maybe I won't have to worry about it any longer. I sat in one in 2019 and I can proudly say our interior is far nicer.Thank you! There was a couple debates on them being "Raptor lights"
Thank you! There was a couple debates on them being "Raptor lights"
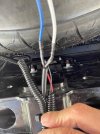
You only need to use the WHITE and BLUE leads to hook up the two lights. If you look closely at the pic below, I took the grounds from both lights and tied them together. Did the same for the +12V leads. I then took the WHITE lead from the CURT to the BLACK leads of the lights and the BLUE lead from the CURT to the RED leads of the lights and soldered them and then heat shrinked them individually. One individually heat shrinked, I then took a larger diameter heat tube and encased the two together. After all was buttoned up, I added split loom and self-sealing silicone wrap for a 100% water tight connection.Okay, so, SG...you have TWO lights there, but the CURT has only one flat 5 connector, into which you applied the additional connector leaving you with flying leads. So my question is, how did you connect wires from a pair of lights to the one set of leads?
Also, did you even consider the Luyeds? They're so much smaller.


It's always a great idea to add memory to anything...I'll bet the radio boots up quicker nowFun little “RAM” hitch cover for my RAM! Hahaha
View attachment 82816
