
PP_McPooperson
Member
- Joined
- Jan 27, 2021
- Messages
- 8
- Reaction score
- 20
- Points
- 3
- Age
- 42
Hey everybody,
I wanted to throw together a quick post of my roof mounted LED bar install. Upon researching the internet for help on this subject I was coming up empty so I figured since I just did it, i'll spread the wealth of knowledge!
I have previously installed a Rhino Rack Pioneer Platform (52" x 56") and would be more than happy to answer any questions about that install if anyone's interested, but for this thread, I'll just chat about my install of:
40 Inch Double Row: Black Oak LED Pro Series 2.0 Dual Row LED Light Bar - Combo Optics 240w
and
(2) 2 Inch Diffused LED Pod Light: Black Oak LED Pro Series 2.0: 40w CREE XM-L2
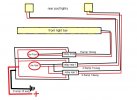
I used the wiring kits that came with them along with the included relays and switches. If you're like me and kinda don't understand why/how relays work, here's a great refresher. This helped me design the following system/diagram:
.jpg")
The rear pod lights put out around 2.5 amps each and the front bar around 16 amps = 21 amps. The stock wiring harnesses came in 14 awg and 12 awg respectively. I wanted to eliminate as many runs through the firewall as possible so I soldered the wires from the feed side of the relays together and sent a 10 awg run through the firewall. As long as you're using less than 13 feet of TOTAL wire (neg & pos) you'll be well within amperage range for 10 awg wire with the 21 amp pull from the lights.
Ram was nice enough to provide a VERY convenient little firewall hole just below the large wire grouping from the dashboard. I hate to say it, but it looks like a little penis and once you snip the tip you have a nice opening for a few wires. Be sure to LUBE THE WIRES before sending them through, I learned that the hard way.


To keep it clean and classy, I added ring connectors to the end of the 10 awg feed wires and found a nice spot for both of them. The Positive was mounted on the bus bar of the fuse panel, and the negative to where the negative battery wire meets up with the chassis near the driver's side front fender:


Then came the fun part:
Removing headliner and drilling some holes through my roof. To remove the headliner it was pretty easy all things considered. A majority or the ceiling is VELCROED with a few screw driven clips to hold it all up. I only took down the driver's side of the roof panel since I knew I was only running wires from that side, but it would've been fairly simple to remove the whole headliner if needed.
Step 1: Remove sunglasses cubby and unscrew 2 hex heads located at ceiling. The whole assembly will pull down, be cautious of the 2 clips towards the rear by the lights, might need a flat head to help you ply. Unplug the 2 wire harnesses clipped in.

Step 2: Drop sun visor mount torx head screws and unclip the power wire.

Step 3: Remove grab handle hex heads at front and rear

Step 4: Take off that coat hanger above rear driver's side door.
Step 5: Pop off the little plastic "airbag" covers on the rear cab pillar, and the rear headliner btw the speakers. There are torx head screws behind each.
Step 6: This is the tricky part, you have to sort of bend the hard plastic covering the pillars where the seat belts pivot and get it pulled away from the headliner in order to drop it. Just be careful and TAKE YOUR TIME.
Here's a shot of the headliner dropped. You'll notice that RAM ram a lot of harnesses through the headliner. The Red and Black wires are from the rear Pod lights i was mocking up for install.

I will continue this post with more photos in the reply so I can keep adding photos of the install...
I wanted to throw together a quick post of my roof mounted LED bar install. Upon researching the internet for help on this subject I was coming up empty so I figured since I just did it, i'll spread the wealth of knowledge!
I have previously installed a Rhino Rack Pioneer Platform (52" x 56") and would be more than happy to answer any questions about that install if anyone's interested, but for this thread, I'll just chat about my install of:
40 Inch Double Row: Black Oak LED Pro Series 2.0 Dual Row LED Light Bar - Combo Optics 240w
and
(2) 2 Inch Diffused LED Pod Light: Black Oak LED Pro Series 2.0: 40w CREE XM-L2
I used the wiring kits that came with them along with the included relays and switches. If you're like me and kinda don't understand why/how relays work, here's a great refresher. This helped me design the following system/diagram:
The rear pod lights put out around 2.5 amps each and the front bar around 16 amps = 21 amps. The stock wiring harnesses came in 14 awg and 12 awg respectively. I wanted to eliminate as many runs through the firewall as possible so I soldered the wires from the feed side of the relays together and sent a 10 awg run through the firewall. As long as you're using less than 13 feet of TOTAL wire (neg & pos) you'll be well within amperage range for 10 awg wire with the 21 amp pull from the lights.
Ram was nice enough to provide a VERY convenient little firewall hole just below the large wire grouping from the dashboard. I hate to say it, but it looks like a little penis and once you snip the tip you have a nice opening for a few wires. Be sure to LUBE THE WIRES before sending them through, I learned that the hard way.
To keep it clean and classy, I added ring connectors to the end of the 10 awg feed wires and found a nice spot for both of them. The Positive was mounted on the bus bar of the fuse panel, and the negative to where the negative battery wire meets up with the chassis near the driver's side front fender:
Then came the fun part:
Removing headliner and drilling some holes through my roof. To remove the headliner it was pretty easy all things considered. A majority or the ceiling is VELCROED with a few screw driven clips to hold it all up. I only took down the driver's side of the roof panel since I knew I was only running wires from that side, but it would've been fairly simple to remove the whole headliner if needed.
Step 1: Remove sunglasses cubby and unscrew 2 hex heads located at ceiling. The whole assembly will pull down, be cautious of the 2 clips towards the rear by the lights, might need a flat head to help you ply. Unplug the 2 wire harnesses clipped in.
Step 2: Drop sun visor mount torx head screws and unclip the power wire.
Step 3: Remove grab handle hex heads at front and rear
Step 4: Take off that coat hanger above rear driver's side door.
Step 5: Pop off the little plastic "airbag" covers on the rear cab pillar, and the rear headliner btw the speakers. There are torx head screws behind each.
Step 6: This is the tricky part, you have to sort of bend the hard plastic covering the pillars where the seat belts pivot and get it pulled away from the headliner in order to drop it. Just be careful and TAKE YOUR TIME.
Here's a shot of the headliner dropped. You'll notice that RAM ram a lot of harnesses through the headliner. The Red and Black wires are from the rear Pod lights i was mocking up for install.
I will continue this post with more photos in the reply so I can keep adding photos of the install...


")


