5thGenRams Forums

Register a free account today to become a member! Once signed in, you'll be able to participate on this site by adding your own topics and posts, as well as connect with other members through your own private inbox!

Retrofitting the 33 gallon tank

CrookedLetta

Active Member
Joined
Nov 25, 2018
Messages
115
Reaction score
26
Any warranty issues for doing the swap? Getting a 33gal truck off the lot is like searching for a needle in a haystack around here. I found the exact truck I'm looking for but has the 26gal tank. Thinking I can live with 26 for now but if I just cant (within the warranty period), I have no problem doing the swap myself. Gonna run it by my dealer and see what they say. But I am curious what others have been told.
No warranty issues. If any dealership tries to claim a warranty issue, due to the fuel tank swap, call their bluff and get a lawyer.
 

dts828

Ram Guru
Joined
Dec 28, 2019
Messages
874
Reaction score
498
Location
Atlanta, GA
Any warranty issues for doing the swap? Getting a 33gal truck off the lot is like searching for a needle in a haystack around here. I found the exact truck I'm looking for but has the 26gal tank. Thinking I can live with 26 for now but if I just cant (within the warranty period), I have no problem doing the swap myself. Gonna run it by my dealer and see what they say. But I am curious what others have been told.
The only warranty issue you can run into with any gas filling issues(not uncommon) or fuel pump issues that may arise. They could claim that issue was caused by the fuel tank swap.

Sent from my GM1917 using Tapatalk
 

ALT_F13

Active Member
Joined
Aug 25, 2020
Messages
169
Reaction score
298
Location
Seattle, WA
The only warranty issue you can run into with any gas filling issues(not uncommon) or fuel pump issues that may arise. They could claim that issue was caused by the fuel tank swap.

Sent from my GM1917 using Tapatalk
I do not believe that warranty claim can be rejected because of the fuel tank swap. Only Mopar parts are used, and replacement process is 100% aligned with FCA service manuals. There should be a strong justification why it shouldn't be covered by warranty ;)

On a side note, I was experiencing filling issues with an old tank too. There is even a service bulletin 14-003-20 from December 5th about this issue. Filling up the whole tank from empty was pretty challenging on any gas station - the pump clicked after filling up ~10 gallons, and I needed to press the handle 4-5 times to fill the tank to the full. After I've switched to 33 gal tank the problem is gone - from 1/8 full to 100% full is just one click. Maybe old vapor canister was causing the problem.
 

dts828

Ram Guru
Joined
Dec 28, 2019
Messages
874
Reaction score
498
Location
Atlanta, GA
I do not believe that warranty claim can be rejected because of the fuel tank swap. Only Mopar parts are used, and replacement process is 100% aligned with FCA service manuals. There should be a strong justification why it shouldn't be covered by warranty ;)

On a side note, I was experiencing filling issues with an old tank too. There is even a service bulletin 14-003-20 from December 5th about this issue. Filling up the whole tank from empty was pretty challenging on any gas station - the pump clicked after filling up ~10 gallons, and I needed to press the handle 4-5 times to fill the tank to the full. After I've switched to 33 gal tank the problem is gone - from 1/8 full to 100% full is just one click. Maybe old vapor canister was causing the problem.
Yes, oem parts are used but they are not doing the labor. At the end of the day they can make any claim they want such as fuel pump was damaged during install, vent lines kinks etc...., they can claim it and you will be left arguing with them and as much as the burden should be on them to prove it really is left up to the truck owner. Some dealers are better than others a d everyone will have different experiences. Not really disagreeing how should be but reality and actual are to different stories.

I have been on the forums long enough to hear plenty of horror stories on how dealers try to get out of warranty claims and some of them are down right ridiculous. Bottom line if you do mods be prepared for possible consequences.

Sent from my GM1917 using Tapatalk
 

Husky_max

Member
Joined
Jan 13, 2021
Messages
19
Reaction score
8
I've finally completed 33 gallon fuel tank retrofit on my 2020 RAM Rebel. I took that truck from stock inventory at the dealership, and I thought I will be OK with 23 gallon tank, which was a trade-off for a eTorque engine. Man, I love how eTorque works comparing to regular 5.7 HEMI.
My previous SUV had just 14 gallon, and while it was very inconvenient, I was living with it for few years. But then I switched to Dodge Durango with its 25 gallon tank and 21 mpg even going 80mph on a highway. So I easily was going 450-500 miles between fuel stops, and I even changed the way I do road trips taking bio-breaks in parks instead of gas stations. My dog definitely appreciated that change. 23 gallon in Rebel wasn't too small comparing to 25 gallon in Durango, but because of way lower mpg on highway speeds, I needed to stop to refuel every 3 hours. Plus when going to the wilderness, I needed to fill-up at the last gas station, and then hoping that I will have enough fuel to return back. So long story short - I realized that I really need a 33 gallon tank.

Thanks to people in this thread for valuable info. Unfortunately, I couldn't find A-Z guide how to do this upgrade, so it took some time to do my own research. Let's start.

Parts that you need:
1. 68408875AE - 33 gallon fuel tank
2. 68409160AE - fuel pump. Looks like if you have 26 gallon tank you can reuse it, but 23 gallon fuel pump is different. It comes with O-ring seal.
3. 52030458AB and 06104717AA - 3rd fuel tank strap and nut. You need this if you are lucky and you have a subframe member for the 3rd strap, closer to the front of the truck. It is not clear why some trucks with 23 or 26 gallon tanks have it, and some don't.
4. 52029888AC - vapor canister (EVAP). It is longer then vapor canister of 23 gallon tank.
5. 52029909AC - hose from vapor canister to fresh air filter. It is different than the hose from 23 gallon tank.
6. 52029908AB - hose from vapor canister to vapor tube
7. 68307831AB - vapor tube. Connects hose 52029908AB with another vapor tube, going to the engine. It is shorter than 23/26 gallon tank tube.
8. 52030443AB - fuel line bundle. Connects vapor canister, fuel pump and exhaust port on the fuel tank. It is longer than 23/26 gallon tank bundle.
9. 04721916AA - lock ring for fuel pump. Small addition that will save you a lot of time. Instead of reusing the lock ring from an old tank, just put a fresh one to a new tank. Few backs worth the pain of trying to remove an old ring from old tank from my perspective.
10. 68408875AE - skid plate for 33 gallon fuel tank. If you have a skid plate on your 23/26 gallon tank, it is shorter and won't cover ~1 feet of the longer 33 gallon tank.

I was upgrading from 23 gallon tank, I don’t have a frame crossmember for the 3rd strap, and I've decided to keep my short fuel tank skid plate since I don't plan to do crazy rock crawling. Total for parts before tax for me was less than $600, which is OK since 33 gallon tank as an extra option when you order the truck costs $450. Plus 2-3 hours of work if you know what to do.

1. First things that you need to do is to burn as much gas in the tank as you can. When I returned back to my garage, trip computer was showing 20 miles to empty, but actually it appeared that ~3 gallons were still left in the tank. So try to get it to the state when it shows "Low". It will save you time from activating fuel pump through AlfaOBD and draining the remaining gas to the bucket. Plus I didn't relieved the pressure from fuel system, I just let the truck to stay overnight in the garage. So use as much gas as you can and then leave the truck alone for 12 hours, and don't start it when you return back to remove the tank.
2. Remove fuel tank skid plate if you have it by unscrewing 4 bolts.
3. Follow Fuel Tank Replacement Guide to remove the tank. I've skipped steps #1 and #4. I used 4 jack stands to lift the vehicle 0.5 feet above the ground - that was enough to work on this. Then I used floor jack with a piece of 2x6 stud to carefully lower the tank to the ground. With few gallons of gas inside, I think total weight was over 30 pounds, so I suggest to use a buddy to help you with this. Check Fuel Connector chart for more details how to disconnect each connector type.
4. Install new fuel pump by following steps #1-#7 from Fuel Pump Replacement guide.
5. Install new vapor canister on a new tank. Install 52029908AB hose and 52030443AB bundle on the tank, use old tank as a reference how to connect everything.
6. Swap heat shield from old tank to new tank by unclipping 4 plastic clips.
7. Go under the truck and remove vapor tube going to the engine, and replace it with shorter vapor tube (68307831AB). You will need to unclip the plastic mounts holding break lines and a fuel line, be careful not to damage them.
8. Then replace hose that goes from you've disconnected from vapor canister, that goes to fresh air filter. New one is 52029909AC.
9. Install new tank, which is directly opposite to tank removal procedure, nothing special there.
10. If you have a frame crossmember for 3rd strap, install that 3rd strap. My truck didn't have it, and I can't say that tank with 2 straps is not secured well - it is not moving anywhere, and majority of the weight is carried on default two straps just fine. Tank is made of a thick high-density plastic, so it will not crack even under its own weight.
11. Install the skid plate.
12. Lower the truck and fuel it up. I poured 2 gallons from the canister and checked for leaks. Start the truck and make sure it runs well and nothing is leaking. Water drops from the exhaust are water, not gas, so don't freak out if you see them :)
13. Connect with AlfaOBD and change VehConfig-3 Fuel Capacity to 125, which is the 33 gallon tank volume in liters (default setting for 23 gallon tank is 87). Check this post for details, thanks Dixit.
14. Go to the gas station and fill up. Enjoy 500+ miles to empty on the trip computer!

If you find this guide useful, check my Amazon influencer page for other items that I use with my RAM: bit.ly/RAMStuff

Thanks! Thinking about that swap too. Very useful!!


Sent from my iPhone using Tapatalk
 

2020Big4x4Horn

Active Member
Joined
Jul 19, 2020
Messages
131
Reaction score
73
Soon as the tank gets here
fa23b02dba5ae0fb3f1c1b3decb4575b.jpg


Sent from my SM-G988U using Tapatalk
 

MaxCarnage

Active Member
Joined
Aug 14, 2020
Messages
51
Reaction score
25
Location
Eastern WA
I've finally completed 33 gallon fuel tank retrofit on my 2020 RAM Rebel. I took that truck from stock inventory at the dealership, and I thought I will be OK with 23 gallon tank, which was a trade-off for a eTorque engine. Man, I love how eTorque works comparing to regular 5.7 HEMI.
My previous SUV had just 14 gallon, and while it was very inconvenient, I was living with it for few years. But then I switched to Dodge Durango with its 25 gallon tank and 21 mpg even going 80mph on a highway. So I easily was going 450-500 miles between fuel stops, and I even changed the way I do road trips taking bio-breaks in parks instead of gas stations. My dog definitely appreciated that change. 23 gallon in Rebel wasn't too small comparing to 25 gallon in Durango, but because of way lower mpg on highway speeds, I needed to stop to refuel every 3 hours. Plus when going to the wilderness, I needed to fill-up at the last gas station, and then hoping that I will have enough fuel to return back. So long story short - I realized that I really need a 33 gallon tank.

Thanks to people in this thread for valuable info. Unfortunately, I couldn't find A-Z guide how to do this upgrade, so it took some time to do my own research. Let's start.

Parts that you need:
1. 68408875AE - 33 gallon fuel tank
2. 68409160AE - fuel pump. Looks like if you have 26 gallon tank you can reuse it, but 23 gallon fuel pump is different. It comes with O-ring seal.
3. 52030458AB and 06104717AA - 3rd fuel tank strap and nut. You need this if you are lucky and you have a subframe member for the 3rd strap, closer to the front of the truck. It is not clear why some trucks with 23 or 26 gallon tanks have it, and some don't.
4. 52029888AC - vapor canister (EVAP). It is longer then vapor canister of 23 gallon tank.
5. 52029909AC - hose from vapor canister to fresh air filter. It is different than the hose from 23 gallon tank.
6. 52029908AB - hose from vapor canister to vapor tube
7. 68307831AB - vapor tube. Connects hose 52029908AB with another vapor tube, going to the engine. It is shorter than 23/26 gallon tank tube.
8. 52030443AB - fuel line bundle. Connects vapor canister, fuel pump and exhaust port on the fuel tank. It is longer than 23/26 gallon tank bundle.
9. 04721916AA - lock ring for fuel pump. Small addition that will save you a lot of time. Instead of reusing the lock ring from an old tank, just put a fresh one to a new tank. Few backs worth the pain of trying to remove an old ring from old tank from my perspective.
10. 68408875AE - skid plate for 33 gallon fuel tank. If you have a skid plate on your 23/26 gallon tank, it is shorter and won't cover ~1 feet of the longer 33 gallon tank.

I was upgrading from 23 gallon tank, I don’t have a frame crossmember for the 3rd strap, and I've decided to keep my short fuel tank skid plate since I don't plan to do crazy rock crawling. Total for parts before tax for me was less than $600, which is OK since 33 gallon tank as an extra option when you order the truck costs $450. Plus 2-3 hours of work if you know what to do.

1. First things that you need to do is to burn as much gas in the tank as you can. When I returned back to my garage, trip computer was showing 20 miles to empty, but actually it appeared that ~3 gallons were still left in the tank. So try to get it to the state when it shows "Low". It will save you time from activating fuel pump through AlfaOBD and draining the remaining gas to the bucket. Plus I didn't relieved the pressure from fuel system, I just let the truck to stay overnight in the garage. So use as much gas as you can and then leave the truck alone for 12 hours, and don't start it when you return back to remove the tank.
2. Remove fuel tank skid plate if you have it by unscrewing 4 bolts.
3. Follow Fuel Tank Replacement Guide to remove the tank. I've skipped steps #1 and #4. I used 4 jack stands to lift the vehicle 0.5 feet above the ground - that was enough to work on this. Then I used floor jack with a piece of 2x6 stud to carefully lower the tank to the ground. With few gallons of gas inside, I think total weight was over 30 pounds, so I suggest to use a buddy to help you with this. Check Fuel Connector chart for more details how to disconnect each connector type.
4. Install new fuel pump by following steps #1-#7 from Fuel Pump Replacement guide.
5. Install new vapor canister on a new tank. Install 52029908AB hose and 52030443AB bundle on the tank, use old tank as a reference how to connect everything.
6. Swap heat shield from old tank to new tank by unclipping 4 plastic clips.
7. Go under the truck and remove vapor tube going to the engine, and replace it with shorter vapor tube (68307831AB). You will need to unclip the plastic mounts holding break lines and a fuel line, be careful not to damage them.
8. Then replace hose that goes from you've disconnected from vapor canister, that goes to fresh air filter. New one is 52029909AC.
9. Install new tank, which is directly opposite to tank removal procedure, nothing special there.
10. If you have a frame crossmember for 3rd strap, install that 3rd strap. My truck didn't have it, and I can't say that tank with 2 straps is not secured well - it is not moving anywhere, and majority of the weight is carried on default two straps just fine. Tank is made of a thick high-density plastic, so it will not crack even under its own weight.
11. Install the skid plate.
12. Lower the truck and fuel it up. I poured 2 gallons from the canister and checked for leaks. Start the truck and make sure it runs well and nothing is leaking. Water drops from the exhaust are water, not gas, so don't freak out if you see them :)
13. Connect with AlfaOBD and change VehConfig-3 Fuel Capacity to 125, which is the 33 gallon tank volume in liters (default setting for 23 gallon tank is 87). Check this post for details, thanks Dixit.
14. Go to the gas station and fill up. Enjoy 500+ miles to empty on the trip computer!

If you find this guide useful, check my Amazon influencer page for other items that I use with my RAM: bit.ly/RAMStuff
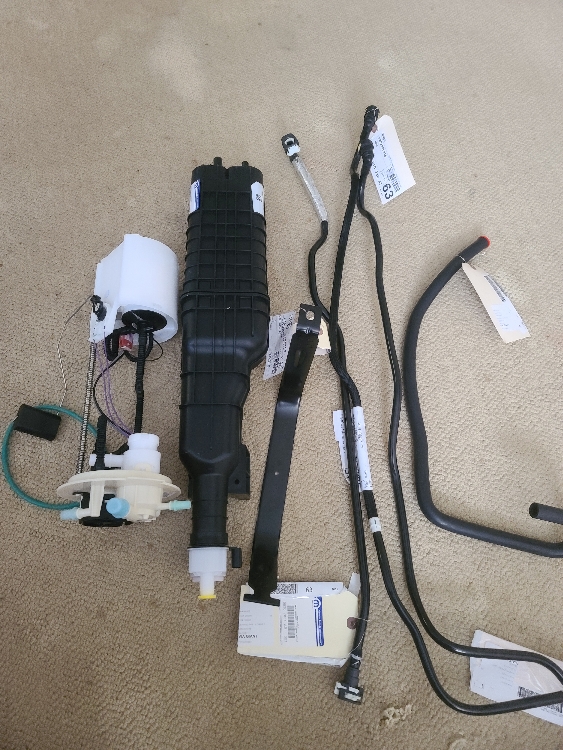
I highlighted two parts that share the same part number. Do you know the correct part number? Look like the skid plate is the wrong one. Also after a search online I'm finding that the 33 gallon tank is part number 68408875AE and also listed as 68408876AE.

Just wanting to verify parts before I order everything. This was on a crew cab too correct?

Thanks
 

2020Big4x4Horn

Active Member
Joined
Jul 19, 2020
Messages
131
Reaction score
73
I highlighted two parts that share the same part number. Do you know the correct part number? Look like the skid plate is the wrong one. Also after a search online I'm finding that the 33 gallon tank is part number 68408875AE and also listed as 68408876AE.

Just wanting to verify parts before I order everything. This was on a crew cab too correct?

Thanks
Looks like 68408876AE is for v6, the other is for v8.

Sent from my SM-G988U using Tapatalk
 

MaxCarnage

Active Member
Joined
Aug 14, 2020
Messages
51
Reaction score
25
Location
Eastern WA
Does anyone know if Tazer can change the setting to 33 gallons? I'm unfamiliar with Alpha OBD. My dealer did say they'd flash the sales code to it for $130. Not sure if it's worth the Alpha OBD, since this is the only thing I want to upgrade.

Just irritated that I got the tow package and the bigger tank wasn't included. I also checked and I don't have the 3rd strap, so I'll either have to ignore it, or get something fabricated. Maybe it's just me, but it seems like vehicle manufacturers are cutting more and more corners with every new model. This is my first truck, so live and learn I guess. Happy with everything else, but the tiny 23 gallon tank. I plan on keeping this truck a good 10 years before I upgrade again, by then I may be forced into an EV truck and I'm not looking forward to that! lol
 

dts828

Ram Guru
Joined
Dec 28, 2019
Messages
874
Reaction score
498
Location
Atlanta, GA
Does anyone know if Tazer can change the setting to 33 gallons? I'm unfamiliar with Alpha OBD. My dealer did say they'd flash the sales code to it for $130. Not sure if it's worth the Alpha OBD, since this is the only thing I want to upgrade.

Just irritated that I got the tow package and the bigger tank wasn't included. I also checked and I don't have the 3rd strap, so I'll either have to ignore it, or get something fabricated. Maybe it's just me, but it seems like vehicle manufacturers are cutting more and more corners with every new model. This is my first truck, so live and learn I guess. Happy with everything else, but the tiny 23 gallon tank. I plan on keeping this truck a good 10 years before I upgrade again, by then I may be forced into an EV truck and I'm not looking forward to that! lol
Tazer can't make the change. I would buy everything to go alpha route. Cheaper than 130(depending which interface you buy) and you may want it for something else down the road.

Sent from my GM1917 using Tapatalk
 

MaxCarnage

Active Member
Joined
Aug 14, 2020
Messages
51
Reaction score
25
Location
Eastern WA
Tazer can't make the change. I would buy everything to go alpha route. Cheaper than 130(depending which interface you buy) and you may want it for something else down the road.

Sent from my GM1917 using Tapatalk

Thanks I looked into the Alphaobd to familiarize myself with it. Seems like I'll need to download the Alpha OBD to my Android phone, buy OBlink MX+ (or other type), and a SGW bypass like tazor or infotainment as well. I'm familiar with the security gateway bypass. I had to install something similar in my challenger that I had. Thankfully our Rams have the SGW in a much easier to access place (Had to pull my 8.4 screen out to access my Challengers SGW).
 

percyZ

Member
Joined
Feb 12, 2021
Messages
7
Reaction score
0
Hi all, I'm trying to compile a parts order and am running into a problem with confirming the right vapor tube. It seems everyone who has done it successfully is using 68307831AB and one stated it's for crew cabs. While using factorychryslerparts' website to check for fitment on my 2020 quad cab, it does not fit. Looking through the vehicle fitment on the site, 68307831AB apparently does not fit 2020 or newer V8 Rams. So I go looking for the proper one and there are two part numbers titled vapor tube that claim to fit. Lost on which I need, or if needed at all if someone knows 68307831AB would actually fit.
The two vapor tubes that the site says fits a 2020 quad cab V8 for a 33 gallon tank are 57008588AA and 57008595AA.
im looking at the same thing. I have 2021 limited. i think 95 and 97 are the ones for 33 gallon tank for limited trim. i belive 85 is for 26 ones.
 

saylor

Well-Known Member
Joined
Jan 5, 2021
Messages
308
Reaction score
232
i got approval from Finance to get it dealer installed - anyone around DFW done this yet and where didya go ?
 

Dr. Jim

Ram Guru
Joined
Aug 16, 2018
Messages
757
Reaction score
553
I gonna be in deep trouble. It's been too long for me to even remember how many years. :unsure: You guys are like newlyweds.
 

htfeep

Member
Joined
May 7, 2019
Messages
9
Reaction score
21
Well, I got my tank replaced last night. Took about five hours. We lost a lot of time primarily on five things: 1) those chassis clips holding the fuel and brake lines, 2) the two fuel line "quick" connects on top of the fuel pump, 3) those retainer clips for the heat shield, 4) getting the fuel inlet hose attached to the new tank, and 5) figuring out AlphaODB.

We took our time since we absolutely did not want to break any plastic pieces.

1) The chassis clips were just a pain even though we had an idea how they worked. As noted in a previous post, you gotta put a pick or ultra small screwdriver in there to pry the hook to release it. We took our time; we didn't want to break them.

2) Those fuel line connections on top of the fuel pump are different than all the rest. Turns out you slide up the retaining clip and push on the opposite side with your thumb (turn sideways for better access) to release.

3) The heat shield clips just needed a pry tool (or putty knife) slipped under the head to pull it up in order to release. Easy peasy, but not totally obvious looking at them.

4) The fuel inlet hose was just massively difficult attaching to the new tank as we didn't want to put grease on it to slide better in case grease got into the fuel tank.

5) The AlphaODB software changed a little bit since Dixit's write-up on the other thread, which slowed me down. After successfully connecting to "My 2019 PowerNet" but before any other steps, you have to tap the diagnostics button at the bottom right. This takes you to the screens for changing the fuel quantity as shown in Dixit's write-up.

When you disconnect the high-pressure fuel line, I'd say about half a cup of fuel comes out. Just be prepared for that.

We've not attached the third strap yet. When we got the 33g tank mounted securely, I pulled down pretty hard on the forward end of the tank and it seemed quite secure. I'll evaluate it again when I change the oil in a couple months.

In other news: When we were putting the new fuel pump into the new tank, we found something rolling around inside the tank (see attached pic). We have no idea what it's for; doesn't seem to belong to the tank. We think it got tossed in there at some point before reaching me. When the tank was delivered, the box had been compromised. It's definitely a check valve but my 23g tank doesn't have anything like it. Anyone know what it is FOR SURE?
20210308_123146.jpg

I wish everyone great success at their project!
 

htfeep

Member
Joined
May 7, 2019
Messages
9
Reaction score
21
Follow-up report.

After about 250 miles, I got a check engine light pointing to a large leak in the EVAP system. Turns out, the EVAP Purge hose (Part No. 52029908AB) disconnected from the canister. I reconnected it and reset the CEL. All is well. Double-check those connections to make sure they're tight!

Took the truck and my 24-ft enclosed trailer on a 650 mile trip last weekend. I only needed to stop twice for fuel. With the 23g tank and pulling my trailer, I had range anxiety sooooo bad (a la Tesla). When you're only getting 8.5-9.0 mpg pulling a trailer like that, those truck stops seem sooo far apart with such a small tank! Well, no longer.

One part I did not use from my earlier parts list was the "Filter to canister hose" (Part No. 52029909AC). I was able to reconnect the existing hose and use it instead.

I've gone through about four full tank loads now without the third strap without any perceived issues. Like I said before, I'll check it when I next perform an oil change.
 

Users who are viewing this thread

Top