Jordan2929
Well-Known Member
like I said earlier, having the lower grill that doesn't allow any airflow can likely be atributed to having the V6 and lighter duty transmission, which need less cooling than the hemi and 8HP75 transmission.
On my last truck (2017 Colorado) I installed a 30" RC curved bar with their included harness. The power going to the switch was just to illuminate the switch when in the on position. The switch itself when turned on sent a ground to the relay to complete the circuit & turn the light bar on. There was no heavy power coming to the switch & back to the relay. Not sure if this is configured the same way, but it makes sense not to send the power needed to light the bar into the cab & back.I've just got around to installing this RC 20" light bar, and I've got the bar itself installed,
--did you ever figure out the wiring so that the light bar isn't always power-on?
--my version of the RC kit came w/ a 3-way SPDT rocker switch...
I've just got around to installing this light bar, and I've got the bar itself installed, gonna finish up the wiring.
Some tips that might help someone looking to do this:
View attachment 11179
- It's easiest to just pull the front bumper off... I initially followed RC's included directions, but I had a hell of a time working in a confined space, on my back, trying to get those stupid click-tabs off. Taking off the front bumper was super easy, and it will allow full unfettered access to removing the plastic air deflector piece behind the grill and installing the light bar is much easier
- RC's directions also mentioned to remove the lower plastic spoiler, not sure why, but if you remove the bumper, you won't need to do this
- RC's wiring harness hooks up directly to the battery--as mentioned, this will leave your switch always ON, even with the car shut off. Presumably the rocker switch will also be always lit up...I want to hook this up so that the RELAYS are hooked up to constant power, but the power to the SWITCH will be from a keyed-on ignition in the cab, same w/ how I wired my radar detector. Shouldn't be too hard to figure out, just need to splice the wiring harness to pull keyed-on power to the switch...
- Still need to figure out where to mount the rocker switch. I'm thinking on the plastic panel beneath the steering wheel, lower left, but have to check on depth available as the rocker switch is pretty deep...
They sell a bezel for the rocker switches. You can buy a single or multiple & it will give your switch a cleaner look.Looks like there's some minor issues regarding this RC light bar... it'd be helpful to consolidate all this info onto 1 thread, so I'm putting it on this one.
If you got to this point and are going ahead w/ the install, then I would say the hardest part is:
- Before buying the RC light, it'd be helpful for people to take a peek at their lower grill--if it's 1 piece (like it appears to be on Sport and/or non-Limited models), the only way you'll be able to install it would be to either cut out that section OR order up a 2 piece lower grill (not sure if it all attaches the same way).
- If you have a 2 piece grill, then the kit would work
- Either way, if you need to work on the lower grill (removing or cutting it), I strongly believe removing the bumper altogether is the way to go, made my life A LOT easier removing the plastic wind shield... No need to remove the lower wind spoiler that RC's directions have you doing
Altogether install for me wasn't quite as painless as I wished; the light is kinda' cool--more really just an accent, rather than actual functional purpose. I keep it on DRL most all the time, as I'm city-driving and don't use the light-part because I don't want to blind drivers...
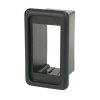
- figuring out where to mount the rocker switch inside--earlier RC LED kits appear to come w/ a smaller switch; mind came w/ a standard size rectangular rocker switch. This necessitated me to break out my dremel and cutting of my dash. I decided to mount it just below my powered adjustable pedal switches. The plastic is pretty thick, and it took me a while to dremel through it, being extra careful:
- View attachment 12633
- running the bundle of wires through the firewall was a MAJOR pain--I used the small nipple just below the OEM wiring harness going in. Well, I ended up removing the wires from the RC wiring harness, taping them altogether, and pushing them through w/ a coat hangar wire. I couldn't get it through until I USED GEL.
- Also, RC's harness has the RELAYS and SWITCH hooked directly up to the battery. Not a huge deal if you want your switch always "LIVE". The switch does NOT LIGHT UP unless it's turned on.
- I wanted the switch to be LIVE only when my truck is keyed-accessories on. I simply used a powered wire via add-a-fuse from the fuse box beneath the steering wheel, rather than the red power wire from RC's harness, and attached it to the rocker switch instead.
Another pic of where I mounted my switch:
View attachment 12634
I just received this same light kit, and I am going through and researching the best way to get this wired. I to want to have the switch live when the truck is keyed-accessories on. My question for you is which slot did you use in the fuse box for the add a fuse, and what amp fuse did you use? Sorry if this is a dumb question, but I have thoroughly confused myself at this point.Looks like there's some minor issues regarding this RC light bar... it'd be helpful to consolidate all this info onto 1 thread, so I'm putting it on this one.
If you got to this point and are going ahead w/ the install, then I would say the hardest part is:
- Before buying the RC light, it'd be helpful for people to take a peek at their lower grill--if it's 1 piece (like it appears to be on Sport and/or non-Limited models), the only way you'll be able to install it would be to either cut out that section OR order up a 2 piece lower grill (not sure if it all attaches the same way).
- If you have a 2 piece grill, then the kit would work
- Either way, if you need to work on the lower grill (removing or cutting it), I strongly believe removing the bumper altogether is the way to go, made my life A LOT easier removing the plastic wind shield... No need to remove the lower wind spoiler that RC's directions have you doing
Altogether install for me wasn't quite as painless as I wished; the light is kinda' cool--more really just an accent, rather than actual functional purpose. I keep it on DRL most all the time, as I'm city-driving and don't use the light-part because I don't want to blind drivers...
- figuring out where to mount the rocker switch inside--earlier RC LED kits appear to come w/ a smaller switch; mind came w/ a standard size rectangular rocker switch. This necessitated me to break out my dremel and cutting of my dash. I decided to mount it just below my powered adjustable pedal switches. The plastic is pretty thick, and it took me a while to dremel through it, being extra careful:
- View attachment 12633
- running the bundle of wires through the firewall was a MAJOR pain--I used the small nipple just below the OEM wiring harness going in. Well, I ended up removing the wires from the RC wiring harness, taping them altogether, and pushing them through w/ a coat hangar wire. I couldn't get it through until I USED GEL.
- Also, RC's harness has the RELAYS and SWITCH hooked directly up to the battery. Not a huge deal if you want your switch always "LIVE". The switch does NOT LIGHT UP unless it's turned on.
- I wanted the switch to be LIVE only when my truck is keyed-accessories on. I simply used a powered wire via add-a-fuse from the fuse box beneath the steering wheel, rather than the red power wire from RC's harness, and attached it to the rocker switch instead.
Another pic of where I mounted my switch:
View attachment 12634
I would appreciate more pictures please. I have a Trigger brand wireless control waiting for a new Rebel, just waiting on orders for 20’s w/multi tailgate. Need to dump my auto dumping 16!So I wired mine in last week, I put it on the accessory stud on the fuse box under the hood which is only powered on when it's in "ACC or RUN" that way if I leave it on accidentally it will turn itself off and not kill the battery. I used the SpeedTech Lights wireless remote that way I didn't have to run wires into the cab and leaves me 5 more accessory wire for future projects.
If you want a picture of where I mounted the remote under the hood let me know and I will take a few more pics.
I would appreciate more pictures please. I have a Trigger brand wireless control waiting for a new Rebel, just waiting on orders for 20’s w/multi tailgate. Need to dump my auto dumping 16!
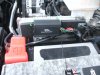
Yah a picture of that stud location would be appreciated. I’m thinking this is something that has changed from the 4th gensHere is a pic of the controller. I wired it to a empty stud on the fuse box under the hood(second stud from firewall). It doesn't have anything on it but its attached to the first stud. If you want a pic of that let me know.
Yah a picture of that stud location would be appreciated. I’m thinking this is something that has changed from the 4th gens

THX much appreciated,forecast here is calling for up to a foot of snowOK currently at work, will try to get one tonight if its not raining.
 ️
️THX much appreciated,forecast here is calling for up to a foot of snow
")
Yah a picture of that stud location would be appreciated. I’m thinking this is something that has changed from the 4th gens
Right on , they made that way easier on the 5th gen. Very perplexing why and how anyone would switch the whole fuse box to the opposite side???OK so this isn't my picture(person moved fuse box to passenger side) but it is a picture of the fuse box, just rotate it so the studs are pointing toward the passenger side and the fuse box is over beside the battery. So the stud I used is the one circle.
Still raining too hard for me to get a pic of mine.
Right on , they made that way easier on the 5th gen. Very perplexing why and how anyone would switch the whole fuse box to the opposite side???
I would like to see that! He is going to huff and puff and blow the eco-boosts downMaking room for his supercharger!