5thGenRams Forums

Register a free account today to become a member! Once signed in, you'll be able to participate on this site by adding your own topics and posts, as well as connect with other members through your own private inbox!

Hard-wire Dash Cam Install

82collector

New Member
Joined
Jun 2, 2021
Messages
1
Reaction score
0
As promised, here are some photos of the Blackvue 750X dash cam setup I installed this week.

I wanted a camera that would allow me to get the lens centered on the windshield, below my toll pass, while not obstructing my view at all. As you can see from the 2 photos below, mission accomplished.

View attachment 81204

View from the driver's perspective:

View attachment 81209

From the passenger side, you can clearly see the camera, but I don't sit there, and it's actually not as intrusive as the photo makes it seem. Wires are run into the sensor cover through two tiny slots I made with a round file to keep things neat.

View attachment 81205

The wiring on the driver's side is run down the a-pillar and secured to the existing wiring, well out of the way of the airbag.

View attachment 81208

I tapped into the fuse panel using F66 for the switched power source, and F33 for the constant power to be able to utilize parking mode. Both have 5 amp fuses installed for the additional circuits as I didn't have any lower ones. F66 also provides the power to my front camera; no issues with having them both running off the 5 amp fuse. Extra wiring is bundled up and zip-tied to an existing harness behind the panel on the end of the dash.

View attachment 81207

On the passenger side I opted to run it along the floor inside the factory wiring channel in lieu of trying to snake it through the headliner and around the airbags. It comes down the a-pillar just like the other side and then goes into the plastic channel all the way to the back where it then goes up behind the plastic on the c-pillar and over to the rear camera.

View attachment 81210

The rear camera is mounted on the passenger side portion of the rear window, with it flipped and moved over as close to the middle as I could get it. Looking at the videos from it, there is plenty of visibility to see to the rear as well as off to the sides a good bit. Eventually I may get an adapter that has a 90 degree end on it, but for now it's fine and really isn't that noticeable either from the driver's seat, or looking in from the outside.

View attachment 81214
where did you find the fuse tap for the Jcase fuse box?
 

sd2134

Active Member
Joined
Jul 31, 2020
Messages
88
Reaction score
96
Location
NV
where did you find the fuse tap for the Jcase fuse box?
You can do a google search for Micro 2 fuse tap.

Amazon has several brands and options, link to one Amazon option below.


thedj817

New Member
Joined
Jun 21, 2021
Messages
2
Reaction score
1
Location
North Texas
Searched entire thread and not finding the answer to this. 2021 Ram 3500 Laramie, the fuse box is in front of the drivers side battery. There is no fuse box under steering column - opened and verified. I installed the Thinkware on my 2018 F-150 (Front/Rear Cam) using fuse taps in the correct positions with no problems and am moving it to the new Ram.

Q - how do you get from inside the cab to the fuse box?

Thank you!
 
Last edited:

securityguy

Legendary member
Joined
Feb 17, 2019
Messages
5,581
Reaction score
4,223
Location
North Florida
Search entire thread and not finding the answer to this. 2021 Ram 3500 Laramie, the fuse box is in front of the drivers side battery. There is no fuse box under steering column - opened and verified. I installed the Thinkware on my 2018 F-150 (Front/Rear Cam) using fuse taps in the correct positions with no problems and am moving it to the new Ram.

Q - how do you get from inside the cab to the fuse box?

Thank you!
There should be a rubber grommet or two in the firewall under the steering column. You can poke a hole through the grommet...fish the wire into the cab with a coat hanger or fish tape and seal it up with RTV or clear silicone. Easy peasy!
 

thedj817

New Member
Joined
Jun 21, 2021
Messages
2
Reaction score
1
Location
North Texas
There should be a rubber grommet or two in the firewall under the steering column. You can poke a hole through the grommet...fish the wire into the cab with a coat hanger or fish tape and seal it up with RTV or clear silicone. Easy peasy!

Perfect!
Thank you very much!
 
Joined
May 21, 2021
Messages
9
Reaction score
7
Location
Fort Drum, NY
Maybe someone here can help me. I got a 21 rebel and I got a blackvue 750X for my truck. Put in the cameras and ran the wires. Crimped in the Fuze taps and plugged in the 5amps like others have done. But I don't get any power to the camera from F33 or F66. Anyone got any recommendations on what to check to trouble shoot it?
 

securityguy

Legendary member
Joined
Feb 17, 2019
Messages
5,581
Reaction score
4,223
Location
North Florida
Maybe someone here can help me. I got a 21 rebel and I got a blackvue 750X for my truck. Put in the cameras and ran the wires. Crimped in the Fuze taps and plugged in the 5amps like others have done. But I don't get any power to the camera from F33 or F66. Anyone got any recommendations on what to check to trouble shoot it?
I PM'd you...call my cell and I'll help get it working. On a DR750X, you need two fuse taps...both F33 and F66 as this model has built in Parking Mode. One fuse tap for the YELLOW wire and another for the RED wire. You did ground it to a solid I assume? I look forward to your call.
 

Bluesurf

Well-Known Member
Joined
May 23, 2019
Messages
347
Reaction score
222
I Installed the BlackVue DR900X-2CH today. I ended up not using the bracket from TheDashCam Store. I removed the door sill plates and much of the surrounding trim to cleanly route and conceal the cable running to the rear camera. But as I feared, routing the cable down the pax A-pillar, under the sill plates and up the C-pillar comes up about 8"-10" short of what's needed to place the camera in the center of the window.

I thought about rerouting the cable above the pax doors, but I really didn't like the idea of tucking the wire without really knowing whether or not it would be in conflict with the side curtain airbags. I removed the A-pillar trim, so while routing the cables in that location, I was sure they were positioned behind the airbags.

I also thought about doing as SecurityGuy had suggested earlier in this thread and attempting to fish the cable between the headliner and the roof. But in the end, I wasn't sure what kind of can-of-worms might be opened by trying to fish across the headliner and I suppose I figured the offset camera position was "good enough."

I used a round file to create a small relief in the plastic mirror trim for the cables to pass through. While I was mocking things up, I noticed it was a little difficult to reinstall the plastic cover. Upon closer look, I noticed the factory had pinched one of the small harnesses in one of the clips. In the picture below, I had already pulled it clear, but you can kind of see the little divot in the harness that was a result of the harness being pinched under the clip.

As I was trying to plug the cable that runs between cameras into the front camera, it didn't seem like it wanted to seat. The little voice in the back of my head said "if it doesn't want to go, don't force it." But the connector is so freakin' small, my vision is years past being able to clearly see what I was dealing with. So, I took a pic and lo and behold, you can see the connector was slightly deformed, right out of the box. A little massaging with a small pair of needle nose pliers and we're back in business.

I formatted the SD card on my PC and also downloaded the latest firmware. I got it all powered up and was surprised to hear voice status prompts. It appears the firmware updated from the SD card on initial boot-up, as I'd hoped it would.

I downloaded the BlackVue app onto my phone and was able to connect the app to the camera through the camera's Wifi. I drove around the block and both cameras seem to function properly. It's a little wonky having the rear camera offset but I think it's adequate.

I also tried to use the BlackVue Downloader app available in the Microsoft store which is intended to connect to the camera while it's in the driveway in parking mode and download the video data. But I'm either not configuring something properly of more likely, the signal from the BlackVue is too weak to reach my router.

Lastly, I set the shutdown voltage in the app to 12.5V. I travel for weeks at a time and the last thing I want is to come home to a dead or weak battery.

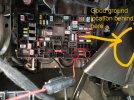
A few people had commented that their add-a-fuse taps wouldn't seat properly because of interference from the adjacent fuses. I used these and seemingly had no problem. The smallest Micro2 fuses I could find were 5 amps. I would have preferred 2 amp fuses but I couldn't find any locally.

Thanks for all of the great advice and tips!

Where the harness was pinched from the factory
View attachment 80715


Filed a small relief for the cables.
View attachment 80716

Connector bent out of the box. This thing is tiny. I couldn't get a clear look at it with the naked eye.
View attachment 80717

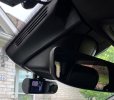
Front camera mounted under large plastic windscreen trim cover. The lens is centered in the windscreen. In hindsight, if I'd positioned it an inch or two further to the right, the camera would be fully concealed by the mirror as viewed from the driver's seat. But no big deal.
View attachment 80718

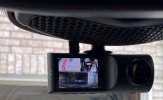
It's hard to get a good picture from the outside.
View attachment 80721

That rear cable keeps wanting to fall from the headliner. It's since been retucked. Hopefully, it'll stay concealed.
View attachment 80720
How did you get the black cover off behind the rearview mirror? I can get it loose but the mirror is in the way.
 

securityguy

Legendary member
Joined
Feb 17, 2019
Messages
5,581
Reaction score
4,223
Location
North Florida
How did you get the black cover off behind the rearview mirror? I can get it loose but the mirror is in the way.
You can pop a flat screwdriver on the far right side near the bottom edge and the entire unit comes right off. It’s a two piece design but comes off easily.
 

Bluesurf

Well-Known Member
Joined
May 23, 2019
Messages
347
Reaction score
222
Thank you very much, I did find a picture guide here later in this forum. It worked out well. I took of the silly stick-on suction cup. I took the off the small ball joint and modified it to work beautifully on the bottom of the plastic box. I also drilled a 3/8 " hole to drop my micro usb down to plug directly into the left side top of the cam. It came out very custom and the dual sided came isn't noticeable with that monstrous suction anchor.
 

brian42

Ram Guru
Joined
Apr 1, 2019
Messages
1,708
Reaction score
1,335
Location
San Diego, CA
Thank you very much, I did find a picture guide here later in this forum. It worked out well. I took of the silly stick-on suction cup. I took the off the small ball joint and modified it to work beautifully on the bottom of the plastic box. I also drilled a 3/8 " hole to drop my micro usb down to plug directly into the left side top of the cam. It came out very custom and the dual sided came isn't noticeable with that monstrous suction anchor.
Pictures of your custom install?
 

Bluesurf

Well-Known Member
Joined
May 23, 2019
Messages
347
Reaction score
222
Pictures of your custom install?
I thought someone would ask so yesterday I took these pictures. It is perfectly centered and very straight from inside the vehicle. It can't be appreciated like when you sit in the truck, it looks very custom. I've attached a picture with that bulky sticky suction device. The cameras take crisp pictures and I have a 256 Gig U3 card in my camera. It also has a built in 320mAh battery for when parked any tap etc. it starts recording in and out. It has the WiFi for my iPhone. It is good enough for what I need. It does get the job done.
 

Attachments

  • CusInst.jpg
    CusInst.jpg
    112.9 KB · Views: 136
  • CusInst1.jpg
    CusInst1.jpg
    78.8 KB · Views: 135
  • vava.jpg
    vava.jpg
    73.9 KB · Views: 135

securityguy

Legendary member
Joined
Feb 17, 2019
Messages
5,581
Reaction score
4,223
Location
North Florida
I thought someone would ask so yesterday I took these pictures. It is perfectly centered and very straight from inside the vehicle. It can't be appreciated like when you sit in the truck, it looks very custom. I've attached a picture with that bulky sticky suction device. The cameras take crisp pictures and I have a 256 Gig U3 card in my camera. It also has a built in 320mAh battery for when parked any tap etc. it starts recording in and out. It has the WiFi for my iPhone. It is good enough for what I need. It does get the job done.
Looks nice, but that camera would not have been my choice. You're happy, we're all happy 🙂
 

Shots

Ram Guru
Joined
Jun 27, 2021
Messages
736
Reaction score
727
Location
N.E. Ohio
Not much to add other than to say the linked fuse tap in the first post worked perfectly for me.
F33 is still good for Aux power on '21 Big Horn. Also, I found a great ground location near the fuse box. It's toward the inboard side of the truck and easily accessible.

There's a piece of metal with a several slots/holes in it. You can easily put a bolt through one of the holes and tighten it down with a nut. Connect your ground using a crimp connector that fits over or around the bolt. Very accessible, and doesn't require you to remove any factory bolts or splice any lines.

The attached photo shows the general location of the ground. You don't need to remove anything extra to get to it. You can access it easily with the panel off that was removed to access the fuse panel. You just have to look in from the side more than the OP's photo was.
 

Attachments

  • Untitled-1.jpg
    Untitled-1.jpg
    352.5 KB · Views: 89

securityguy

Legendary member
Joined
Feb 17, 2019
Messages
5,581
Reaction score
4,223
Location
North Florida
Not much to add other than to say the linked fuse tap in the first post worked perfectly for me.
F33 is still good for Aux power on '21 Big Horn. Also, I found a great ground location near the fuse box. It's toward the inboard side of the truck and easily accessible.

There's a piece of metal with a several slots/holes in it. You can easily put a bolt through one of the holes and tighten it down with a nut. Connect your ground using a crimp connector that fits over or around the bolt. Very accessible, and doesn't require you to remove any factory bolts or splice any lines.

The attached photo shows the general location of the ground. You don't need to remove anything extra to get to it. You can access it easily with the panel off that was removed to access the fuse panel. You just have to look in from the side more than the OP's photo was.
When you remove the knee panel you will also see a screw in the upper left corner which is a great ground and only visible when the plastic panel is removed. You can just loosen it and slide your wire right in...no bolts and nuts to buy. Several good places to ground I'm sure.
 

Shots

Ram Guru
Joined
Jun 27, 2021
Messages
736
Reaction score
727
Location
N.E. Ohio
Hmmm, I must have overlooked that one. I was looking for something like that but couldn't find any that grounded well. Good tip.
 

jaygunnah5150

New Member
Joined
Jul 25, 2021
Messages
4
Reaction score
0
Fire, this is the kit (pic attached) I got that goes with my radar detector. Looks like, based on your pics, I don't need to buy "add a fuse" because I have an inline fuse like your kit. So, I could just snip off the end of the red wire and wrap it around a fuse as you did right??? That's the end most are snipping to use a "add a fuse" ........also, how do we know F66 is unused? Looking in the manual, I do notice it says "accessory" but if it were unused, wouldn't it say "spare" like I see elsewhere?

I'm not sure I can split the red/black wire in order to run the black wire into the side panel (due to distance) for grounding, but I'll check. I know they aren't one wire.....and I can basically pull them apart........I noticed that yesterday. We'll see
we're can i find that connector or what's it called i need it for my amp steps plug and play unit
 

mikeru82

Legendary member
Joined
Nov 18, 2019
Messages
5,508
Reaction score
5,144
Location
The Palouse
You can pop a flat screwdriver on the far right side near the bottom edge and the entire unit comes right off. It’s a two piece design but comes off easily.
I can pop the cover off but how do you separate the two pieces? It doesn't pull away from the windshield far enough for me to tell how the two pieces are attached. I don't want to force anything and risk breaking things.
 

Users who are viewing this thread

Top