5thGenRams Forums
You are using an out of date browser. It may not display this or other websites correctly.
You should upgrade or use an alternative browser.
You should upgrade or use an alternative browser.
Boogielander Build
- Thread starter boogielander
- Start date
What is the brand/model of this Mounting point on the dash? I had a RAM Mount rail in my Tacoma, but this looks NICE!
boogielander
Spends too much time on here
- Joined
- Jun 29, 2022
- Messages
- 3,646
- Reaction score
- 5,764
- Points
- 113
that's ICS Fabrication. They make these mounts for many platforms. I had them on my 4Runner and loved them. So far they are the only one that makes dash mounts like these for RAM 1500s that I know of. Bulletpoint is another one but my existing mounting solutions are all geared for ICS so I didn't switch.What is the brand/model of this Mounting point on the dash? I had a RAM Mount rail in my Tacoma, but this looks NICE!
boogielander
Spends too much time on here
- Joined
- Jun 29, 2022
- Messages
- 3,646
- Reaction score
- 5,764
- Points
- 113
This weekend was not as productive as I planned. I was going to wire up the rear end but I was missing a few key components for my projects, and the weather was not cooperating. Originally, I planed to run both camp lights and chase lights as well as bed power distribution all together this weekend; both camp lights and chase lights will go to Switch-Pros, and I'd run a 4 gauge to the bed. All of the wires would go down the engine bay, follow the frame, and through the bed. However, since I am missing the key components for the power distribution panel, and I didn't want to run the wires twice, I put a pause on that project. Plus it was raining here and there too, so I didn't want to get under the truck on damp ground.
Instead, I did the following:
Installed SDHQ Ditch light Brackets and reinstalled my old BD Squadron Sports and TRAM HAM Antenna that I took off from my 4Runner. I should've bought new Squadron faceplates and new antenna but... why waste money just to look good? Not like Im sponsored or anything. I also reused the HAM antenna mount from my 4Runner, made by Rago Fabrication. I forgot that I was supposed to run the HAM antenna wire through the mount first before fishing it through the firewall, so instead of pulling the antenna wire and redo everything I enlarged the hole on the antenna mount. Works just as well.
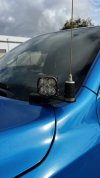
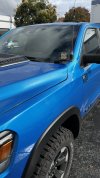
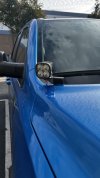
One thing I didn't like about the SDHQ mount is that it leaves a cap between fender and hood. But that is because of how thick the mount material is. With that thickness and the shape of the mount, it is sitting on top of the plastic cover right where the windshield wipers are when hood is closed. I could use a thinner mount, but since I am mounting my antenna there I much rather trade that gap for a thicker and beefier mount.
Also installed SDHQ Terminal kit to clean up my wiring at the battery, since I need to add one more power cable from battery and will need multiple grounds for all the lights and stuff I planned to add.
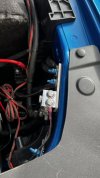
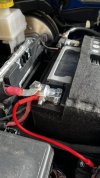
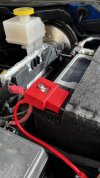
Perhaps it was after a long day of work when I put this in, but I found the instruction wasn't 100% clear on which bolt goes where. The CAD illustration helped somewhat, but more angles of the graph would be more helpful. I also found that I have quite a few washers left over too.
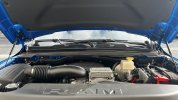
Finally, extended and hid the ditch light wires as the originally supplied harness was not long enough for a full size truck. I took off the plastic plugs and hid all the wires under the plastic cover. There are plenty of room under the plastic cover for that.
Instead, I did the following:
Installed SDHQ Ditch light Brackets and reinstalled my old BD Squadron Sports and TRAM HAM Antenna that I took off from my 4Runner. I should've bought new Squadron faceplates and new antenna but... why waste money just to look good? Not like Im sponsored or anything. I also reused the HAM antenna mount from my 4Runner, made by Rago Fabrication. I forgot that I was supposed to run the HAM antenna wire through the mount first before fishing it through the firewall, so instead of pulling the antenna wire and redo everything I enlarged the hole on the antenna mount. Works just as well.


One thing I didn't like about the SDHQ mount is that it leaves a cap between fender and hood. But that is because of how thick the mount material is. With that thickness and the shape of the mount, it is sitting on top of the plastic cover right where the windshield wipers are when hood is closed. I could use a thinner mount, but since I am mounting my antenna there I much rather trade that gap for a thicker and beefier mount.
Also installed SDHQ Terminal kit to clean up my wiring at the battery, since I need to add one more power cable from battery and will need multiple grounds for all the lights and stuff I planned to add.


Perhaps it was after a long day of work when I put this in, but I found the instruction wasn't 100% clear on which bolt goes where. The CAD illustration helped somewhat, but more angles of the graph would be more helpful. I also found that I have quite a few washers left over too.
Finally, extended and hid the ditch light wires as the originally supplied harness was not long enough for a full size truck. I took off the plastic plugs and hid all the wires under the plastic cover. There are plenty of room under the plastic cover for that.

boogielander
Spends too much time on here
- Joined
- Jun 29, 2022
- Messages
- 3,646
- Reaction score
- 5,764
- Points
- 113
Also changed did my 500 mile oil change at 800 miles. I was going to do that before Thanksgiving but we were closed the week of Thanksgiving, and I don't have the keys to the shop. Oil was very clean when I dumped it and whoever put the filter on at the factory put it on TIGHT.
Excellent! I ended up stumbling on Bulletpoint, and bought their version. Seems fairly solid at 1/3rd the cost of the ICS. Will see how it holds up!that's ICS Fabrication. They make these mounts for many platforms. I had them on my 4Runner and loved them. So far they are the only one that makes dash mounts like these for RAM 1500s that I know of. Bulletpoint is another one but my existing mounting solutions are all geared for ICS so I didn't switch.
What antenna are you all using for your HAM radios? I have a Comet UHV 4 band antenna for my Yeasu 8900 but looking for a smaller 2 band antenna.
Great truck and build.
Diamond NR-770H-NMO is what I have used on my rig and it works fantastically!
boogielander
Spends too much time on here
- Joined
- Jun 29, 2022
- Messages
- 3,646
- Reaction score
- 5,764
- Points
- 113
i thought about bulletpoint but at the time of ordering i did not see the rubigrid for some reason lolExcellent! I ended up stumbling on Bulletpoint, and bought their version. Seems fairly solid at 1/3rd the cost of the ICS. Will see how it holds up!
boogielander
Spends too much time on here
- Joined
- Jun 29, 2022
- Messages
- 3,646
- Reaction score
- 5,764
- Points
- 113
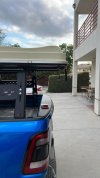
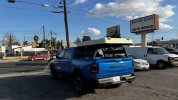
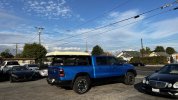
Short version of the story: Added some downforce today because my RTT has been sitting at the shop for too long.
Long version of the story: I took off my roof top tent (RTT) back in August when I was parting out my 4Runner and left it sitting on a trailer at the shop. Now my friend wants to take the trailer so I have to put it on the Rebel even though it's nowhere near ready for that. Original plan was to paint it black and get the Rebel lifted, and install my bed power box before I put on the tent, but now gotta do those later.
I also need mounting brackets for the tent because I had to micky mouse some bracket together. It felt sturdy enough but I don't trust my own micky mouse work. Hopefully the brackets from BA Tents will work with mine.
And yes, it's sticking out a bit so... downforce!!!


boogielander
Spends too much time on here
- Joined
- Jun 29, 2022
- Messages
- 3,646
- Reaction score
- 5,764
- Points
- 113
truck is currently grounded until my roof tent mounts arrive. Right now i'm using some thin metal sheets to secure it temporarily so I could drive home. Until I get the proper mounting plates installed, I'll be back driving my E90 M for daily commute.
But while that's happening, something came today.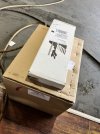
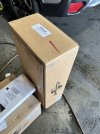
The missing links for my Fox 2.5 set up are here. The rear springs, UCA, and rear end links are finally here and hopefully I'll have lift space at the shop on Saturday to put them on. That said, if anyone is interested in my stock Rebel full suspension (front coilovers, UCA, rear springs and shocks, and end links) feel free to send me an offer. I only have less than 1K miles on them.
But while that's happening, something came today.


The missing links for my Fox 2.5 set up are here. The rear springs, UCA, and rear end links are finally here and hopefully I'll have lift space at the shop on Saturday to put them on. That said, if anyone is interested in my stock Rebel full suspension (front coilovers, UCA, rear springs and shocks, and end links) feel free to send me an offer. I only have less than 1K miles on them.
boogielander
Spends too much time on here
- Joined
- Jun 29, 2022
- Messages
- 3,646
- Reaction score
- 5,764
- Points
- 113
So finally gathered enough parts to tackle this project. This is my idea of getting switched power in the bed. I don't have drawings or diagrams, since 12v wiring is what I do at the shop mostly.
My goal is to create a waterproof electrical box in the bed, in which I will be running switched accessories like bed lights, camp lights, and possibly a 12v socket for charging if I choose to. Because this will be installed on the bed rail on top of Decked drawer system, it will be exposed to elements so I need to utilize waterproof case. It took me some time to search, but I've found the Harbor Freight 50cal plastic ammo box to be the best fitment. 30 cal would be a bit too narrow to my liking, but if you have smaller hands or no solar charger, then that's doable as well.
I started by removing all switches on the Nilight panel and marked all 4 holes, and used nuts and bolts to secure the faceplate. For now I am just using #10 nuts and bolts since that's what I have in the garage, but will either change to nylon nuts or crush washer to make sure it doesn't back out. To fit #10 bolts through, mounting holes on all 4 corners must be enlarged. Then, I marked the 5 spots where the switches will be, removed the faceplate and drew lines on the outside border of the 5 switch holes. I then broke out my Dremel and cutting disk and cut along the line I made, instead of drilling the holes for the switches. This is due to the wings that the switches have to hold themselves in place. I didn't really have to keep the line straight, as the cutting disk does the job by itself as long as I kept my hand steady.
I then utilized two fuse blocks. One is individually fused and powered, the other is fuse block with ground. Reason being I am also retaining the light feature on the switches. With the light feature, all switches are receiving constant power and giving constant ground (thus two outside spaded connectors). The middle spade is switched power; when the switch is ON, power goes through the switch out out of middle spade to the accessory controlled, and the little light on the switch turns on. When the switch is OFF, circuit is broken and therefore no power goes through the circuit to your accessory. Simple concept but I had to explain it 10 times to my friend for him to understand LOL
I then used different colored wires to run from the switch to the fuse block. No particular reason, but I do have 7 rolls of different colored wires so why not? The other fuse block with negative will be the power distribution center. That will be where the solar controller is plugged into with one of the fused slots. (*Disclaimer: Do I need a fused slot for solar controller? No. In fact, instruction said run it directly to battery. However, to be on the safe side and following my electrical engineering friend's suggestion, I fused it). Some people would ask: how would electricity produced by solar panel charge your battery? I don't know the science behind it, but apparently, since the power side of the big fuse block is all connected, when the vehicle is off power travels back to the battery even if it's split and consumed by added accessories. That part I know would work as tested on the 4Runner and monitored with the bluetooth module.
For power supply to the battery, I utilize 8 gauge power and ground cables for audio systems and will run it along the frame to engine bay. There, it will be connected to a Blue Sea circuit breaker for added peace of mind. I will do that part with running wires for my chase lights as I hate to work off the ground. I am also waiting for longer bolts for me to install this on the bed rails as the bolts I have now are about an inch too short. Once I have this installed and run all the wires for lights, I will then silicone all the cuts and holes I made to keep it waterproof.
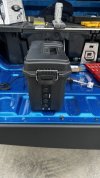
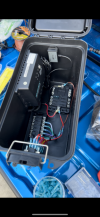


boogielander
Spends too much time on here
- Joined
- Jun 29, 2022
- Messages
- 3,646
- Reaction score
- 5,764
- Points
- 113
Today (Sunday) I received the bolts for bed rail. I did ordered the bolts about 1/4" too long but nothing some washers and crush washers can't fix, right 
After I made holes for the bolts, I made a harness to run everything to engine bay.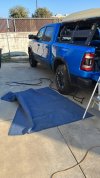
Since I am also running chase lights, I combined both the power box 8 gauge wires and the chase lights 14 gauge wires into one sheath. I had to extend the BD S2 harness, as the one I had was too short for full size and ya boy is too cheap to spend another $100 on BD extension harness. I simply cut off the ring terminals and the fuse (that I did not cut off when I did it on the 4Runner), extended the wires, and put new ring terminals.
I first by ran the sheath externally from the bed to the engine bay, then added about 1' or so of additional sheath to account for running through the bed and up the bay. Then, I used the sheath as a guide and cut both power and ground cable for the BD light, and fed all of them through the sheath. When I was done, I pulled additional 1ft of 8 gauge for running to the box and for reserve.
*One thing I learned after doing 12v electrical on vehicles for a while is that you can never get exact length of wires right, unless you're doing short distance measurable by arms span. Luckily, wires and cables are cheap enough for a little bit of "waste," which we usually keep for short distance applications.
Since I don't have proper heat shrink for this sheath size, I opt for temporarily ziptie the end of the sheath close, then use e-tape to close them off later. Then, I went under, and ziptied the sheathed harness to the frame, or more precisely, the existing harnesses along the frame. There were only a few spots that I tied it directly to the frame due to my fat *** prevented me from reaching. I may change that later when I install rock lights on a lift though.
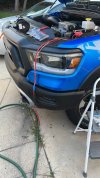
As I pulled the harness out from engine bay, I realized I could've not do the reserve and I'd still have plenty of wires left for reserve. Later, I realized this is discrepancy was due to I took some shortcuts while ziptie the harness in addition to the 1' reserve. No big deal, as leftover wires are better than not enough wires.
As I connect everything together, I realized one glaring problem: I cannot do basic math and I am 3 8 gauge ring terminals short. So I attached everything and heatshrink the power cable for the power box and called it a day on that part.
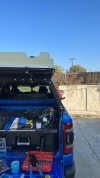
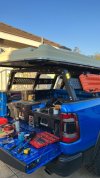
I also installed chase lights and make sure everything works properly, including the strobe function. I utilized the old spot on my previous setup, but I may change the location since there will be a few blank spots as I am not running roof lights, and camp/ bed lights will be wired to the power box.
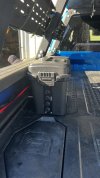
Here is what the finished power box looks like. Since it is not completed, I ziptied it to the bed rail along with my solar panel harness. Once I finish it this long weekend, I will clean it up better!
I purposely put the power box at that location since I like the idea of leaving Decked ammo box functional. Not sure what I will be putting in there yet, but most likely will be some dirty stuff (maybe reusable utensils, or even green propane bottles, or dirty beach clothing? who knows)
After I made holes for the bolts, I made a harness to run everything to engine bay.

Since I am also running chase lights, I combined both the power box 8 gauge wires and the chase lights 14 gauge wires into one sheath. I had to extend the BD S2 harness, as the one I had was too short for full size and ya boy is too cheap to spend another $100 on BD extension harness. I simply cut off the ring terminals and the fuse (that I did not cut off when I did it on the 4Runner), extended the wires, and put new ring terminals.
I first by ran the sheath externally from the bed to the engine bay, then added about 1' or so of additional sheath to account for running through the bed and up the bay. Then, I used the sheath as a guide and cut both power and ground cable for the BD light, and fed all of them through the sheath. When I was done, I pulled additional 1ft of 8 gauge for running to the box and for reserve.
*One thing I learned after doing 12v electrical on vehicles for a while is that you can never get exact length of wires right, unless you're doing short distance measurable by arms span. Luckily, wires and cables are cheap enough for a little bit of "waste," which we usually keep for short distance applications.
Since I don't have proper heat shrink for this sheath size, I opt for temporarily ziptie the end of the sheath close, then use e-tape to close them off later. Then, I went under, and ziptied the sheathed harness to the frame, or more precisely, the existing harnesses along the frame. There were only a few spots that I tied it directly to the frame due to my fat *** prevented me from reaching. I may change that later when I install rock lights on a lift though.

As I pulled the harness out from engine bay, I realized I could've not do the reserve and I'd still have plenty of wires left for reserve. Later, I realized this is discrepancy was due to I took some shortcuts while ziptie the harness in addition to the 1' reserve. No big deal, as leftover wires are better than not enough wires.
As I connect everything together, I realized one glaring problem: I cannot do basic math and I am 3 8 gauge ring terminals short. So I attached everything and heatshrink the power cable for the power box and called it a day on that part.


I also installed chase lights and make sure everything works properly, including the strobe function. I utilized the old spot on my previous setup, but I may change the location since there will be a few blank spots as I am not running roof lights, and camp/ bed lights will be wired to the power box.

Here is what the finished power box looks like. Since it is not completed, I ziptied it to the bed rail along with my solar panel harness. Once I finish it this long weekend, I will clean it up better!
I purposely put the power box at that location since I like the idea of leaving Decked ammo box functional. Not sure what I will be putting in there yet, but most likely will be some dirty stuff (maybe reusable utensils, or even green propane bottles, or dirty beach clothing? who knows)
Biggiehorn
Ram Guru
Coming together so nicely! How far out are you from putting everything to test in the field? Looking forward to hearing your experience and comparison to the 4Runner.
boogielander
Spends too much time on here
- Joined
- Jun 29, 2022
- Messages
- 3,646
- Reaction score
- 5,764
- Points
- 113
hopefully ill be able to get it on dirt for new years weekend. I'm installing the fox this week when the shop is "closed" and I'll finish the power box over the weekend with the ring terminals and fit the camp and bed lights. Also the RTT is a little bit too close to the cab for my liking so I'll need to enlist some help to move it back by half an inch or so.Coming together so nicely! How far out are you from putting everything to test in the field? Looking forward to hearing your experience and comparison to the 4Runner.
Now the problem is where to go for new years weekend lol i'm trying to find a BLM land where I can at least do some driving and shooting that doesn't attract the attention of any local law enforcement to "come and check things out"
boogielander
Spends too much time on here
- Joined
- Jun 29, 2022
- Messages
- 3,646
- Reaction score
- 5,764
- Points
- 113
Shop called today as I was pulling into the lot, letting me know that they have no wiring need today so I don't need to go in. So instead of turning around and head home, I grabbed an empty lift and started on installing the Fox kit.
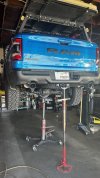
I started at around 11AM and took an hour break and a few smoking breaks here and there, and completed the whole thing by 7PM. Since this was the first RAM being lifted at the shop, I had to figure out a few things myself in regard to UCA, end links, and front coilover situation.
I didn't mess with the preload settings in the front, and installed them exactly the way they came. Then, as I put the truck down on the floor, It was apparent that Fox sent me the Carolina Special Kit
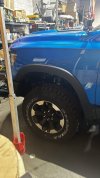
Front was sitting high, looks a lot lifted.
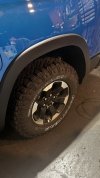
Rear is sitting sagged. Like I have no lift at all.
Upon further investigation (aka checking the screenshot of the Carli order), I found that the shop ordered the wrong rear springs and I didn't catch it. Will try to fix that tomorrow.

I started at around 11AM and took an hour break and a few smoking breaks here and there, and completed the whole thing by 7PM. Since this was the first RAM being lifted at the shop, I had to figure out a few things myself in regard to UCA, end links, and front coilover situation.
I didn't mess with the preload settings in the front, and installed them exactly the way they came. Then, as I put the truck down on the floor, It was apparent that Fox sent me the Carolina Special Kit

Front was sitting high, looks a lot lifted.

Rear is sitting sagged. Like I have no lift at all.
Upon further investigation (aka checking the screenshot of the Carli order), I found that the shop ordered the wrong rear springs and I didn't catch it. Will try to fix that tomorrow.
boogielander
Spends too much time on here
- Joined
- Jun 29, 2022
- Messages
- 3,646
- Reaction score
- 5,764
- Points
- 113
Well, shop called CJC today and placed the order for the rear springs, and I couldn't wait for them to ship to me so I took my M3 and drove down to pick them up.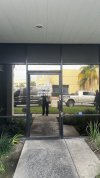
Then I swapped out the rear springs in about 30 minutes then got it aligned.
I am happy to report that the springs were the culprit, and it fixed itself as the new springs went in.
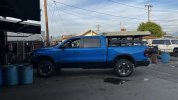
It is amazing how 1.5" of lift (2.5" of lift for non ORG) don't look much on a full size truck like this. I had to break out the special measurement tool that we have to confirm it IS lifted.
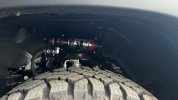
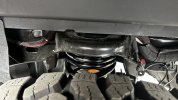
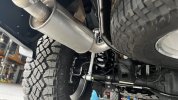
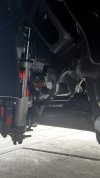
Then I put about 60 miles. Freeway driving is pretty compliant without messing with the adjusters. Overall very happy with the Fox kit and the Carli parts. Maybe later down the line I'll look into revalving to get better offroad performance.

Then I swapped out the rear springs in about 30 minutes then got it aligned.
I am happy to report that the springs were the culprit, and it fixed itself as the new springs went in.

It is amazing how 1.5" of lift (2.5" of lift for non ORG) don't look much on a full size truck like this. I had to break out the special measurement tool that we have to confirm it IS lifted.


Then I put about 60 miles. Freeway driving is pretty compliant without messing with the adjusters. Overall very happy with the Fox kit and the Carli parts. Maybe later down the line I'll look into revalving to get better offroad performance.
crusher
Ram Guru
- Joined
- Mar 2, 2022
- Messages
- 1,470
- Reaction score
- 626
- Points
- 113
- Age
- 42
- Location
- st-jean quebec canada
nice buildWell, shop called CJC today and placed the order for the rear springs, and I couldn't wait for them to ship to me so I took my M3 and drove down to pick them up.View attachment 146774
Then I swapped out the rear springs in about 30 minutes then got it aligned.
I am happy to report that the springs were the culprit, and it fixed itself as the new springs went in.
View attachment 146769
It is amazing how 1.5" of lift (2.5" of lift for non ORG) don't look much on a full size truck like this. I had to break out the special measurement tool that we have to confirm it IS lifted.
View attachment 146773View attachment 146772View attachment 146771View attachment 146770
Then I put about 60 miles. Freeway driving is pretty compliant without messing with the adjusters. Overall very happy with the Fox kit and the Carli parts. Maybe later down the line I'll look into revalving to get better offroad performance.
boogielander
Spends too much time on here
- Joined
- Jun 29, 2022
- Messages
- 3,646
- Reaction score
- 5,764
- Points
- 113
thank you bud!nice build
Still following your build closely. It definitely inspired the direction I decided to go. I’m building around my Khaya camper though. I’m picking it up in January and am super excited!
Sent from my iPhone using Tapatalk
Sent from my iPhone using Tapatalk
boogielander
Spends too much time on here
- Joined
- Jun 29, 2022
- Messages
- 3,646
- Reaction score
- 5,764
- Points
- 113
i didn't go the camper route because of the weight and the cost.Still following your build closely. It definitely inspired the direction I decided to go. I’m building around my Khaya camper though. I’m picking it up in January and am super excited!
Sent from my iPhone using Tapatalk
Now i'm thinking I should've went GFC instead LOL
Users who are viewing this thread
Total: 1 (members: 0, guests: 1)
Staff online
-
EightyModerator / Dream Killer


