5thGenRams Forums

Register a free account today to become a member! Once signed in, you'll be able to participate on this site by adding your own topics and posts, as well as connect with other members through your own private inbox!

5th Gen Ram 1500 30" Light Bar Bracket Set

Okay, so yesterday was the day of mounting the LED bar. It can indeed be done by 1 person but it is easier to do with 2.

Actually swapping the closed lower grill with the open lower grill is still the most of a PITA. Especially taking out the parking sensors out of the housing ánd then the housing out of the plastic grill. But nothing broke.

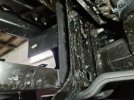
What we also did was removing the airdam, it is only 4 bolts in total and 1 connector. Which results in the fact that afterwards you have a lot of room for your head and arms.
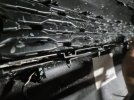
20220929_200838.jpg
It has so many plastic and metal clips it is crazy, if they would use half of it, it would stick as good too.
this were on the top of the grill:
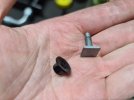
20220929_200852.jpg
These at the bottom, why they do not use the more easier screws, like on the top part, instead of these plastic delicate things, unsure...
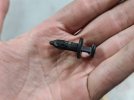
20220929_200914.jpg
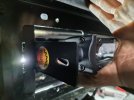
Most delicate of the whole evening. The sensor itself. the connector is quite easy to release. But the sensor and also the bracket for the sensor are very delicate. Luckily nothing broke.
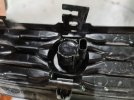
20220929_201244.jpg

Then removed the 2 factory bolts and also released the lower bolt and squeezed the S&G bracket in place.

driver side:
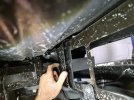
20220929_202012.jpg
passenger side:
20220929_203237.jpg

Cause the grill was open in the front, it was easy to put the led bar via this opening in the car. I rested it on the plastic and then installed the open grill. It is easier than fiddling the led bar from the underside in to the place behind the grill. (y)

tight fit
20220929_203037.jpg


But here it comes to my remark. :eek: As I read here in the topic earlier, I also should better have bought the double row light bar, as it is indeed very low in the grill. But already bought the single row before those posts.
So, Actually the lightbar should be 1 to 1.5cm (so 0.39 to 0.59 inch) higher which would bring it more in the middle of the lower grill.
The opening to mount the light bar to the bracket should not only be an oval opening front to back, as you see on my above picture, but also have the option to mount it lower or higher.

What I will perhaps do is to take a piece of stainless steel, drill 2 holes in it. Use one hole to fix it to the S&G bracket and the other, higher hole, to mount the led bar to it so that it gets more centered.
It is difficult to take a picture of it to see how low it is, but on this below picture you see that it is almost in front of the bumper below the grill instead of the opening. You see that the biggest portion of the lower grill opening is "empty" and at the bottom there you can see the led bar for 80 or 85%.
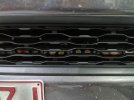
20220929_220518.jpg
 
Awesome write up with photos! We appreciate that! I have a Limited as well. My plan is to drill holes into the brackets themselves above the existing slot where there’s enough meat before attaching to the bumper.

@Shifts And Grins Fab - is there a plan to also add these extra holes or slots above the ones you already have on your brackets to give the other trims the adjustment factor? This way the instructions can say “TRX/Rebel mount light bar to lower holes. All other trims suggest to use top holes.” I’d gladly pay a little extra for that just so that I don’t have to do it myself. I used to enjoy fabbing or modifying things like this but I got a little burnt out on it & strapped as ever on spare time. I have the tools & ability to do so, just at this point would prefer to pay extra to have ready to roll. Just a thought is all. 😎
A customer with a limited drilled holes halfway between the the existing holes and top of the bracket. This centered his bar or very close to it. I am almost sold out of the current run so I will likely be ordering more materials this week to build a new run with the added slot splitting that difference. That will allow the other than Rebel and TRX trucks to move the bar up. Looks like version 4.0 is coming. lol. I am always up for improving our products to better serve you all and have a better and easier overall product to work with for our customers.
 
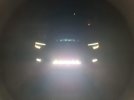
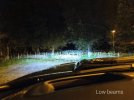
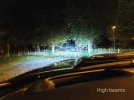
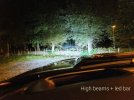
But the result is still ok when the light is on, although the high beams on the truck are really decent too I have to admit.
So I think that centering the LED bar or putting it so that it shines a bit higher in the air will improve some more.

View attachment 140122

View attachment 140123
View attachment 140124
View attachment 140125
Great write up. We will be adding another slotted hole above the current slotted hole on the next run. Thank you for the feedback.
 
that is great, version 4 will help many new customers, a pity I don't have a version 4 hahaha
A pity that I don't have the double row, as I checked the RC website and the price difference is not a lot. But even then I think that bar would still need to sit a bit higher as well.
 
Great write up and photos. That really helps paint the picture for a game plan, I have some time off coming and i'm tempted to get this done. I have a curved dual row sitting on the shelf that i'm going to see abut using. And a Trigger 4 wireless/bluetooth switch set up. half want to install the hood Rigid D2s I have at the same time.. I just need mounts. Now my wheels are turning. would be nice to get this pile of parts off the shelf finally. I'll have to see if I have the lower grille in stock at work. If I recall; that is a part number 68334531AD
 
Great write up and photos. That really helps paint the picture for a game plan, I have some time off coming and i'm tempted to get this done. I have a curved dual row sitting on the shelf that i'm going to see abut using. And a Trigger 4 wireless/bluetooth switch set up. half want to install the hood Rigid D2s I have at the same time.. I just need mounts. Now my wheels are turning. would be nice to get this pile of parts off the shelf finally. I'll have to see if I have the lower grille in stock at work. If I recall; that is a part number 68334531AD

Thanks man.

And indeed, that partnumber is correct.
grill

and if you do not want to fiddle with the sensor brackets like I did, I guess these are the ones you need:

 
Thanks man.

And indeed, that partnumber is correct.
grill

and if you do not want to fiddle with the sensor brackets like I did, I guess these are the ones you need:


Thanks for posting this & making it easy! I’m pretty sure I will accidentally break at least one of these no matter how I try.
 
Hey @Shifts And Grins Fab . Would you mind posting a specs drawing for the 4th gen version of these brackets? Those of us with previous versions who do not have the light coming straight through the opening are interested in where exactly the new hole would be located.

I don't know what version i have, but I bought them sometime this past July I believe.
Likely half the distance from current mount hole to the edge i would assume.
 
fingers crossed mine live
 
Very likely, but justvwant to be sure. I don't have much of a metal shop, so doing this with a drill.
We have them in stock at work...super cheap, may grab them just in case. Do they twist out? Can not say I have ever pulled them out. Or maybe a tab pushes in then they come out?
 
Hey @Shifts And Grins Fab . Would you mind posting a specs drawing for the 4th gen version of these brackets? Those of us with previous versions who do not have the light coming straight through the opening are interested in where exactly the new hole would be located.

I don't know what version i have, but I bought them sometime this past July I believe.
Regardless of the version you have there has never been a change to the part the light actually mounts to. The only changes have been to the base plate that bolts to the truck. As far as the newest version when they get released, they will have another slot identical to the current light mount slot halfway between the current slot and the edge.
 
Great write up and photos. That really helps paint the picture for a game plan, I have some time off coming and i'm tempted to get this done. I have a curved dual row sitting on the shelf that i'm going to see abut using. And a Trigger 4 wireless/bluetooth switch set up. half want to install the hood Rigid D2s I have at the same time.. I just need mounts. Now my wheels are turning. would be nice to get this pile of parts off the shelf finally. I'll have to see if I have the lower grille in stock at work. If I recall; that is a part number 68334531AD
We have ditch light/ A pillar brackets as well. Let us know if we can help.
 
Are you referring to the park sensors?
Yeah, was not sure how they popped out, I picked up some new bracket/retainers just in case today at work. Just waiting to have them dropped by my office. Cannot say I have ever removed them before.
We have ditch light/ A pillar brackets as well. Let us know if we can help.
Yepper planned to check it out today/tonight. Are they painted or powder coated by the way?
 
But the result is still ok when the light is on, although the high beams on the truck are really decent too I have to admit.
So I think that centering the LED bar or putting it so that it shines a bit higher in the air will improve some more.

View attachment 140122

View attachment 140123
View attachment 140124
View attachment 140125
Excellent write-up with pictures! Thanks!
Honestly, I'm a bit underwhelmed by the additional light this brings, so indeed, I guess changing the position of the led bar might help with this. Would be very interested in some more pictures after you made any changes.
It's great to see though, as for now, it tempers my enthusiasm a bit for doing this upgrade :-) So thanks!
 
On those nuts, just a guess, are they an 8mm? Just curious if you recall at all. If not no worries.

I'll be doing mine this weekend, And I'll likely remove the active flap for work room and reinstall it when done. It is pretty crammed in there with it in place. Do you recall the size of bolt on those. I have been googling but haven't see the wrench size. But I'm just being overly prepared at this point.
 

Users who are viewing this thread

Back
Top