
Finally got all my parts installed and my passive entry is working flawlessly. I am extremely thankful to @MayhemMOORE, @Jimmy07 and all who worked hard at making this a success, as I took my truck back to the dealer to trade it in about a week after buying it. (luckily they didn't have anything I liked). Awesome upgrade pretty simple if you follow the write up.
5thGenRams Forums
You are using an out of date browser. It may not display this or other websites correctly.
You should upgrade or use an alternative browser.
You should upgrade or use an alternative browser.
Adding Passive Entry: How-to
- Thread starter MayhemMOORE
- Start date
Just finished mine today as well, details were great. Followed everything and everything went smoothly, I changed out all four handles for the all white ones and got rid of the chrome strip. The one thing I did different was when mounting the rear bumper antenna. I have a 2019+ Bighorn and there was a spot behind the license plate that looks like it was made to hold the antenna, I mounted it there. Didn't have to remove any of the bumper. Just drop the spare to be able to get in there to work. Thanks so much to @MayhemMOORE, @Jimmy07.
Attachments
edehosse
Active Member
Another successful install here. Finally the truck is the way it should have been from the factory! Thanks @MayhemMOORE and @Jimmy07 !!
Funny how when you do the drivers side first, the passenger side takes a quarter of the time.
Funny how when you do the drivers side first, the passenger side takes a quarter of the time.
RyanZ
Active Member
- Joined
- May 28, 2020
- Messages
- 32
- Reaction score
- 9
- Points
- 8
- Age
- 38
Looking at making my own harness to save the $ and rear wiring parts on digi-key but for the doors I'm having a hard time finding the following. Anyone find a source or we all using @
Jimmy07 for harnesses? I love to tinker so trying to do it myself.
Door Connector Terminals: Aptiv 10762775
Door Handle Connector Shell: Yazaki 7283-6079-30
Door Handle Connector Shell Terminals: Yazaki 7116-4720-02
Jimmy07 for harnesses? I love to tinker so trying to do it myself.
Door Connector Terminals: Aptiv 10762775
Door Handle Connector Shell: Yazaki 7283-6079-30
Door Handle Connector Shell Terminals: Yazaki 7116-4720-02
edehosse
Active Member
I had every intention of taking some vid/snapping more pics during my install, but I got involved and forgot all about it. I did note a few tips during my install that may help others:Will someone please record the install of this! This would be an awesome How-To Video!
- When removing the harness from the door jamb - I found it a lot easier to use a trim tool and remove the rubber boot from the connector before trying to release the connector from the sheetmetal. Once the boot is pulled back, it exposes three release tabs, one top and two bottom, that when pressed makes the connector removal a piece of cake.
- The two pesky bolts that fasten the carrier plate on the inside - The original write-up states to reach in through the speaker hole to access them. I found that impossible as I could only get my arm in maybe 6" or so. Best method I found was to remove all of the exterior carrier plate bolts, then gently pull the plate back at the speaker hole and reach in from the top with an 8mm gear wrench to remove the last two interior bolts. Really strange design, and would love to see how they assemble that at the factory...
- Pay very close attention to the routing of the inside latch release cable when re-installing the carrier plate. If you accidentally route it in front of the window track, you won't discover your error until you're almost ready to put the door panel back on, and will use a lot of choice words once you realize you have to pull everything back apart to fix it.
- It is helpful to have a pair of body clip pliers handy. I've attached a pic of the ones I used. Make really quick work of removing the female portion of the door panel clips when they pull from the door and stay with the panel.
- Be VERY gentle with anything plastic on these trucks. It is all EXTREMELY brittle. Learned a $40 lesson and will be replacing the drivers inside release latch due to impatience and brute force.

Last edited:
- Joined
- Apr 11, 2019
- Messages
- 2,563
- Reaction score
- 3,114
- Points
- 113
The Aptiv terminals are available at mouser- https://www.mouser.com/ProductDetail/Aptiv-formerly-Delphi/10762775-L?qs=BfWxhSndWVuNyNctiONiFA==Looking at making my own harness to save the $ and rear wiring parts on digi-key but for the doors I'm having a hard time finding the following. Anyone find a source or we all using @
Jimmy07 for harnesses? I love to tinker so trying to do it myself.
Door Connector Terminals: Aptiv 10762775
Door Handle Connector Shell: Yazaki 7283-6079-30
Door Handle Connector Shell Terminals: Yazaki 7116-4720-02
The Yazaki stuff is a pain because of minimum order quantities. SMD Inc carries all the Yazaki parts, and if you call them, you might be able to talk them into giving you free samples for those instead of making a $100 minimum order.
MayhemMOORE
Ram Guru
- Joined
- Apr 6, 2020
- Messages
- 572
- Reaction score
- 526
- Points
- 93
I had every intention of taking some vid/snapping more pics during my install, but I got involved and forgot all about it. I did note a few tips during my install that may help others:
View attachment 64251
- When removing the harness from the door jamb - I found it a lot easier to use a trim tool and remove the rubber boot from the connector before trying to release the connector from the sheetmetal. Once the boot is pulled back, it exposes three release tabs, one top and two bottom, that when pressed makes the connector removal a piece of cake.
- The two pesky bolts that fasten the carrier plate on the inside - The original write-up states to reach in through the speaker hole to access them. I found that impossible as I could only get my arm in maybe 6" or so. Best method I found was to remove all of the exterior carrier plate bolts, then gently pull the plate back at the speaker hole and reach in from the top with an 8mm gear wrench to remove the last two interior bolts. Really strange design, and would love to see how they assemble that at the factory...
- Pay very close attention to the routing of the inside latch release cable when re-installing the carrier plate. If you accidentally route it in front of the window track, you won't discover your error until you're almost ready to put the door panel back on, and will use a lot of choice words once you realize you have to pull everything back apart to fix it.
- It is helpful to have a pair of body clip pliers handy. I've attached a pic of the ones I used. Make really quick work of removing the female portion of the door panel clips when they pull from the door and stay with the panel.
- Be VERY gentle with anything plastic on these trucks. It is all EXTREMELY brittle. Learned a $40 lesson and will be replacing the drivers inside release latch due to impatience and brute force.
The pliers are definitely a handy tool to have. As for those 2 bolts on the inside, the factory manual actually says to remove the 3 screws from the latch and then pull it all out as one unit. I could not figure out how they expect that to work given the way the latch is tucked in there. Removing the bolts is a pain for sure.
edehosse
Active Member
The pliers are definitely a handy tool to have. As for those 2 bolts on the inside, the factory manual actually says to remove the 3 screws from the latch and then pull it all out as one unit. I could not figure out how they expect that to work given the way the latch is tucked in there. Removing the bolts is a pain for sure.
That actually makes sense as to how it was assembled at the factory - Everything attached to the carrier plate, then slid into the door cavity and fastened. Those two interior bolts are simply to locate the latch assembly in the proper position until bolted from the outside.
I actually considered removing the three latch bolts to see if it would come out with the carrier, but the heads on them looked like something I didn't have a tool for, and figured they were probably torqued pretty tight.
Midwest Kid
New Member
I ended up not buying harnesses and just buying the connectors and pins.
MayhemMOORE
Ram Guru
- Joined
- Apr 6, 2020
- Messages
- 572
- Reaction score
- 526
- Points
- 93
That actually makes sense as to how it was assembled at the factory - Everything attached to the carrier plate, then slid into the door cavity and fastened. Those two interior bolts are simply to locate the latch assembly in the proper position until bolted from the outside.
I actually considered removing the three latch bolts to see if it would come out with the carrier, but the heads on them looked like something I didn't have a tool for, and figured they were probably torqued pretty tight.
They are just torx head screws, I believe they are T-27 like the one that holds the handle cap on.
2019Rebel0747
Active Member
- Joined
- Jun 14, 2019
- Messages
- 46
- Reaction score
- 12
- Points
- 8
- Age
- 48
Success! Functioning passive entry on both doors. Still waiting on rear bumper antenna so not done yet but the hard part is over. My arms look like I fought off a mountain lion but I got it done. Those two hidden screws are a PITA!
Big shout out and thank you to
MayhemMOORE
Jimmy07
mike_ct
MannyHen
And Swifty for reinvigorating this thread.
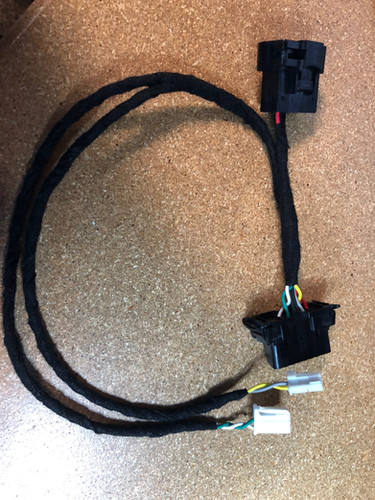
I used Jimm07’s cables (highly recommend) and they are definitely just as quality as OEM. Originally I wanted the OEM harnesses but there are too many part numbers and I didn’t want to have to modify it if it wasn’t right. No worries about losing any existing features either. Save you money and some work by not having to disconnect existing harness and then running the new one. Pinning the cables into the factory harness was easy too for someone who had never done it before.
For those like me who have never used AlphOBD before and don’t have an android device this is what I used:
Fire tablet- $49.99
To get the Fire tablet to access the google play store so you can purchase and use the AlphaOBD software check this link for instructions:

 www.androidpolice.com
OBDLink MX- $99.95 (there are cheaper options but I wanted to be able to read codes with my iPhone)
Security bypass harness-$55
 www.kaodtech.com
AlphaOBD software on Google play store $49
Sent from my iPhone using Tapatalk
Big shout out and thank you to
MayhemMOORE
Jimmy07
mike_ct
MannyHen
And Swifty for reinvigorating this thread.
I used Jimm07’s cables (highly recommend) and they are definitely just as quality as OEM. Originally I wanted the OEM harnesses but there are too many part numbers and I didn’t want to have to modify it if it wasn’t right. No worries about losing any existing features either. Save you money and some work by not having to disconnect existing harness and then running the new one. Pinning the cables into the factory harness was easy too for someone who had never done it before.
For those like me who have never used AlphOBD before and don’t have an android device this is what I used:
Fire tablet- $49.99
To get the Fire tablet to access the google play store so you can purchase and use the AlphaOBD software check this link for instructions:
How to install the Google Play Store on every Amazon Fire tablet
Get the apps you want on your brand-new device
www.androidpolice.com
OBDLink MX- $99.95 (there are cheaper options but I wanted to be able to read codes with my iPhone)
Amazon.com: OBDLink MX+ OBD2 Bluetooth Scanner for iPhone, Android, and Windows: Automotive
Buy OBDLink MX+ OBD2 Bluetooth Scanner for iPhone, Android, and Windows: Code Readers & Scan Tools - Amazon.com ✓ FREE DELIVERY possible on eligible purchases
www.amazon.com
Security bypass harness-$55
Security Module Bypass | KaodTech
Will Ship 3-5 Business Days after OrderIf you have a 2018 - 2024 RAM and would like to perform diagnostics or make changes to the modules of your truck using tools like AlfaOBD or AutoEngenuity, this bypass is for you.Does this allow access to all modules?It has been tested connecting to the BCM...
AlphaOBD software on Google play store $49
Sent from my iPhone using Tapatalk
z0n3
Ram Guru
- Joined
- Jun 16, 2019
- Messages
- 1,722
- Reaction score
- 1,378
- Points
- 113
- Age
- 33
Success! Functioning passive entry on both doors. Still waiting on rear bumper antenna so not done yet but the hard part is over. My arms look like I fought off a mountain lion but I got it done. Those two hidden screws are a PITA!
Big shout out and thank you to
MayhemMOORE
Jimmy07
mike_ct
MannyHen
And Swifty for reinvigorating this thread.
I used Jimm07’s cables (highly recommend) and they are definitely just as quality as OEM. Originally I wanted the OEM harnesses but there are too many part numbers and I didn’t want to have to modify it if it wasn’t right. No worries about losing any existing features either. Save you money and some work by not having to disconnect existing harness and then running the new one. Pinning the cables into the factory harness was easy too for someone who had never done it before.
For those like me who have never used AlphOBD before and don’t have an android device this is what I used:
Fire tablet- $49.99
To get the Fire tablet to access the google play store so you can purchase and use the AlphaOBD software check this link for instructions:
How to install the Google Play Store on every Amazon Fire tablet
Get the apps you want on your brand-new device
OBDLink MX- $99.95 (there are cheaper options but I wanted to be able to read codes with my iPhone)
Amazon.com: OBDLink MX+ OBD2 Bluetooth Scanner for iPhone, Android, and Windows: Automotive
Buy OBDLink MX+ OBD2 Bluetooth Scanner for iPhone, Android, and Windows: Code Readers & Scan Tools - Amazon.com ✓ FREE DELIVERY possible on eligible purchaseswww.amazon.com
Security bypass harness-$55
Security Module Bypass | KaodTech
Will Ship 3-5 Business Days after OrderIf you have a 2018 - 2024 RAM and would like to perform diagnostics or make changes to the modules of your truck using tools like AlfaOBD or AutoEngenuity, this bypass is for you.Does this allow access to all modules?It has been tested connecting to the BCM...
AlphaOBD software on Google play store $49
Sent from my iPhone using Tapatalk
Does this do the same thing as the security bypass harness? Is it just bluetooth where yours is a wired connection?
2019Rebel0747
Active Member
- Joined
- Jun 14, 2019
- Messages
- 46
- Reaction score
- 12
- Points
- 8
- Age
- 48
Does this do the same thing as the security bypass harness? Is it just bluetooth where yours is a wired connection?
If you are referring to the OBDLink it can only read (codes, check engine) not write anything to the BCM. You need the security bypass harness to change any settings.
You’ll need a version of both to accomplish adding passive entry plus a method of running the AlphaOBD software through them.
Sent from my iPhone using Tapatalk
z0n3
Ram Guru
- Joined
- Jun 16, 2019
- Messages
- 1,722
- Reaction score
- 1,378
- Points
- 113
- Age
- 33
I was more referencing the security module bypass you posted. Ive seen people post the one you have and the one from infotainment which is just a small plug. Wondering what the difference of these two is.If you are referring to the OBDLink it can only read (codes, check engine) not write anything to the BCM. You need the security bypass harness to change any settings.
You’ll need a version of both to accomplish adding passive entry plus a method of running the AlphaOBD software through them.
Sent from my iPhone using Tapatalk
- Joined
- Apr 11, 2019
- Messages
- 2,563
- Reaction score
- 3,114
- Points
- 113
The major difference is, the one from infotainment REPLACES the security gateway module, leaving the radio vulnerable (slim chance of hacking, but the major reason the gateway was implemented). The kaodtech cable grabs the can c and can ihs busses AFTER the gateway, and leaves security in place.I was more referencing the security module bypass you posted. Ive seen people post the one you have and the one from infotainment which is just a small plug. Wondering what the difference of these two is.
2019Rebel0747
Active Member
- Joined
- Jun 14, 2019
- Messages
- 46
- Reaction score
- 12
- Points
- 8
- Age
- 48
I was more referencing the security module bypass you posted. Ive seen people post the one you have and the one from infotainment which is just a small plug. Wondering what the difference of these two is.
Yeah I don’t have any info on that one. They accomplish the same thing. The one I listed was suggested to me.
Sent from my iPhone using Tapatalk
2019Rebel0747
Active Member
- Joined
- Jun 14, 2019
- Messages
- 46
- Reaction score
- 12
- Points
- 8
- Age
- 48
Rear antenna showed up today. What size bolts do I need to install it? Want to grab them on the way home and don’t have the antenna with me...
Sent from my iPhone using Tapatalk
Sent from my iPhone using Tapatalk
Users who are viewing this thread
Total: 1 (members: 0, guests: 1)


