5thGenRams Forums

Register a free account today to become a member! Once signed in, you'll be able to participate on this site by adding your own topics and posts, as well as connect with other members through your own private inbox!

Adding Passive Entry: How-to

Rear antenna showed up today. What size bolts do I need to install it? Want to grab them on the way home and don’t have the antenna with me...


Sent from my iPhone using Tapatalk

I ended up just using wire ties to secure my rear antenna in place. The plastic pocket that it installs in has two square holes that look to accept a clip in threaded insert that would have to be assembled from the rear with the bumper step removed. Wasn't up for trying to remove the step and breaking half the clips in the process.

I slid mine in from the side, and since I had the interior antenna with mount holes on opposite sides, I used one of the square holes, drilled a small hole on the left side to accept a wire tie, two 4" ties and done. Not going anywhere, and just have to snip a couple ties if I need to remove it for any reason.
 
I just drilled out the tabs on the antenna slightly and used some push fasteners for now. I had gotten some of the plugs for the square holes, but without taking off the bumper cover there wasn't enough room the get the bolts in. I may just end up drilling holes through it behind the license plate since there's already 4 there anyway. Then I can secure it with some bolts. But zip ties or plastic fasteners are likely more than sufficient to hold it.
 
I ended up just using wire ties to secure my rear antenna in place. The plastic pocket that it installs in has two square holes that look to accept a clip in threaded insert that would have to be assembled from the rear with the bumper step removed. Wasn't up for trying to remove the step and breaking half the clips in the process.

I slid mine in from the side, and since I had the interior antenna with mount holes on opposite sides, I used one of the square holes, drilled a small hole on the left side to accept a wire tie, two 4" ties and done. Not going anywhere, and just have to snip a couple ties if I need to remove it for any reason.

I did the same -- zip ties and I added a piece of double sided adhesive to the back. Probably isn't actually sticking to anything anymore but figured it can't hurt.
 
Got everything ordered! I'll attempt to record a video of my install and ya'll be available please for when I'm stuck lol! Been reading this thread over and over trying to make sure I got the process down.
 
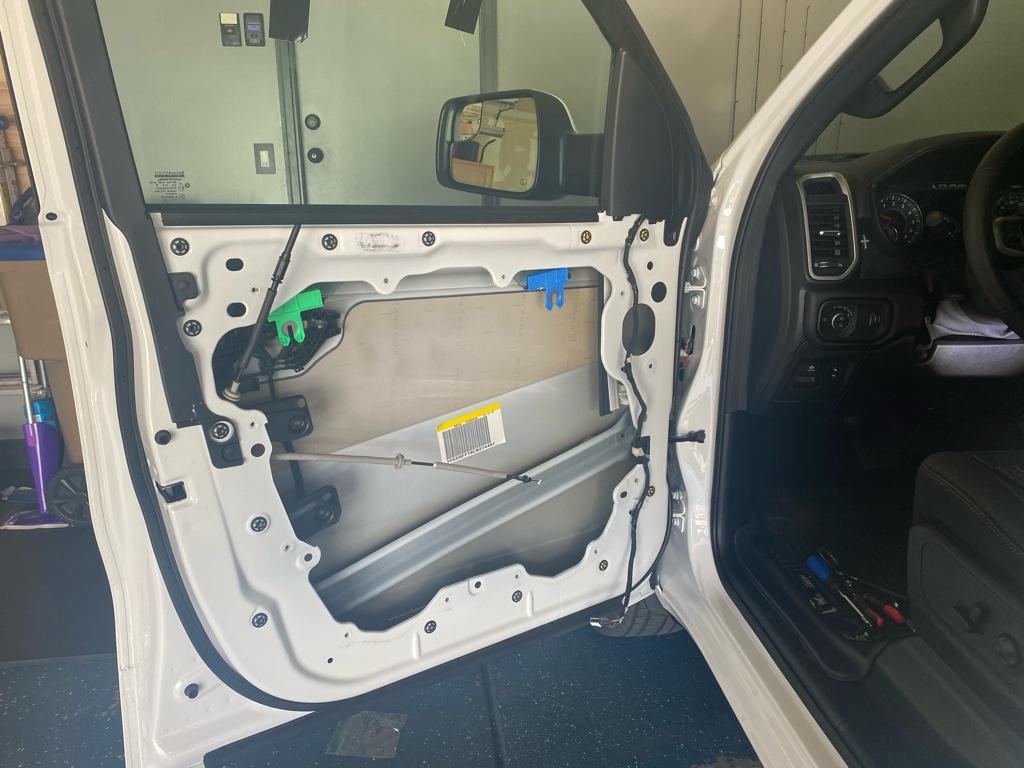
This entire black circled thing is the carrier plate? Once you remove all of the bolts along the outside of it, removing the speaker and reaching inside should gain you access to the two bolts to allow complete removal correct? Or are you only needing to pull the top half out to get to the door handle area and run the cable? Having a hard time picturing this step lol. Did anyone take pictures of this step, or take pictures of how you routed the new cables?

1596573603280.png
 
Last edited:
This entire black circled thing is the carrier plate? Once you remove all of the bolts along the outside of it, removing the speaker and reaching inside should gain you access to the two bolts to allow complete removal correct? Or are you only needing to pull the top half out to get to the door handle area and run the cable? Having a hard time picturing this step lol. Did anyone take pictures of this step, or take pictures of how you routed the new cables?

View attachment 64363

Remove the whole panel so you end up with this. You will see the window track on the latch side of the door, and you’ll need to run the wiring around the outside of it. There’s some clips to hold it in place that are a pain to reach. That’s probably the worst part of all this. It’s also one spot I don’t have a photo of. You can see where the two hidden bolts attach to the latch assembly in this pic as well.

8d510f76c4a930ebb8f24ecee1a77a6d.jpg
 
This entire black circled thing is the carrier plate? Once you remove all of the bolts along the outside of it, removing the speaker and reaching inside should gain you access to the two bolts to allow complete removal correct? Or are you only needing to pull the top half out to get to the door handle area and run the cable? Having a hard time picturing this step lol. Did anyone take pictures of this step, or take pictures of how you routed the new cables?

View attachment 64363
After removing bolts you can pull the carrier plate out enough to get an arm and 1/4 ratchet back there to do the other 2 bolts. The bolts go through 2 rather flexible plastic arms that give you some room to bend.
 
Rear antenna showed up today. What size bolts do I need to install it? Want to grab them on the way home and don’t have the antenna with me...


Sent from my iPhone using Tapatalk
I ended up using a single wire tie in the one hole that lined up with the $8 sensor. The cubby it sits in supports and surrounds all sides but 1 so you just need something to keep it from sliding out.
 
Just for information, if you buy a new door harness, you can salvage the 2 terminals needed for rear sensor install from the old harness. I think it might have been the speaker connector that had the right ones. Was a 2 pin connector with green/lime and green/purple wires.
 
This entire black circled thing is the carrier plate? Once you remove all of the bolts along the outside of it, removing the speaker and reaching inside should gain you access to the two bolts to allow complete removal correct? Or are you only needing to pull the top half out to get to the door handle area and run the cable? Having a hard time picturing this step lol. Did anyone take pictures of this step, or take pictures of how you routed the new cables?

View attachment 64363
I was able to manage it without taking off the entire panel, but I still removed all the exterior bolts along with the 2 bolts inside the panel to give it a little more wiggle room. I rested it on a 5 gal bucket while I worked around the side but didn't detach the entire wiring harness.
 
You guys are killin it. Quick question, for the HD guys does this all carry over?
 
You guys are killin it. Quick question, for the HD guys does this all carry over?

It's all pretty similar. From what I've been told, the wires use different terminals in the door connectors on the HD's. I'm working with a guy at work on getting his done, so once I have more info I can update one of the reserved spots at the beginning with the info on the HD's.
 
Add another one to the list! I still need to add the rear antenna, but the front doors work perfectly.

When I purchased my ecodiesel in January, I reactivated on some forums I had been on previously. I found THIS forum by searching for Passive Entry issues. I told my wife in January that there some REALLY smart people on this forum and I was confident "someone" or multiple "someones" would figure this issue out. I VERY much appreciate the time and effort others have put into solving this issue so that others simply had to follow instructions and buy the correct parts!

One last comment. My wife asked me why passive entry was such a big deal. I had 2 reasons.

1. I miss having that feature
2. FCA telling us we CAN'T have passive entry on a Bighorn was all the motivation I needed!

Thanks everyone.
 
success.. doors are working as they should. need to add rear antenna, ah... another day! heat index was too high to continue.
Typical learning curve stuff. Second door went much faster.
Thanks for all the help.
Used jimmy07's wiring and Mannyhen's part numbers and MayhemMOORE's instructions.

Getting to the wiring harness door to chassis was troublesome and the two hidden screws were a bear.
gotta order some replacement pins, then good.
 
Last edited:
First off I would like to take a moment to thank everyone here that played a part in getting Passive Entry working, couldn't have done it without everyone's input.
You guys rock!!! This forum rocks!!!

This is my first Ram, like everyone, I thought that Bighorn Level 2 would have included this option and the wording 'Keyless Entry N Go' is very misleading on FCA's part.
Never used Alfaobd before, fairly easy to use. Just like anything, the more you use the easier it gets.


I finally got everything installed and it works as intended.

Here is list of the parts I used, 2019DT Bighorn, Level 2, 8.4 w/Nav:

Granite Chrystal Metallic w/chrome insert
2X Door Handles 6CV361AUAD
1X LF Door Handle Cap 6CV50LAUAC
1x RT Door Handle Cap 6CV52LAUAB
1X Rear Antenna 52112204AA
I used the harnesses that Jimmy07 made for me, did an awesome job, very professional looking.

Thanks again to everyone!
 
rear antenna was a breeze with the pictures. I used double sided tape and padded it w/ some soft foam wire wrap I had from another project.
thanks again.
 
I'm looking at this thread for information of pulling the door module out of my laramie for sound deadening. Does the door lock come out with the door module or can it be left in the vehicle?
 
When installing the rear antenna is it necessary to remove the plastic cover on the top of the bumper? Or can this be installed by climbing under the bumper?
 
When installing the rear antenna is it necessary to remove the plastic cover on the top of the bumper? Or can this be installed by climbing under the bumper?

Do it from under/behind the bumper. I attempted to follow the service manual instructions and due to the design of the clips, I did not see a way of doing it without breaking them all. Drop the spare tire down and there is plenty of room to work.
 
Do it from under/behind the bumper. I attempted to follow the service manual instructions and due to the design of the clips, I did not see a way of doing it without breaking them all. Drop the spare tire down and there is plenty of room to work.
Thats what I figured. If i had to remove that to install the antenna I may as well buy a new part because it wouldn't make it out in one piece.
 

Users who are viewing this thread

Back
Top