5thGenRams Forums

Register a free account today to become a member! Once signed in, you'll be able to participate on this site by adding your own topics and posts, as well as connect with other members through your own private inbox!

What did you do to your Ram today???

AdamChandler

Ram Guru
Joined
Jan 2, 2021
Messages
596
Reaction score
1,399
Location
Lebanon, NH
Not too many camping days left so wife and I spent 2 days out in the woods. Just 15 miles from the house. Low last night was 32 degrees. Dog kept us warm:
IpFo61H.jpg
qbfGfPj.jpg
2Z9otgy.jpg
U2sU2NW.jpg
3QoCd9c.jpg
DdgQblD.jpg


Camping again next weekend if the weather holds out. My friends from Quebec come down for their thanksgiving and we ride dirt bikes around in the woods. Looking forward to it!
 

CMil527

Spends too much time on here
Joined
Nov 23, 2020
Messages
2,324
Reaction score
1,092
Location
Old Bridge, NJ
Not too many camping days left so wife and I spent 2 days out in the woods. Just 15 miles from the house. Low last night was 32 degrees. Dog kept us warm:
IpFo61H.jpg
qbfGfPj.jpg
2Z9otgy.jpg
U2sU2NW.jpg
3QoCd9c.jpg
DdgQblD.jpg


Camping again next weekend if the weather holds out. My friends from Quebec come down for their thanksgiving and we ride dirt bikes around in the woods. Looking forward to it!
Great shots!
 

JamRam

Ram Guru
Joined
Aug 17, 2021
Messages
655
Reaction score
1,395
Pulled my driveshaft today to regrease it and get rid of the driveshaft binding bump at stop lights.

20221001_130215.jpg


This is how it came out.
It appears to me the the grease simply gets used up and vaporized as there was very minimal grease left on it when I removed it, female side looked the same.
There's no grease in the plastic accordion dust boot nor any running down the driveshaft, its just gone.
Below is same way I greased it 25K miles ago


20221001_130716.jpg


Now re-greased and ready for reassembly.
About to run some errands and will check it but I am 1000% confident that it will butter smooth again just like last time.
Took about 5 min to remove and 20 min all together. Toughest part is compressing the two halves together with that grease; aligned/phased the 2 shaft halves, put a new clamp on and done.

Yes my truck is under warranty and they would fix this but I'd have to take it in, spend 20 min talking to them, get a rental or a ride home then be without the truck the 1-5 days it would take them to look at and address this. Took me 20-30 min including putting tools away. Dealer service isn't worth the time for this.
I would be interested in a how-to write up on this. 👍
 

2019Raven

Active Member
Joined
Jun 22, 2022
Messages
97
Reaction score
119
Pulled my driveshaft today to regrease it and get rid of the driveshaft binding bump at stop lights.

20221001_130215.jpg


This is how it came out.
It appears to me the the grease simply gets used up and vaporized as there was very minimal grease left on it when I removed it, female side looked the same.
There's no grease in the plastic accordion dust boot nor any running down the driveshaft, its just gone.
Below is same way I greased it 25K miles ago


20221001_130716.jpg


Now re-greased and ready for reassembly.
About to run some errands and will check it but I am 1000% confident that it will butter smooth again just like last time.
Took about 5 min to remove and 20 min all together. Toughest part is compressing the two halves together with that grease; aligned/phased the 2 shaft halves, put a new clamp on and done.

Yes my truck is under warranty and they would fix this but I'd have to take it in, spend 20 min talking to them, get a rental or a ride home then be without the truck the 1-5 days it would take them to look at and address this. Took me 20-30 min including putting tools away. Dealer service isn't worth the time for this.
Would love a how-to written up about this also.
 

Nsleone

Ram Guru
Joined
Sep 20, 2020
Messages
711
Reaction score
619
Location
Florida
Pulled my driveshaft today to regrease it and get rid of the driveshaft binding bump at stop lights.

20221001_130215.jpg


This is how it came out.
It appears to me the the grease simply gets used up and vaporized as there was very minimal grease left on it when I removed it, female side looked the same.
There's no grease in the plastic accordion dust boot nor any running down the driveshaft, its just gone.
Below is same way I greased it 25K miles ago


20221001_130716.jpg


Now re-greased and ready for reassembly.
About to run some errands and will check it but I am 1000% confident that it will butter smooth again just like last time.
Took about 5 min to remove and 20 min all together. Toughest part is compressing the two halves together with that grease; aligned/phased the 2 shaft halves, put a new clamp on and done.

Yes my truck is under warranty and they would fix this but I'd have to take it in, spend 20 min talking to them, get a rental or a ride home then be without the truck the 1-5 days it would take them to look at and address this. Took me 20-30 min including putting tools away. Dealer service isn't worth the time for this.
Guess I need to do this too, starting to notice a strong thud feeling when it stops the motor at a light. What grease did you use?
 

BowDown

Spends too much time on here
Joined
Mar 20, 2020
Messages
3,339
Reaction score
3,438
Location
Frisco TX
Guess I need to do this too, starting to notice a strong thud feeling when it stops the motor at a light. What grease did you use?

Schaeffer Manufacturing Co. 02292-029S Ultra Red Supreme Grease, NLGI #2, 14 oz.​


Pack of these clamps

Stainless Steel Universal Adjustable AXLE CV Joint Boot Crimp Clamp Kit,24PCS​


Lisle 30800 CV Boot Clamp Pliers​


BowDown

Spends too much time on here
Joined
Mar 20, 2020
Messages
3,339
Reaction score
3,438
Location
Frisco TX
I would be interested in a how-to write up on this. 👍

Would love a how-to written up about this also.

Here you go

My truck is a limited so I started off placing the truck in Off-Road 2 so I didn't need to jack it up

Tools:
1/2" or 3/8" 15MM Socket

1/2" or 3/8" Impact gun

(I used a Kobalt 1/2" gun the 1st time, it took the drive shaft flange bolts off easily, they are very very tight and have blue Loctite on them
I bought a Milwaukee 2960-22 Combo on sale at Home Depot a few months ago so I used it. The reason for the Milwaukee is that it is 1/2 the size of the Kobalt 1/2" gun and gets into the space between the drive shaft and the muffler much easier and can use a shorter extension because its far smaller than the big gun. You can do this with a 1/2 hand tools but you will need a big ratchet, those bolts are on there. The impact gun will make life far easier.)

Screenshot 2022-10-02 093709.png


swivel
(I use these from harbor as they don't move very much)

Screenshot 2022-10-02 093029.png

3/8" 8"-12" extension drive
angle cutters (to remove Dust Cover boot)
CV Boot clamp tool
Grease and CV Boot Clamp


1. Set the emergency brake (I chocked the front wheels too)
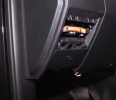
2. Open emergency neutral switch door and pull the orange Manual Neutral lever placing the trans in neutral

Screenshot 2022-10-02 092345.png

3. Lift the rear of the truck if yours is too low, mine is normally in Aero Mode so its too low. Off Road 2 lifts it high enough for me to get under and keep the tires on the ground.
4. Slide under the rear of the truck (I went under Infront of the rear tires so I was facing the diff) with your angle cutters, impact wrench, extension, swivel (at the end of the extension) and 15MM socket
4A. Optional but probably a good idea, use a white grease pencil and mark both the end of the dust boot and the driveshaft with a line for reassembly
5. Cut the rear or the front dust boot clamp and remove it, you don't need to remove the both clamps, just one. I removed the rear clamp leaving the boot on the front section of the driveshaft.
6. With your impact wrench and socket, remove the four 15mm bolts form the rear of the driveshaft where it attaches to the differential, you can get to all 4 bolts without having to rotate the diff pinion flange.
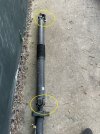
7. This is important, notate the drive shaft u joint ears orientation, they all need to be facing the same direction on reassembly, note the two yellow circles, otherwise you'll get a vibration on acceleration

s-l1600.jpg
8. The rear section of the drive shaft is 2 pieces, slide the rear section of the drive shaft out of the front 1/2 of the rear section. It will come apart with minimal effort.
(the above pic is just for illustration, I did not (you do not) need to remove the entire drive shaft or even only the rear section. All you need to grease is the rear male end of the drive shaft)


9. Take the rear section and place it on a work bench and check for wear or damage, wipe it clean then regrease
20221001_130215.jpg

10. Regrease the entire length of the splines with some extra grease towards the front. As you reinsert the male shaft into the female receiver shaft, the grease will be pushed back from towards the rear of the shaft.

20221001_130716.jpg

11. Reassemble making sure that you orient the U-Joint yokes the same as the front yokes, see image in step 7.
The easiest way for me was to rotate the drive shaft still attached to the trans to the point were all the u-joint yoke ears were pointing straight down, I then took the newly greased section and oriented it so its rear u-joint yoke ear was also facing down and inserted it into the dust cover then into the female section of the shaft.
It doesn't matter if you reassemble the shaft 180° out from the way it was (bottom u-joint yoke is now top or vice versa) the two yoke sides are weighted the same, mine had two 1.60oz weights on both sides yoke ears so it was identical however you would probably be smart to use a white grease pencil and mark both the end of the dust boot and the driveshaft.

12. This was the most difficult step, once you've aligned the driveshaft halves, you will need to push the male shaft into the female end, the schaffer high tack grease makes that difficult.
I placed one foot on the axle tube and my two hands around the tail end of the drive shaft and pulled it together until it collapsed enough to get on over pinion yoke of the differential.

13. At this point, re-check your yoke alignment and ensure that all 3 u-joint yoke ears are aligned (pointing straight down). It is very easy to get the rear section one spline off so double check it.

14. Once you're satisfied with the alignment, place some blue Loctite (242) one the bolts, snug the bolts up so the driveshaft flange sits flat on the diff pinion flange then tighten with your impact wrench.
15. Torque driveshaft bolts to 81ftlbs
Screenshot 2022-10-02 103422.png

16. Install a new dust shield clamp and clamp with your tool.

That's it, looks like a lot but it took an hour the 1st time I did it and 20-30 minutes this time. Took it for a test drive yesterday and it was butter smooth, zero sensation at stops or with auto stop/start. Its so smooth now that I have to look at the tach/AutoStart icon to see if its off and no bumps at stops lights.
 

Attachments

  • s-l1600.jpg
    s-l1600.jpg
    288 KB · Views: 36
  • Screenshot 2022-10-02 092345.png
    Screenshot 2022-10-02 092345.png
    334.8 KB · Views: 37
  • Screenshot 2022-10-02 092345.png
    Screenshot 2022-10-02 092345.png
    334.8 KB · Views: 36
Last edited:

Scap

Ram Guru
Joined
Feb 1, 2021
Messages
1,710
Reaction score
4,792
Spent almost 7 hours in the seat yesterday.
No seat feels good after that long, but yowza my backside was not happy.
 

Wirerat

Active Member
Joined
Apr 18, 2021
Messages
118
Reaction score
120
Diy oil change with pup and Fram xg filter. Ordered one of those flexable funnels from amazon. It made the job a lot less messy.
 

Wirerat

Active Member
Joined
Apr 18, 2021
Messages
118
Reaction score
120
The Oil Udder?
Flex drain tool

On my 4th Gen I used the plastic bag over the oil filter. This bendy funnel was better. I shaped it to mostly flat V and slid it under the filter, pointed over my drain pan and then loosened the filter. Also, it wedged right in between the sway bar and oil pan for draining.
 
Last edited:

Jeepdinger

Active Member
Joined
Jun 10, 2019
Messages
61
Reaction score
93
Flex drain tool

On my 4th Gen I used the plastic bag over the oil filter. This bendy funnel was better. I shaped it to mostly flat V and slid it under the filter, pointed over my drain pan and then loosened the filter. Also, it wedged right in between the sway bar and oil pan for draining.
Looks like you could just cut a gallon of milk jug so that it's shaped like this. then you could even have the molded in handle and spout if you needed it...
 

William1034

Active Member
Joined
Nov 26, 2020
Messages
67
Reaction score
82
Location
Austin
I installed the Borla S Type today. I haven’t worked on cars in many years, and I have limited mechanical abilities. I watched all the videos, bought all the tools. I really thought I could do this with minimal pain. Nope. First, I got 6 ton jacks so I could lift the truck up high enough to pull the exhaust without cutting it, epic fail. First, don’t jack the truck up that high. Makes it impossible to reach the hangars and clamps when re-installing the exhaust. Second, the clamp on the passenger side pipe, above the axle is awful to remove. Maybe there is a trick, I couldn’t make it budge. At this point I brought out the sawzall. I didn’t make the cut close enough to the axle, so I had to make another cut. No point in saving the drivers side, cut it off too. Installing the borla was easier than taking it off. Would have been easier if I hadn’t jacked the truck up so high. Also, use lots of wd-40 in and on the hangars. You need lots of lube to get it in 😆. Finally, don’t believe the videos. It isn’t as easy as it looks if you are mechanically challenged. Glad I love the final result. In the end it was worth it.
 

Wirerat

Active Member
Joined
Apr 18, 2021
Messages
118
Reaction score
120
Looks like you could just cut a gallon of milk jug so that it's shaped like this. then you could even have the molded in handle and spout if you needed it...
Yea, lots of ways to get creative with it. I didn't mind the $17 for something easy to clean that fits in my tool box.
 

Users who are viewing this thread

Top