I would be interested in a how-to write up on this.

Would love a how-to written up about this also.
Here you go
My truck is a limited so I started off placing the truck in Off-Road 2 so I didn't need to jack it up
Tools:
1/2" or 3/8" 15MM Socket
1/2" or 3/8" Impact gun
(I used a Kobalt 1/2" gun the 1st time, it took the drive shaft flange bolts off easily, they are very very tight and have blue Loctite on them
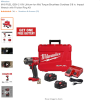
I bought a Milwaukee 2960-22 Combo on sale at Home Depot a few months ago so I used it. The reason for the Milwaukee is that it is 1/2 the size of the Kobalt 1/2" gun and gets into the space between the drive shaft and the muffler much easier and can use a shorter extension because its far smaller than the big gun. You can do this with a 1/2 hand tools but you will need a big ratchet, those bolts are on there. The impact gun will make life far easier.)
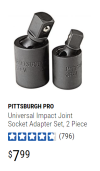
swivel
(I use these from harbor as they don't move very much)
3/8" 8"-12" extension drive
angle cutters (to remove Dust Cover boot)
CV Boot clamp tool
Grease and CV Boot Clamp
1. Set the emergency brake (I chocked the front wheels too)
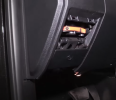
2. Open emergency neutral switch door and pull the orange Manual Neutral lever placing the trans in neutral
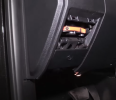
3. Lift the rear of the truck if yours is too low, mine is normally in Aero Mode so its too low. Off Road 2 lifts it high enough for me to get under and keep the tires on the ground.
4. Slide under the rear of the truck (I went under Infront of the rear tires so I was facing the diff) with your angle cutters, impact wrench, extension, swivel (at the end of the extension) and 15MM socket
4A. Optional but probably a good idea, use a white grease pencil and mark both the end of the dust boot and the driveshaft with a line for reassembly
5. Cut the rear or the front dust boot clamp and remove it, you don't need to remove the both clamps, just one. I removed the rear clamp leaving the boot on the front section of the driveshaft.
6. With your impact wrench and socket, remove the four 15mm bolts form the rear of the driveshaft where it attaches to the differential, you can get to all 4 bolts without having to rotate the diff pinion flange.
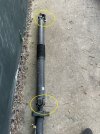
7. This is important, notate the drive shaft u joint ears orientation,
they all need to be facing the same direction on reassembly, note the two yellow circles, otherwise you'll get a vibration on acceleration
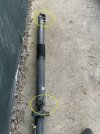
8. The rear section of the drive shaft is 2 pieces, slide the rear section of the drive shaft out of the front 1/2 of the rear section. It will come apart with minimal effort.
(the above pic is just for illustration, I did not (you do not) need to remove the entire drive shaft or even only the rear section. All you need to grease is the rear male end of the drive shaft)
9. Take the rear section and place it on a work bench and check for wear or damage, wipe it clean then regrease
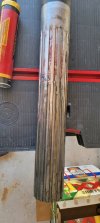
10. Regrease the entire length of the splines with some extra grease towards the front. As you reinsert the male shaft into the female receiver shaft, the grease will be pushed back from towards the rear of the shaft.
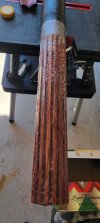
11. Reassemble making sure that you orient the U-Joint yokes the same as the front yokes, see image in step 7.
The easiest way for me was to rotate the drive shaft still attached to the trans to the point were all the u-joint yoke ears were pointing straight down, I then took the newly greased section and oriented it so its rear u-joint yoke ear was also facing down and inserted it into the dust cover then into the female section of the shaft.
It doesn't matter if you reassemble the shaft 180° out from the way it was (bottom u-joint yoke is now top or vice versa) the two yoke sides are weighted the same, mine had two 1.60oz weights on both sides yoke ears so it was identical however you would probably be smart to use a white grease pencil and mark both the end of the dust boot and the driveshaft.
12. This was the most difficult step, once you've aligned the driveshaft halves, you will need to push the male shaft into the female end, the schaffer high tack grease makes that difficult.
I placed one foot on the axle tube and my two hands around the tail end of the drive shaft and pulled it together until it collapsed enough to get on over pinion yoke of the differential.
13. At this point, re-check your yoke alignment and ensure that all 3 u-joint yoke ears are aligned (pointing straight down). It is very easy to get the rear section one spline off so double check it.
14. Once you're satisfied with the alignment, place some blue Loctite (242) one the bolts, snug the bolts up so the driveshaft flange sits flat on the diff pinion flange then tighten with your impact wrench.
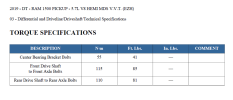
15. Torque driveshaft bolts to 81ftlbs
16. Install a new dust shield clamp and clamp with your tool.
That's it, looks like a lot but it took an hour the 1st time I did it and 20-30 minutes this time. Took it for a test drive yesterday and it was butter smooth, zero sensation at stops or with auto stop/start. Its so smooth now that I have to look at the tach/AutoStart icon to see if its off and no bumps at stops lights.
