So I went about putting my Putco bar on. I just like how the Putco bar actually looks like a solid bar of light, due to how many LEDs and how they mount them, Vs the Opt7. But, to each is own!!! They all look great guys! Good work!
Few things I will be doing, and noticed... Couple tips for some.
1. I found the measurement for spacers to be right, but have forgiveness.. yet you want to do at least 1/4 on the out sides.. or about 4mm. The inside spacers 1/2 or 8mm.
2. Kit comes with 4 plastic snap-in mounts (this alone was enough for me to purchase it, over the Opt7 metal ones I’ve seen) Now, I’ve put one on my buddies 2017 Danali using just the 3M tape, no drilling. The 3M tape is strong! Make sure you clean the body, and the mounts or light bar. Heat them up good! Stuff was like glue! ***Important note, the plastic mounts/clips MUST be on the inside of each edge on the light bar, DO NOT TRY AND CLIP OVER THE PLASTIC ENDS. They don’t fit, and this is where I learned how good the 3M tape really was. But, you own a RAM! See below
3. With the RAM, you won’t be anyplace close the the end, so no worries! Also, using 3 mounts is plenty enough! Like mentioned, make sure your bottom clip edge is just below the lip of the bumper. This will give an even look! But, measure from the top of the metal bed, to the top of your mark for the hole! in each location to make sure your in-line with each other. So, my middle mount was about dead center with the truck. Using a 1/2 spacer, I made my hole. Now I have 3 spots for my mounts. Drill small first, use a long drill bit so you don’t mark the bumper. Not a fan of self tapers, and seen them fall out. I used 10-32nd x 3/4 and 1 inch. Plus nuts with washers and blue Loctite to secure.
My tailgate was removed to make it easy!
4. When putting all back together I put the light-bar tucked down under the bumper, and wires ran under the bumper for now. So, it’s there but hidden. I installed my gate, made my wire connections for the camera and latch (remember, no tailgate latch when disconnected, so make sure your gate is down) and then reached down between it all with the gate shut and snapped the bar in to place. You’ve got a center line on Putco’s bar to make it easy to center.
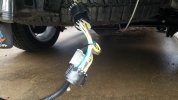
5. Used the Curtis harness, middle pin is reverse. Box mounted under truck, with isolater pad under it (kills some vibrations, lessons the shock) ran the harness over to the 7-pin... made some changes to the Curtis harness to shorten it out with out cutting. Put it all together. I’ll take photos later to show.
Zip tie it all up. Did not take to long
what I notice.
4-ways or Hazards are not coming up Amber, they are red stop lights flashing. But it works. Brakes work good, reverse works good. My signals are working.. Have a very very small delay! I’m going to think about how and why to get rid of. Might not be able to. Was considering just hooking up signals to the tail lights, and then grabbing rest as it is for brakes and such.
Don’t for get to use dielectric grease. Keep a clean work area. Have fun!
again, This was just some **** to add to everyone’s help and information for others.
have to edit some photos and videos to bring down size and I’ll post.


 .
.