5thGenRams Forums

Register a free account today to become a member! Once signed in, you'll be able to participate on this site by adding your own topics and posts, as well as connect with other members through your own private inbox!

side mirror removal to replace mirror cap

PorBoy

Spends too much time on here
Joined
Jun 15, 2018
Messages
4,554
Reaction score
2,692
Location
Millville NJ
yes pretty much before I take something on, I find out generally what it will cost to replace. This ensures that I readily have access if needed to those parts.
 
Last edited:

Sambad001

New Member
Joined
Sep 8, 2019
Messages
2
Reaction score
6
Changed my chrome mirror caps from chrome to bodycolor today.
Used a different kind of suction cup, the ones they use to lift glass. Works even better than the dent puller suction cup because this one is more solid.
I heated up the mirror for about 5 minutes with the heat gun. I didn't even had to pull that hard.
No broken mirrors and both caps changed witin 30 minutes.
20200205_182250.jpg
20200205_161006.jpg
 

Jeremy47

Active Member
Joined
Jan 24, 2020
Messages
54
Reaction score
48
Location
Cypress, TX
Changed my chrome mirror caps from chrome to bodycolor today.
Used a different kind of suction cup, the ones they use to lift glass. Works even better than the dent puller suction cup because this one is more solid.
I heated up the mirror for about 5 minutes with the heat gun. I didn't even had to pull that hard.
No broken mirrors and both caps changed witin 30 minutes.
View attachment 45827
View attachment 45826
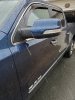
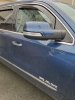
Where did you buy your suction cup from? link?
 

Jeremy47

Active Member
Joined
Jan 24, 2020
Messages
54
Reaction score
48
Location
Cypress, TX
I was able to get my passenger side mirror off no problem. The two wires came out as well. I saw someone post the “black” wire connects closest to the truck and the “black/blue” wire is next to it.
Can anyone confirm before I button everything up? Or have a breakout of the passenger side mirror?


Sent from my iPhone using Tapatalk
 

chrisnack

Active Member
Joined
Mar 13, 2020
Messages
153
Reaction score
117
Location
Madison, WI
Awesome thread! Ordered the suction cap and granite crystal mirror covers today. Can't wait to ditch the chrome mirror caps on my '20 Limited, this forum rocks!
 

Baron74

Active Member
Joined
Jul 22, 2019
Messages
76
Reaction score
35
What process did you use to remove the adhesive residue when you removed your “RAM” emblems? I’m finding it very stubborn.


Sent from my iPhone using Tapatalk

I've removed both my RAM emblems, and the rear Limited and 4x4 emblems. Removed all black tape by keeping the blow dryer aimed at the black tape and rolling it off with my thumb. Very easy. A little clear glue left over comes off super easy with any Goo Gone or similar.
 

Baron74

Active Member
Joined
Jul 22, 2019
Messages
76
Reaction score
35
I miraculously got it back together, not without breaking half the tabs and what not. Took me 2 hours to figure the damn thing out... the motor housing easily snaps out of the mirror housing. There's a T10 Torx screw in the middle that also holds the motor housing to the mirror housing, and also acts in part to hold the halves of the motor together. After removing the motor entirely, I stared at it for awhile trying to see why it wouldn't go together... it's hard to explain. Basically the half with the actual motors has a notched ring all the way around, and this ring snaps inside of the other half. Not without a ton of prying and pressing force though. I can't believe it came apart, and I REALLY can't believe I got it back together. Was about to throw it across the driveway and go to the dealer this week to hopefully get a new one, but I couldn't find the part online and the numbers on the motor housing didn't lead to anything, so I figured I needed to fix it myself.

This was the 4th mirror I did. The first 3 went smooth as butter. I should have known something was up when this mirror didn't come apart as easily/quickly, yet I kept pulling... probably needed to use more heat, but maybe it was unavoidable. I have used the suction cup tool... wouldn't try it with anything else.

Same sh%$ happened to me with the motor splitting in half on the passenger side. No luck getting it back together either. Does anyone know the part number for the mirror actuator/motor? Drivers side took about two minutes after heating and the mirror released from the entire motor, no issues.
 

Baron74

Active Member
Joined
Jul 22, 2019
Messages
76
Reaction score
35
Same sh%$ happened to me with the motor splitting in half on the passenger side. No luck getting it back together either. Does anyone know the part number for the mirror actuator/motor? Drivers side took about two minutes after heating and the mirror released from the entire motor, no issues.
Found out you can't just order the motor. Have to replace the ENTIRE mirror assembly, not just the mirror motor/actuator. $302 from Bam auto parts. Ouch.
 

chrisnack

Active Member
Joined
Mar 13, 2020
Messages
153
Reaction score
117
Location
Madison, WI
Well replaced mine today, had both off with no issues, then realized i forgot to put the screw back in on the passenger side, and cracked it pulling it the 2nd time, go figure!

I need the part # for the right (pasenger) mirror, heated, blind spot, i assume self-dimming as well. Is 68402094AA correct? There are a million of the part #'s and no descriptions.

The other part# for right that is similarly priced is 68402126AA, can't seem to find the difference.
 
Last edited:

snj1013

Active Member
Joined
Aug 8, 2019
Messages
113
Reaction score
70
I finally took on this project without breaking any mirrors. I purchased a decent tile/glass suction tool similar to simbad001 from Home Depot (https://www.homedepot.com/p/QEP-4-7...andling-Large-Tile-and-Glass-75000Q/100119050). It is pretty warm today in Houston (around 85). I drove to Home Depot, left the truck in the driveway with the sun on it for 20 mins, hit each mirror with a hair dryer for a minute or 2, and popped the mirrors off fairly easily. The mirrors do still require some force to remove, to the point that the electrical connections got disconnected in the process. Not damaged, just didn't even have to make the choice whether to disconnect or not. The only issue I had was I initially removed the wrong T20 screw and couldn't figure out why the mirror cover wouldn't come free. The one I removed was a machine screw (metric threads) and if I was paying attention, it would have occurred to me that wasn't correct. The correct T20 is a screw for plastic, with threads that look more like a wood screw. Anyway even with the temporary delay, the whole process took about 30 minutes.
I went the different route than most in this thread, I removed black plastic covers from my Crystal Granite Lone Star edition and added chrome mirror covers. If anyone in the Houston area wants the black plastic covers, message me and you can come pick them up. I won't ship, so don't ask. I did apply Cerocoat to all of the plastic on my truck so they do have a bit of shine to them.
 

Baron74

Active Member
Joined
Jul 22, 2019
Messages
76
Reaction score
35
I finally took on this project without breaking any mirrors. I purchased a decent tile/glass suction tool similar to simbad001 from Home Depot (https://www.homedepot.com/p/QEP-4-7...andling-Large-Tile-and-Glass-75000Q/100119050). It is pretty warm today in Houston (around 85). I drove to Home Depot, left the truck in the driveway with the sun on it for 20 mins, hit each mirror with a hair dryer for a minute or 2, and popped the mirrors off fairly easily. The mirrors do still require some force to remove, to the point that the electrical connections got disconnected in the process. Not damaged, just didn't even have to make the choice whether to disconnect or not. The only issue I had was I initially removed the wrong T20 screw and couldn't figure out why the mirror cover wouldn't come free. The one I removed was a machine screw (metric threads) and if I was paying attention, it would have occurred to me that wasn't correct. The correct T20 is a screw for plastic, with threads that look more like a wood screw. Anyway even with the temporary delay, the whole process took about 30 minutes.
I went the different route than most in this thread, I removed black plastic covers from my Crystal Granite Lone Star edition and added chrome mirror covers. If anyone in the Houston area wants the black plastic covers, message me and you can come pick them up. I won't ship, so don't ask. I did apply Cerocoat to all of the plastic on my truck so they do have a bit of shine to them.

Good for you sir! I just had my passenger mirror replaced. Had to do the WHOLE mirror assembly since the mirror motor came apart when I took the mirror off. $500 accident (165 installation). I used the same process of heating up the mirrors for 5 minutes. The only change was on the drivers side I moved the mirror into a more neutral position versus the moving mirror out as far as possible from the door. Might not have made a difference but pretty disappointing. Drivers side worked like a charm. About 10 minutes total. Glad to hear most are having success with the suctions cup method.
 

Scott_65

Ram Guru
Joined
Sep 1, 2019
Messages
521
Reaction score
414
Location
SC
Did mine today using the suction cup and finally got rid of the chrome and now have paint matched caps, whole process took about 10 minutes and no broken mirrors.
 
U

User_18352

Guest
I ordered a couple of mirror covers to match the color of my Limited, I can deal with the chrome everywhere else on the truck but the mirrors are just too much.
After reading this entire thread (everyones experienes and reviews have been very informative and super helpful by the way) I just want to make sure I've got the procedure to switch these out (hopefully without breaking the mirrors) down to a science.
I'm going to park my truck in our warehouse at work and let it sit for an hour or two, it's heated which should help as it's still not that warm here in Nova Scotia.


1. Use the mirror switch on the drivers door to turn both mirrors away from the truck as far as they will go.
2. Use a heat gun all over the mirror for a few minutes (cover, glass etc.) to get it good and warm.
3. Place the suction cup as close to the center of the mirror as possible, I already have a red suction cup identical to the one Sambad001 used so that's what I'm going to use
4. Brace the mirror with your free hand and pull straight back on the suction cup with the other hand to remove the mirror
5. Pop the cover off (4 clips, 1 screw)
6. Put the new cover on (seat the clips, put screw back)
7. Make sure all wires are reattached to the same spot they come off of (hoping not to disconnect them), put mirror back on
8. Test Mirror Functions to make sure everything is still working

Please feel free to chime in if I left anything out.

Thanks!
 

Scott_65

Ram Guru
Joined
Sep 1, 2019
Messages
521
Reaction score
414
Location
SC
I ordered a couple of mirror covers to match the color of my Limited, I can deal with the chrome everywhere else on the truck but the mirrors are just too much.
After reading this entire thread (everyones experienes and reviews have been very informative and super helpful by the way) I just want to make sure I've got the procedure to switch these out (hopefully without breaking the mirrors) down to a science.
I'm going to park my truck in our warehouse at work and let it sit for an hour or two, it's heated which should help as it's still not that warm here in Nova Scotia.


1. Use the mirror switch on the drivers door to turn both mirrors away from the truck as far as they will go.
2. Use a heat gun all over the mirror for a few minutes (cover, glass etc.) to get it good and warm.
3. Place the suction cup as close to the center of the mirror as possible, I already have a red suction cup identical to the one Sambad001 used so that's what I'm going to use
4. Brace the mirror with your free hand and pull straight back on the suction cup with the other hand to remove the mirror
5. Pop the cover off (4 clips, 1 screw)
6. Put the new cover on (seat the clips, put screw back)
7. Make sure all wires are reattached to the same spot they come off of (hoping not to disconnect them), put mirror back on
8. Test Mirror Functions to make sure everything is still working

Please feel free to chime in if I left anything out.

Thanks!
Sounds like you’re prepared to take the plunge. I ordered the suction cup about 4 months ago and finally got the courage up to order the covers and give it a go and as I posted above it took all of 10 minutes. I didn’t turn the mirrors I actually centered them and also heated only on the actual mirror and around the edges of it and gave a couple small pulls and it popped right out. Make sure you have a flat head screwdriver or something to free up the clips to get the cover off. Good luck and post your results here.
 
U

User_18352

Guest
Installed! Everything went well except the sticky piece that holds the sensor for the blindspot detection function came off. I put the heat gun to it and it rebonded nicely. Heating just the mirrors up with a heat gun really helps in removing them.
 

Attachments

  • 20200410_145033.jpg
    20200410_145033.jpg
    246.7 KB · Views: 74
  • 20200410_145022.jpg
    20200410_145022.jpg
    255.7 KB · Views: 74

Scott_65

Ram Guru
Joined
Sep 1, 2019
Messages
521
Reaction score
414
Location
SC
Installed! Everything went well except the sticky piece that holds the sensor for the blindspot detection function came off. I put the heat gun to it and it rebonded nicely. Heating just the mirrors up with a heat gun really helps in removing them.
Glad you got it done with no broken mirrors, truck looks great with the color matched covers.
 

trixdesigns

Active Member
Joined
Jan 26, 2019
Messages
74
Reaction score
55
This unit is an absolute piece of crap, it just doesnt glue to the mirror, i'm trying since half an hour now

Then you’re doing it wrong or you’ve got a defective cup with a hole in it.

Ensure the mirror is warm.
Ensure no section of the suction cup goes off the mirror.
It does take significant force to pop the mirror out, but you also have to be careful not to go ripping the wires off (they’re on quick connectors so they should disconnect if pulled too far.)

It took several tries on the first side, but it eventually came off. The second side was almost immediate.
 

Users who are viewing this thread

Top