securityguy
Legendary member
It has 30,000 feet to ferment.....What about the Commercial where the guys have their mouth open claiming "It's Raining Beer!"
Malodave
It has 30,000 feet to ferment.....What about the Commercial where the guys have their mouth open claiming "It's Raining Beer!"
Malodave
")
Nice job!I've finally completed 33 gallon fuel tank retrofit on my 2020 RAM Rebel. I took that truck from stock inventory at the dealership, and I thought I will be OK with 23 gallon tank, which was a trade-off for a eTorque engine. Man, I love how eTorque works comparing to regular 5.7 HEMI.
My previous SUV had just 14 gallon, and while it was very inconvenient, I was living with it for few years. But then I switched to Dodge Durango with its 25 gallon tank and 21 mpg even going 80mph on a highway. So I easily was going 450-500 miles between fuel stops, and I even changed the way I do road trips taking bio-breaks in parks instead of gas stations. My dog definitely appreciated that change. 23 gallon in Rebel wasn't too small comparing to 25 gallon in Durango, but because of way lower mpg on highway speeds, I needed to stop to refuel every 3 hours. Plus when going to the wilderness, I needed to fill-up at the last gas station, and then hoping that I will have enough fuel to return back. So long story short - I realized that I really need a 33 gallon tank.
Thanks to people in this thread for valuable info. Unfortunately, I couldn't find A-Z guide how to do this upgrade, so it took some time to do my own research. Let's start.
Parts that you need:
1. 68408875AE - 33 gallon fuel tank
2. 68409160AE - fuel pump. Looks like if you have 26 gallon tank you can reuse it, but 23 gallon fuel pump is different. It comes with O-ring seal.
3. 52030458AB and 06104717AA - 3rd fuel tank strap and nut. You need this if you are lucky and you have a subframe member for the 3rd strap, closer to the front of the truck. It is not clear why some trucks with 23 or 26 gallon tanks have it, and some don't.
4. 52029888AC - vapor canister (EVAP). It is longer then vapor canister of 23 gallon tank.
5. 52029909AC - hose from vapor canister to fresh air filter. It is different than the hose from 23 gallon tank.
6. 52029908AB - hose from vapor canister to vapor tube
7. 68307831AB - vapor tube. Connects hose 52029908AB with another vapor tube, going to the engine. It is shorter than 23/26 gallon tank tube.
8. 52030443AB - fuel line bundle. Connects vapor canister, fuel pump and exhaust port on the fuel tank. It is longer than 23/26 gallon tank bundle.
9. 04721916AA - lock ring for fuel pump. Small addition that will save you a lot of time. Instead of reusing the lock ring from an old tank, just put a fresh one to a new tank. Few backs worth the pain of trying to remove an old ring from old tank from my perspective.
10. 68408875AE - skid plate for 33 gallon fuel tank. If you have a skid plate on your 23/26 gallon tank, it is shorter and won't cover ~1 feet of the longer 33 gallon tank.
I was upgrading from 23 gallon tank, I don’t have a frame crossmember for the 3rd strap, and I've decided to keep my short fuel tank skid plate since I don't plan to do crazy rock crawling. Total for partner before tax for me was less than $600, which is OK since 33 gallon tank as an extra option when you order the truck costs $450.
1. First things that you need to do is to burn as much gas in the tank as you can. When I returned back to my garage, trip computer was showing 20 miles to empty, but actually it appeared that ~3 gallons were still left in the tank. So try to get it to the state when it shows "Low". It will save you time from activating fuel pump through AlfaOBD and draining the remaining gas to the bucket. Plus I didn't relieved the pressure from fuel system, I just let the truck to stay overnight in the garage. So use as much gas as you can and then leave the truck alone for 12 hours, and don't start it when you return back to remove the tank.
2. Remove fuel tank skid plate if you have it by unscrewing 4 bolts.
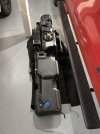
3. Follow Fuel Tank Replacement Guide to remove the tank. I've skipped steps #1 and #4. I used 4 jack stands to lift the vehicle 0.5 feet above the ground - that was enough to work on this. Then I used floor jack with a piece of 2x6 stud to carefully lower the tank to the ground. With few gallons of gas inside, I think total weight was over 30 pounds, so I suggest to use a buddy to help you with this. Check Fuel Connector chart for more details how to disconnect each connector type.
4. Install new fuel pump by following steps #1-#7 from Fuel Pump Replacement guide.
5. Install new vapor canister on a new tank. Install 52029908AB hose and 52030443AB bundle on the tank, use old tank as a reference how to connect everything.
6. Swap heat shield from old tank to new tank by unclipping 4 plastic clips.
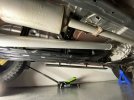
7. Go under the truck and remove vapor tube going to the engine, and replace it with shorter vapor tube (68307831AB). You will need to unclip the plastic mounts holding break lines and a fuel line, be careful not to damage them.
8. Then replace hose that goes from you've disconnected from vapor canister, that goes to fresh air filter. New one is 52029909AC.
9. Install new tank, which is directly opposite to tank removal procedure, nothing special there.
10. If you have a frame crossmember for 3rd strap, install that 3rd strap. My truck didn't have it, and I can't say that tank with 2 straps is not secured well - it is not moving anywhere, and majority of the weight is carried on default two straps just fine. Tank is made of a thick high-density plastic, so it will not crack even under its own weight.
11. Install the skid plate.
12. Lower the truck and fuel it up. I poured 2 gallons from the canister and checked for leaks. Start the truck and make sure it runs well and nothing is leaking. Water drops from the exhaust are water, not gas, so don't freak out if you see them
13. Connect with AlfaOBD and change VehConfig-3 Fuel Capacity to 125, which is the 33 gallon tank volume in liters (default setting for 23 gallon tank is 87). Check this post for details, thanks Dixit.
14. Go to the gas station and fill up. Enjoy 500+ miles to empty on the trip computer!
Great info!I've finally completed 33 gallon fuel tank retrofit on my 2020 RAM Rebel. I took that truck from stock inventory at the dealership, and I thought I will be OK with 23 gallon tank, which was a trade-off for a eTorque engine. Man, I love how eTorque works comparing to regular 5.7 HEMI.
My previous SUV had just 14 gallon, and while it was very inconvenient, I was living with it for few years. But then I switched to Dodge Durango with its 25 gallon tank and 21 mpg even going 80mph on a highway. So I easily was going 450-500 miles between fuel stops, and I even changed the way I do road trips taking bio-breaks in parks instead of gas stations. My dog definitely appreciated that change. 23 gallon in Rebel wasn't too small comparing to 25 gallon in Durango, but because of way lower mpg on highway speeds, I needed to stop to refuel every 3 hours. Plus when going to the wilderness, I needed to fill-up at the last gas station, and then hoping that I will have enough fuel to return back. So long story short - I realized that I really need a 33 gallon tank.
Thanks to people in this thread for valuable info. Unfortunately, I couldn't find A-Z guide how to do this upgrade, so it took some time to do my own research. Let's start.
Parts that you need:
1. 68408875AE - 33 gallon fuel tank
2. 68409160AE - fuel pump. Looks like if you have 26 gallon tank you can reuse it, but 23 gallon fuel pump is different. It comes with O-ring seal.
3. 52030458AB and 06104717AA - 3rd fuel tank strap and nut. You need this if you are lucky and you have a subframe member for the 3rd strap, closer to the front of the truck. It is not clear why some trucks with 23 or 26 gallon tanks have it, and some don't.
4. 52029888AC - vapor canister (EVAP). It is longer then vapor canister of 23 gallon tank.
5. 52029909AC - hose from vapor canister to fresh air filter. It is different than the hose from 23 gallon tank.
6. 52029908AB - hose from vapor canister to vapor tube
7. 68307831AB - vapor tube. Connects hose 52029908AB with another vapor tube, going to the engine. It is shorter than 23/26 gallon tank tube.
8. 52030443AB - fuel line bundle. Connects vapor canister, fuel pump and exhaust port on the fuel tank. It is longer than 23/26 gallon tank bundle.
9. 04721916AA - lock ring for fuel pump. Small addition that will save you a lot of time. Instead of reusing the lock ring from an old tank, just put a fresh one to a new tank. Few backs worth the pain of trying to remove an old ring from old tank from my perspective.
10. 68408875AE - skid plate for 33 gallon fuel tank. If you have a skid plate on your 23/26 gallon tank, it is shorter and won't cover ~1 feet of the longer 33 gallon tank.
I was upgrading from 23 gallon tank, I don’t have a frame crossmember for the 3rd strap, and I've decided to keep my short fuel tank skid plate since I don't plan to do crazy rock crawling. Total for partner before tax for me was less than $600, which is OK since 33 gallon tank as an extra option when you order the truck costs $450.
1. First things that you need to do is to burn as much gas in the tank as you can. When I returned back to my garage, trip computer was showing 20 miles to empty, but actually it appeared that ~3 gallons were still left in the tank. So try to get it to the state when it shows "Low". It will save you time from activating fuel pump through AlfaOBD and draining the remaining gas to the bucket. Plus I didn't relieved the pressure from fuel system, I just let the truck to stay overnight in the garage. So use as much gas as you can and then leave the truck alone for 12 hours, and don't start it when you return back to remove the tank.
2. Remove fuel tank skid plate if you have it by unscrewing 4 bolts.
3. Follow Fuel Tank Replacement Guide to remove the tank. I've skipped steps #1 and #4. I used 4 jack stands to lift the vehicle 0.5 feet above the ground - that was enough to work on this. Then I used floor jack with a piece of 2x6 stud to carefully lower the tank to the ground. With few gallons of gas inside, I think total weight was over 30 pounds, so I suggest to use a buddy to help you with this. Check Fuel Connector chart for more details how to disconnect each connector type.
4. Install new fuel pump by following steps #1-#7 from Fuel Pump Replacement guide.
5. Install new vapor canister on a new tank. Install 52029908AB hose and 52030443AB bundle on the tank, use old tank as a reference how to connect everything.
6. Swap heat shield from old tank to new tank by unclipping 4 plastic clips.
7. Go under the truck and remove vapor tube going to the engine, and replace it with shorter vapor tube (68307831AB). You will need to unclip the plastic mounts holding break lines and a fuel line, be careful not to damage them.
8. Then replace hose that goes from you've disconnected from vapor canister, that goes to fresh air filter. New one is 52029909AC.
9. Install new tank, which is directly opposite to tank removal procedure, nothing special there.
10. If you have a frame crossmember for 3rd strap, install that 3rd strap. My truck didn't have it, and I can't say that tank with 2 straps is not secured well - it is not moving anywhere, and majority of the weight is carried on default two straps just fine. Tank is made of a thick high-density plastic, so it will not crack even under its own weight.
11. Install the skid plate.
12. Lower the truck and fuel it up. I poured 2 gallons from the canister and checked for leaks. Start the truck and make sure it runs well and nothing is leaking. Water drops from the exhaust are water, not gas, so don't freak out if you see them
13. Connect with AlfaOBD and change VehConfig-3 Fuel Capacity to 125, which is the 33 gallon tank volume in liters (default setting for 23 gallon tank is 87). Check this post for details, thanks Dixit.
14. Go to the gas station and fill up. Enjoy 500+ miles to empty
 .
.Great write up. I had a 33 in my old truck and never needed it, but if plans change with the new one, Its good to see it is possible for not much more than if i found it optioned on my new oneI've finally completed 33 gallon fuel tank retrofit on my 2020 RAM Rebel. I took that truck from stock inventory at the dealership, and I thought I will be OK with 23 gallon tank, which was a trade-off for a eTorque engine. Man, I love how eTorque works comparing to regular 5.7 HEMI.
My previous SUV had just 14 gallon, and while it was very inconvenient, I was living with it for few years. But then I switched to Dodge Durango with its 25 gallon tank and 21 mpg even going 80mph on a highway. So I easily was going 450-500 miles between fuel stops, and I even changed the way I do road trips taking bio-breaks in parks instead of gas stations. My dog definitely appreciated that change. 23 gallon in Rebel wasn't too small comparing to 25 gallon in Durango, but because of way lower mpg on highway speeds, I needed to stop to refuel every 3 hours. Plus when going to the wilderness, I needed to fill-up at the last gas station, and then hoping that I will have enough fuel to return back. So long story short - I realized that I really need a 33 gallon tank.
Thanks to people in this thread for valuable info. Unfortunately, I couldn't find A-Z guide how to do this upgrade, so it took some time to do my own research. Let's start.
Parts that you need:
1. 68408875AE - 33 gallon fuel tank
2. 68409160AE - fuel pump. Looks like if you have 26 gallon tank you can reuse it, but 23 gallon fuel pump is different. It comes with O-ring seal.
3. 52030458AB and 06104717AA - 3rd fuel tank strap and nut. You need this if you are lucky and you have a subframe member for the 3rd strap, closer to the front of the truck. It is not clear why some trucks with 23 or 26 gallon tanks have it, and some don't.
4. 52029888AC - vapor canister (EVAP). It is longer then vapor canister of 23 gallon tank.
5. 52029909AC - hose from vapor canister to fresh air filter. It is different than the hose from 23 gallon tank.
6. 52029908AB - hose from vapor canister to vapor tube
7. 68307831AB - vapor tube. Connects hose 52029908AB with another vapor tube, going to the engine. It is shorter than 23/26 gallon tank tube.
8. 52030443AB - fuel line bundle. Connects vapor canister, fuel pump and exhaust port on the fuel tank. It is longer than 23/26 gallon tank bundle.
9. 04721916AA - lock ring for fuel pump. Small addition that will save you a lot of time. Instead of reusing the lock ring from an old tank, just put a fresh one to a new tank. Few backs worth the pain of trying to remove an old ring from old tank from my perspective.
10. 68408875AE - skid plate for 33 gallon fuel tank. If you have a skid plate on your 23/26 gallon tank, it is shorter and won't cover ~1 feet of the longer 33 gallon tank.
I was upgrading from 23 gallon tank, I don’t have a frame crossmember for the 3rd strap, and I've decided to keep my short fuel tank skid plate since I don't plan to do crazy rock crawling. Total for parts before tax for me was less than $600, which is OK since 33 gallon tank as an extra option when you order the truck costs $450. Plus 2-3 hours of work if you know what to do.
1. First things that you need to do is to burn as much gas in the tank as you can. When I returned back to my garage, trip computer was showing 20 miles to empty, but actually it appeared that ~3 gallons were still left in the tank. So try to get it to the state when it shows "Low". It will save you time from activating fuel pump through AlfaOBD and draining the remaining gas to the bucket. Plus I didn't relieved the pressure from fuel system, I just let the truck to stay overnight in the garage. So use as much gas as you can and then leave the truck alone for 12 hours, and don't start it when you return back to remove the tank.
2. Remove fuel tank skid plate if you have it by unscrewing 4 bolts.
3. Follow Fuel Tank Replacement Guide to remove the tank. I've skipped steps #1 and #4. I used 4 jack stands to lift the vehicle 0.5 feet above the ground - that was enough to work on this. Then I used floor jack with a piece of 2x6 stud to carefully lower the tank to the ground. With few gallons of gas inside, I think total weight was over 30 pounds, so I suggest to use a buddy to help you with this. Check Fuel Connector chart for more details how to disconnect each connector type.
4. Install new fuel pump by following steps #1-#7 from Fuel Pump Replacement guide.
5. Install new vapor canister on a new tank. Install 52029908AB hose and 52030443AB bundle on the tank, use old tank as a reference how to connect everything.
6. Swap heat shield from old tank to new tank by unclipping 4 plastic clips.
7. Go under the truck and remove vapor tube going to the engine, and replace it with shorter vapor tube (68307831AB). You will need to unclip the plastic mounts holding break lines and a fuel line, be careful not to damage them.
8. Then replace hose that goes from you've disconnected from vapor canister, that goes to fresh air filter. New one is 52029909AC.
9. Install new tank, which is directly opposite to tank removal procedure, nothing special there.
10. If you have a frame crossmember for 3rd strap, install that 3rd strap. My truck didn't have it, and I can't say that tank with 2 straps is not secured well - it is not moving anywhere, and majority of the weight is carried on default two straps just fine. Tank is made of a thick high-density plastic, so it will not crack even under its own weight.
11. Install the skid plate.
12. Lower the truck and fuel it up. I poured 2 gallons from the canister and checked for leaks. Start the truck and make sure it runs well and nothing is leaking. Water drops from the exhaust are water, not gas, so don't freak out if you see them
13. Connect with AlfaOBD and change VehConfig-3 Fuel Capacity to 125, which is the 33 gallon tank volume in liters (default setting for 23 gallon tank is 87). Check this post for details, thanks Dixit.
14. Go to the gas station and fill up. Enjoy 500+ miles to empty on the trip computer!
If you find this guide useful, check my Amazon influencer page for other items that I use with my RAM: bit.ly/RAMStuff
Traveling in wilderness in Utah was pretty stressful with 23 gallon tank. Gravel road with a lot of inclines and curves, plus fuel stations just don't exist in every town. So I needed to fill up basically on every gas station that I saw, and sometimes prices were crazy.Great info. This is on my list to do once the weather warms up. Getting ready to take a trip from KS up into the Rockies and I’m curious to see how only having the 23 gallon tank does on the drive.
Sent from my iPhone using Tapatalk
Great summary. Sounds like you got a great deal on the parts too. Doing this upgrade was really worth it for me. The 23 gallon tank was a huge mistake from the factory. Now I don’t have to always be on the lookout for the next gas station.I've finally completed 33 gallon fuel tank retrofit on my 2020 RAM Rebel. I took that truck from stock inventory at the dealership, and I thought I will be OK with 23 gallon tank, which was a trade-off for a eTorque engine. Man, I love how eTorque works comparing to regular 5.7 HEMI.
My previous SUV had just 14 gallon, and while it was very inconvenient, I was living with it for few years. But then I switched to Dodge Durango with its 25 gallon tank and 21 mpg even going 80mph on a highway. So I easily was going 450-500 miles between fuel stops, and I even changed the way I do road trips taking bio-breaks in parks instead of gas stations. My dog definitely appreciated that change. 23 gallon in Rebel wasn't too small comparing to 25 gallon in Durango, but because of way lower mpg on highway speeds, I needed to stop to refuel every 3 hours. Plus when going to the wilderness, I needed to fill-up at the last gas station, and then hoping that I will have enough fuel to return back. So long story short - I realized that I really need a 33 gallon tank.
Thanks to people in this thread for valuable info. Unfortunately, I couldn't find A-Z guide how to do this upgrade, so it took some time to do my own research. Let's start.
Parts that you need:
1. 68408875AE - 33 gallon fuel tank
2. 68409160AE - fuel pump. Looks like if you have 26 gallon tank you can reuse it, but 23 gallon fuel pump is different. It comes with O-ring seal.
3. 52030458AB and 06104717AA - 3rd fuel tank strap and nut. You need this if you are lucky and you have a subframe member for the 3rd strap, closer to the front of the truck. It is not clear why some trucks with 23 or 26 gallon tanks have it, and some don't.
4. 52029888AC - vapor canister (EVAP). It is longer then vapor canister of 23 gallon tank.
5. 52029909AC - hose from vapor canister to fresh air filter. It is different than the hose from 23 gallon tank.
6. 52029908AB - hose from vapor canister to vapor tube
7. 68307831AB - vapor tube. Connects hose 52029908AB with another vapor tube, going to the engine. It is shorter than 23/26 gallon tank tube.
8. 52030443AB - fuel line bundle. Connects vapor canister, fuel pump and exhaust port on the fuel tank. It is longer than 23/26 gallon tank bundle.
9. 04721916AA - lock ring for fuel pump. Small addition that will save you a lot of time. Instead of reusing the lock ring from an old tank, just put a fresh one to a new tank. Few backs worth the pain of trying to remove an old ring from old tank from my perspective.
10. 68408875AE - skid plate for 33 gallon fuel tank. If you have a skid plate on your 23/26 gallon tank, it is shorter and won't cover ~1 feet of the longer 33 gallon tank.
I was upgrading from 23 gallon tank, I don’t have a frame crossmember for the 3rd strap, and I've decided to keep my short fuel tank skid plate since I don't plan to do crazy rock crawling. Total for parts before tax for me was less than $600, which is OK since 33 gallon tank as an extra option when you order the truck costs $450. Plus 2-3 hours of work if you know what to do.
1. First things that you need to do is to burn as much gas in the tank as you can. When I returned back to my garage, trip computer was showing 20 miles to empty, but actually it appeared that ~3 gallons were still left in the tank. So try to get it to the state when it shows "Low". It will save you time from activating fuel pump through AlfaOBD and draining the remaining gas to the bucket. Plus I didn't relieved the pressure from fuel system, I just let the truck to stay overnight in the garage. So use as much gas as you can and then leave the truck alone for 12 hours, and don't start it when you return back to remove the tank.
2. Remove fuel tank skid plate if you have it by unscrewing 4 bolts.
3. Follow Fuel Tank Replacement Guide to remove the tank. I've skipped steps #1 and #4. I used 4 jack stands to lift the vehicle 0.5 feet above the ground - that was enough to work on this. Then I used floor jack with a piece of 2x6 stud to carefully lower the tank to the ground. With few gallons of gas inside, I think total weight was over 30 pounds, so I suggest to use a buddy to help you with this. Check Fuel Connector chart for more details how to disconnect each connector type.
4. Install new fuel pump by following steps #1-#7 from Fuel Pump Replacement guide.
5. Install new vapor canister on a new tank. Install 52029908AB hose and 52030443AB bundle on the tank, use old tank as a reference how to connect everything.
6. Swap heat shield from old tank to new tank by unclipping 4 plastic clips.
7. Go under the truck and remove vapor tube going to the engine, and replace it with shorter vapor tube (68307831AB). You will need to unclip the plastic mounts holding break lines and a fuel line, be careful not to damage them.
8. Then replace hose that goes from you've disconnected from vapor canister, that goes to fresh air filter. New one is 52029909AC.
9. Install new tank, which is directly opposite to tank removal procedure, nothing special there.
10. If you have a frame crossmember for 3rd strap, install that 3rd strap. My truck didn't have it, and I can't say that tank with 2 straps is not secured well - it is not moving anywhere, and majority of the weight is carried on default two straps just fine. Tank is made of a thick high-density plastic, so it will not crack even under its own weight.
11. Install the skid plate.
12. Lower the truck and fuel it up. I poured 2 gallons from the canister and checked for leaks. Start the truck and make sure it runs well and nothing is leaking. Water drops from the exhaust are water, not gas, so don't freak out if you see them
13. Connect with AlfaOBD and change VehConfig-3 Fuel Capacity to 125, which is the 33 gallon tank volume in liters (default setting for 23 gallon tank is 87). Check this post for details, thanks Dixit.
14. Go to the gas station and fill up. Enjoy 500+ miles to empty on the trip computer!
If you find this guide useful, check my Amazon influencer page for other items that I use with my RAM: bit.ly/RAMStuff
Traveling in wilderness in Utah was pretty stressful with 23 gallon tank. Gravel road with a lot of inclines and curves, plus fuel stations just don't exist in every town. So I needed to fill up basically on every gas station that I saw, and sometimes prices were crazy.
With 23 gallon tank, you can drive 200-250 miles with no stress, but then you need to look for a pump (sometimes pump can be 150 miles away).
Think about that from this perspective... Chevy Silverado Trailboss has 24 gallon tank. New Nissan Titan has 26 gallon tank. New Ford F-150 has 23 gallon for Crew Cab, 26 gallon for King Cab, and 36 gallon as extra option for $$$. Most of F-150s in stock in Seattle dealerships have 23 gallon tanks.Great summary. Sounds like you got a great deal on the parts too. Doing this upgrade was really worth it for me. The 23 gallon tank was a huge mistake from the factory. Now I don’t have to always be on the lookout for the next gas station.
can someone post the link to PURCHASE the alpha OBD adapter (and anything else required) to change fuel tank size to the 33-gallon tank? I had the dealership swap my tank from the 26 gallon to 33-gallon tank last week. but they said they didn’t know how to change the tank size in the truck. Now when I fill up the fuel gauge shows 326 miles and does not start decreasing until I run out the additional 7 gallons of gas. not the end of the world but would like to have it fixed.I've finally completed 33 gallon fuel tank retrofit on my 2020 RAM Rebel. I took that truck from stock inventory at the dealership, and I thought I will be OK with 23 gallon tank, which was a trade-off for a eTorque engine. Man, I love how eTorque works comparing to regular 5.7 HEMI.
My previous SUV had just 14 gallon, and while it was very inconvenient, I was living with it for few years. But then I switched to Dodge Durango with its 25 gallon tank and 21 mpg even going 80mph on a highway. So I easily was going 450-500 miles between fuel stops, and I even changed the way I do road trips taking bio-breaks in parks instead of gas stations. My dog definitely appreciated that change. 23 gallon in Rebel wasn't too small comparing to 25 gallon in Durango, but because of way lower mpg on highway speeds, I needed to stop to refuel every 3 hours. Plus when going to the wilderness, I needed to fill-up at the last gas station, and then hoping that I will have enough fuel to return back. So long story short - I realized that I really need a 33 gallon tank.
Thanks to people in this thread for valuable info. Unfortunately, I couldn't find A-Z guide how to do this upgrade, so it took some time to do my own research. Let's start.
Parts that you need:
1. 68408875AE - 33 gallon fuel tank
2. 68409160AE - fuel pump. Looks like if you have 26 gallon tank you can reuse it, but 23 gallon fuel pump is different. It comes with O-ring seal.
3. 52030458AB and 06104717AA - 3rd fuel tank strap and nut. You need this if you are lucky and you have a subframe member for the 3rd strap, closer to the front of the truck. It is not clear why some trucks with 23 or 26 gallon tanks have it, and some don't.
4. 52029888AC - vapor canister (EVAP). It is longer then vapor canister of 23 gallon tank.
5. 52029909AC - hose from vapor canister to fresh air filter. It is different than the hose from 23 gallon tank.
6. 52029908AB - hose from vapor canister to vapor tube
7. 68307831AB - vapor tube. Connects hose 52029908AB with another vapor tube, going to the engine. It is shorter than 23/26 gallon tank tube.
8. 52030443AB - fuel line bundle. Connects vapor canister, fuel pump and exhaust port on the fuel tank. It is longer than 23/26 gallon tank bundle.
9. 04721916AA - lock ring for fuel pump. Small addition that will save you a lot of time. Instead of reusing the lock ring from an old tank, just put a fresh one to a new tank. Few backs worth the pain of trying to remove an old ring from old tank from my perspective.
10. 68408875AE - skid plate for 33 gallon fuel tank. If you have a skid plate on your 23/26 gallon tank, it is shorter and won't cover ~1 feet of the longer 33 gallon tank.
I was upgrading from 23 gallon tank, I don’t have a frame crossmember for the 3rd strap, and I've decided to keep my short fuel tank skid plate since I don't plan to do crazy rock crawling. Total for parts before tax for me was less than $600, which is OK since 33 gallon tank as an extra option when you order the truck costs $450. Plus 2-3 hours of work if you know what to do.
1. First things that you need to do is to burn as much gas in the tank as you can. When I returned back to my garage, trip computer was showing 20 miles to empty, but actually it appeared that ~3 gallons were still left in the tank. So try to get it to the state when it shows "Low". It will save you time from activating fuel pump through AlfaOBD and draining the remaining gas to the bucket. Plus I didn't relieved the pressure from fuel system, I just let the truck to stay overnight in the garage. So use as much gas as you can and then leave the truck alone for 12 hours, and don't start it when you return back to remove the tank.
2. Remove fuel tank skid plate if you have it by unscrewing 4 bolts.
3. Follow Fuel Tank Replacement Guide to remove the tank. I've skipped steps #1 and #4. I used 4 jack stands to lift the vehicle 0.5 feet above the ground - that was enough to work on this. Then I used floor jack with a piece of 2x6 stud to carefully lower the tank to the ground. With few gallons of gas inside, I think total weight was over 30 pounds, so I suggest to use a buddy to help you with this. Check Fuel Connector chart for more details how to disconnect each connector type.
4. Install new fuel pump by following steps #1-#7 from Fuel Pump Replacement guide.
5. Install new vapor canister on a new tank. Install 52029908AB hose and 52030443AB bundle on the tank, use old tank as a reference how to connect everything.
6. Swap heat shield from old tank to new tank by unclipping 4 plastic clips.
7. Go under the truck and remove vapor tube going to the engine, and replace it with shorter vapor tube (68307831AB). You will need to unclip the plastic mounts holding break lines and a fuel line, be careful not to damage them.
8. Then replace hose that goes from you've disconnected from vapor canister, that goes to fresh air filter. New one is 52029909AC.
9. Install new tank, which is directly opposite to tank removal procedure, nothing special there.
10. If you have a frame crossmember for 3rd strap, install that 3rd strap. My truck didn't have it, and I can't say that tank with 2 straps is not secured well - it is not moving anywhere, and majority of the weight is carried on default two straps just fine. Tank is made of a thick high-density plastic, so it will not crack even under its own weight.
11. Install the skid plate.
12. Lower the truck and fuel it up. I poured 2 gallons from the canister and checked for leaks. Start the truck and make sure it runs well and nothing is leaking. Water drops from the exhaust are water, not gas, so don't freak out if you see them
13. Connect with AlfaOBD and change VehConfig-3 Fuel Capacity to 125, which is the 33 gallon tank volume in liters (default setting for 23 gallon tank is 87). Check this post for details, thanks Dixit.
14. Go to the gas station and fill up. Enjoy 500+ miles to empty on the trip computer!
If you find this guide useful, check my Amazon influencer page for other items that I use with my RAM: bit.ly/RAMStuff
Which dealer?can someone post the link to PURCHASE the alpha OBD adapter (and anything else required) to change fuel tank size to the 33-gallon tank? I had the dealership swap my tank from the 26 gallon to 33-gallon tank last week. but they said they didn’t know how to change the tank size in the truck. Now when I fill up the fuel gauge shows 326 miles and does not start decreasing until I run out the additional 7 gallons of gas. not the end of the world but would like to have it fixed.
Don Davis Dodge in arlington texas... this is copy of work orderWhich dealer?
Sent from my SM-G988U using Tapatalk
Yes, both tanks and fuel pump should be available for order. Mine was delivered within a week after I've ordered it at local dealership.Are the tanks backordered? The pump has already shipped from another vendor and they told me no returns on electrical items.
Sent from my SM-G988U using Tapatalk
Yea I bought the pump from a separate place and it shipped to me. I ordered the tank and everything else from another and they canceled it so I called and they said the tank was backordered. Guess I'll keep looking around.Yes, both tanks and fuel pump should be available for order. Mine was delivered within a week after I've ordered it at local dealership.