reb0957
Active Member
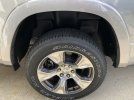
For those of us with factory flares, correct me where I am wrong.
1. Everyone removes the inside screw on the forward side of the flare.
2. Remove the 1 screw from, for the tiny mudflap.
3. Loosen all screws that go through the factory flares and factory liner
4. Slide RC liner between factory liner and sheet metal. Top of liner just rests on inside of sheet metal
5. start lone inner screw, start mud flap screw, push in push pin,
6. tighten all!
Is this process correct?