If I'm looking at the correct part number for tow mirrors, I'm seeing some on eBay.Good info @Murt! And great news for anyone unable to locate the other jumper harnesses.
Now if I could only find the power folding tow mirrors with BSM indicator lights that I’ve been searching for. I haven’t checked recently, but it may be time to start calling around again so I can get this BSM, and power folding mirror project wrapped up.
5thGenRams Forums
You are using an out of date browser. It may not display this or other websites correctly.
You should upgrade or use an alternative browser.
You should upgrade or use an alternative browser.
Is it possible to add Blind Spot?
- Thread starter turboj
- Start date
Biggiehorn
Ram Guru
These are the part numbers needed. I have non power folding, non BSM tow mirrors currently. Since I'm swapping for BSM mirrors, I figured I might as well add the power folding tow mirror option as well. Many of the places I've found advertise as they have them in stock but once I call they notify me that they are backordered with no ETA. I haven't put much effort into my search recently, so that could have changed since I last shopped around.If I'm looking at the correct part number for tow mirrors, I'm seeing some on eBay.
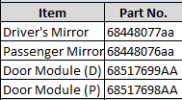
Sent you a PM.These are the part numbers needed. I have non power folding, non BSM tow mirrors currently. Since I'm swapping for BSM mirrors, I figured I might as well add the power folding tow mirror option as well. Many of the places I've found advertise as they have them in stock but once I call they notify me that they are backordered with no ETA. I haven't put much effort into my search recently, so that could have changed since I last shopped around.
View attachment 131648
Thank you to all that have shared information on this post. I have completed the upgrade on my 2022 Laramie. It has the 300aa jumpers and leaving the #8 pin disconnected at the tail light worked. My only issue was with the aftermarket mirrors I purchased from amazon. The female plug on the mirror was deeper than the male plug I had on the harness so no connection was being made even though the connector clicked in place. This caused the blind spot function to be unavailable. Once I jumped across the connector all worked as it should. I will also add that I am probably going to go with OEM mirrors as the brightness of the leds are adequate at night and almost invisible during the day.
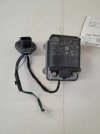
ok starting to get going on this... got the drivers seat harness from Jimmy07, which is excellent quality, btw, and i was just super lucky enuff to pick-up both sensors on ebay for my LED tail lights that actually came with all the wiring, so once i Dremel out the backs and un-pin the #8 drivers side jumper (i have the 300AA's) i'll need to enable it and then start figuring out the front mirror glass. but it should at least be able to work audibly for the time being. but i got both these sensors for under $90 each with the heat sinks for left and right and the wiring with connectors attached. Right ebay search Right day i guess!
One question for those who have re-pinned the XY400 - do you actually have to disassemble and unplug the bottom (exterior) side just to add the 4 pins on the interior part? Just seems like if you're only adding the 4 pins to the interior that you wouldn't have to crawl under and take the outer apart, just plug the top one back in when you're done?
Edit: looked thru the pdf again on the XY400 connector and i think i see it now... looks like if you don't unplug from the bottom, it won't just lift up when you want to manipulate the top part.

Last edited:
Biggiehorn
Ram Guru
Your edited comment above is correct. The bottom portion of the XY400 is what actually latches and locks both sides of the connector together. Without releasing the bottom female side of the connector under the truck, you will be unable to access the interior side of the male connector. Without access to the interior male side, you’ll be unable to release the red locking tab on that portion of the male connector (step 9 on my PDF file). The stabilizer plate will need to be up and that red tab must be in the open position in order to add your pins from your new BSM harness to the connector.ok starting to get going on this... got the drivers seat harness from Jimmy07, which is excellent quality, btw, and i was just super lucky enuff to pick-up both sensors on ebay for my LED tail lights that actually came with all the wiring, so once i Dremel out the backs and un-pin the #8 drivers side jumper (i have the 300AA's) i'll need to enable it and then start figuring out the front mirror glass. but it should at least be able to work audibly for the time being. but i got both these sensors for under $90 each with the heat sinks for left and right and the wiring with connectors attached. Right ebay search Right day i guess!
One question for those who have re-pinned the XY400 - do you actually have to disassemble and unplug the bottom (exterior) side just to add the 4 pins on the interior part? Just seems like if you're only adding the 4 pins to the interior that you wouldn't have to crawl under and take the outer apart, just plug the top one back in when you're done?
Edit: looked thru the pdf again on the XY400 connector and i think i see it now... looks like if you don't unplug from the bottom, it won't just lift up when you want to manipulate the top part.
View attachment 131940
I apologize if that sounds super confusing lol. But to simply answer your question, yes the bottom will need to come off so that you have access to the interior portion of the connector. It will all make sense once you’re actually in there and looking at how everything goes together.
Last edited:
Yeah after a good look it seemed that way, but yes, thanks for the confirmation! and all your additions to the thread!
Quick question for you guys...
I saw that Jimmy07 recommended OBD JScan (the app) as opposed to alpha OBD for us iPhoners/Mac users who can't run the PC/android stuff. does anyone have a good recommendation for an OBD bluetooth interface as well and a gateway bypass to grab?
I saw that OBD Genie has a "both things" pack you can buy but theirs are like one-trick-pony style so it's a non-interactive OBD plug that only programs the 1 feature you buy it for, which seems like a waste of money since it's not really cheap.
So Just curious if anyone has used Jscan on iphone for this stuff and has any hardware recommendations thx in advance.
Last edited:
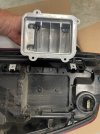
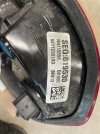
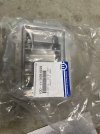
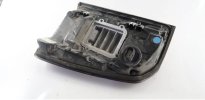
Hey any of you guys who have modified your own LED tail lights to fit the sensors.... any one got a part number specifically for the Drivers side heat sink only??
The 2 sensors i ordered that came with a little harness on them were both passenger side ones.
I know the blind spot sensors themselves are the same on both sides so i'll just keep these if i can find the driver's side heat sink.
All i can find for it anywhere is this number: 68396592AA But the stupid description lists it as LEFT and then says RIGHT below it but i know these are not the same. Thanks for any help.
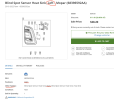

Edit: I have the same issue. My parts guy told me and swears that it only calls for one number. When I tried to do a little digging with him, he showed me part numbers that are different than the tail lights I have. I’m not sure that that means anything though. what I’m contemplating is if I should trim two ears off of the heat sink to fit it on the left tail light.Hey any of you guys who have modified your own LED tail lights to fit the sensors.... any one got a part number specifically for the Drivers side heat sink only??
The 2 sensors i ordered that came with a little harness on them were both passenger side ones.
I know the blind spot sensors themselves are the same on both sides so i'll just keep these if i can find the driver's side heat sink.
All i can find for it anywhere is this number: 68396592AA But the stupid description lists it as LEFT and then says RIGHT below it but i know these are not the same. Thanks for any help.
View attachment 132406
Last edited:
Edit: I have the same issue. My parts guy told me and swears that it only calls for one number. When I tried to do a little digging with him, he showed me part numbers that are different than the tail lights I have. I’m not sure that that means anything though. what I’m contemplating is if I should trim two ears off of the heat sink to fit it on the left tail light.
It’s weird. When you drill down that far in parts it starts to get dicey for accurate numbers.
But your pics answer my question, it’s def the passenger one. I was actually hoping there was an off chance that when you buy a heat sink, you get both, hence the weird right/left description and the 1 part number. But I guess no such luck.

Idk if trimming off 2 ears would be good tho since that’s half the contact points that hold it in, unless you could drill 2 new ones and make sure the screws didn’t penetrate any electronics inside the light. But it looks shallow and busy in there

I’m about to cut mine possibly this weekend, so we’ll see how that goes. Gotta really figure out the best but to use since just saying “I Dremeled it” doesn’t really give a method, bit type and what to look out for. But in this thread you can see that the electronics are very close to the part we have to cut.


Wired my XY400 connector the other day and that was a snap. So after I do the lights/sensors the next hurdle will be programming since I’m trying it with JScan. Which it seems not a lot of folk use and it doesn’t look super user friendly. And I think you have to buy 1 license per VIN ($23)

Sent from my iPhone using Tapatalk
After spending a bunch of time with my parts guy, I’m beginning to think I’d need to buy the entire tailight to get the heat sink. If I can’t find the correct one (which I have near-zero faith in finding), I’ll trim the two ears and use speed nuts with tiny bolts. Probably something close to 8-32 x 3/8 bolts. I’m amazed no one else has run into this besides you and me.It’s weird. When you drill down that far in parts it starts to get dicey for accurate numbers.
But your pics answer my question, it’s def the passenger one. I was actually hoping there was an off chance that when you buy a heat sink, you get both, hence the weird right/left description and the 1 part number. But I guess no such luck.
Idk if trimming off 2 ears would be good tho since that’s half the contact points that hold it in, unless you could drill 2 new ones and make sure the screws didn’t penetrate any electronics inside the light. But it looks shallow and busy in there
I’m about to cut mine possibly this weekend, so we’ll see how that goes. Gotta really figure out the best but to use since just saying “I Dremeled it” doesn’t really give a method, bit type and what to look out for. But in this thread you can see that the electronics are very close to the part we have to cut.
Wired my XY400 connector the other day and that was a snap. So after I do the lights/sensors the next hurdle will be programming since I’m trying it with JScan. Which it seems not a lot of folk use and it doesn’t look super user friendly. And I think you have to buy 1 license per VIN ($23)
Sent from my iPhone using Tapatalk
Yeah it’s kinda crazy. I was considering the same thing, but that’s a big price tag. Plus I wasn’t sure how much luck I’d have getting rid of the old ones afterward.
Have you checked eBay? There were still a bunch of sensors with heat sinks on there. We must have just been late to the party.
I bit the bullet and bought one I made sure was drivers side and I plan to just relist my extra one once I have this all installed and working. Sucks tho cuz the 2 passenger side heat sinks I have are ok and the one drivers side I ended up with looks like was in WWII.
Let us know how modifying it works if you try that tho.
Sent from my iPhone using Tapatalk
Have you checked eBay? There were still a bunch of sensors with heat sinks on there. We must have just been late to the party.
I bit the bullet and bought one I made sure was drivers side and I plan to just relist my extra one once I have this all installed and working. Sucks tho cuz the 2 passenger side heat sinks I have are ok and the one drivers side I ended up with looks like was in WWII.

Let us know how modifying it works if you try that tho.
Sent from my iPhone using Tapatalk
Do you have the listing you purchased from?Yeah it’s kinda crazy. I was considering the same thing, but that’s a big price tag. Plus I wasn’t sure how much luck I’d have getting rid of the old ones afterward.
Have you checked eBay? There were still a bunch of sensors with heat sinks on there. We must have just been late to the party.
I bit the bullet and bought one I made sure was drivers side and I plan to just relist my extra one once I have this all installed and working. Sucks tho cuz the 2 passenger side heat sinks I have are ok and the one drivers side I ended up with looks like was in WWII.
Let us know how modifying it works if you try that tho.
Sent from my iPhone using Tapatalk
This is the one. I grit my teeth and bought.

Interesting tho, these pics are new, and he says there’s one left. This heat sink looks clean compared to mine AND this sensor is an AE… mine was an AD (but I already have 2 AE’s so I’m just using those)
Sent from my iPhone using Tapatalk

2019 2020 2021 DODGE RAM 1500 Blind Spot Radar Detection Module Driver Side OEM | eBay
Find many great new & used options and get the best deals for 2019 2020 2021 DODGE RAM 1500 Blind Spot Radar Detection Module Driver Side OEM at the best online prices at eBay! Free shipping for many products!
www.ebay.com
Interesting tho, these pics are new, and he says there’s one left. This heat sink looks clean compared to mine AND this sensor is an AE… mine was an AD (but I already have 2 AE’s so I’m just using those)
Sent from my iPhone using Tapatalk
Thanks for posting that. I decided that I’m tired of spending money, so I’m doing the ol’ snip snip on the RH heat sink. I’ll post pics when I do it.This is the one. I grit my teeth and bought.

2019 2020 2021 DODGE RAM 1500 Blind Spot Radar Detection Module Driver Side OEM | eBay
Find many great new & used options and get the best deals for 2019 2020 2021 DODGE RAM 1500 Blind Spot Radar Detection Module Driver Side OEM at the best online prices at eBay! Free shipping for many products!www.ebay.com
Interesting tho, these pics are new, and he says there’s one left. This heat sink looks clean compared to mine AND this sensor is an AE… mine was an AD (but I already have 2 AE’s so I’m just using those)
Sent from my iPhone using Tapatalk
No prob. Pretty curious to see how that works out. 

Sent from my iPhone using Tapatalk


Sent from my iPhone using Tapatalk
ZombieSlayer
Ram Guru
Thanks for posting that. I decided that I’m tired of spending money, so I’m doing the ol’ snip snip on the RH heat sink. I’ll post pics when I do it.
Consider modifying the plastic vs cutting the heat sink tabs. It looks like you should be able to melt/cut a semi-circle for the bottom mount pretty easy. You might even be able to screw in the one tab that will be sticking out.
Just a note of caution tho, if you start putting screws into the housing where they aren’t planned for, just make sure you know what’s behind that plastic and how far the screw will protrude. These LED housings have a lot more to them than the old halogen style ones.
Sent from my iPhone using Tapatalk
Sent from my iPhone using Tapatalk
Users who are viewing this thread
Total: 1 (members: 0, guests: 1)
Members online
Total: 643 (members: 4, guests: 639)

