5thGenRams Forums
You are using an out of date browser. It may not display this or other websites correctly.
You should upgrade or use an alternative browser.
You should upgrade or use an alternative browser.
Center console to bench seat swap Complete
- Thread starter SNBI07
- Start date
Do you need a console
Originally I was looking to swap but starting to get used to the jump seat….still might consider it.
Sent from my iPhone using Tapatalk
Tgryphon
Active Member
- Joined
- Jun 7, 2021
- Messages
- 52
- Reaction score
- 56
- Points
- 18
- Age
- 42
Do you need a console
Peck2121 Id be interested in discussing a swap for my jump seat
I need to swap, love the console but need the jump seat, let me know of you want to swapOriginally I was looking to swap but starting to get used to the jump seat….still might consider it.
Sent from my iPhone using Tapatalk
Peck2121 Id be interested in discussing a swap for my jump seat
Is your truck a 1500?
Sent from my iPhone using Tapatalk
Tgryphon
Active Member
- Joined
- Jun 7, 2021
- Messages
- 52
- Reaction score
- 56
- Points
- 18
- Age
- 42
Yes. Bighorn with black / gray clothIs your truck a 1500?
Sent from my iPhone using Tapatalk
YesIs your truck a 1500?
Sent from my iPhone using Tapatalk
Awesome, I can do it asap. Do you want to email mePeck2121 Id be interested in discussing a swap for my jump seat
Chheitmiller
New Member
- Joined
- Sep 8, 2021
- Messages
- 2
- Reaction score
- 0
- Points
- 1
- Age
- 29
Sent you a pm.You still want to swap
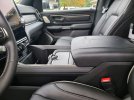
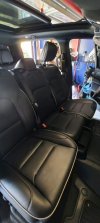
2021 limited with console converted to 2021 limited with leather jump seat. All rear heat and ventilation, usb's working.
Didn't take pics along whole install but just know this can be done. The console went into a bighorn eco diesel. No major hitches. I'm willing to help you along the way.
Didn't take pics along whole install but just know this can be done. The console went into a bighorn eco diesel. No major hitches. I'm willing to help you along the way.
Attachments
Last edited:
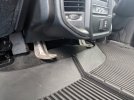
I did, huskey center hump cover, doesn't look badAny reason a guy doesn't simply cover the carpet hope with a nice square mat?
Attachments
Jump seat in limited can work, I did it. Used the center console harness, plugged my buttons in read into blanks, just need to extend the arm rest usb wireSo, I and another member are stuck on the wiring. Trying to swap a 2019 Laramie jump seat without the CD player with a 2021 Limited console without a CD player. The OEM console wiring harness does not want to power up the USBs front or rear (lid works), nor the front power port (rear power works) in the Laramie. This is also the case with the 68362132AC harness. Haven't even tried the jump seat in the Limited. If anyone can PM me if they think they can help we would greatly appreciate it.
$900 + shipping, I believe... I have to check to know exact amount but that's the ballparkHow much was it?
I need some help - can't figure out the jumpseat back bracket installation... what am I missing here?2021 limited with console converted to 2021 limited with leather jump seat. All rear heat and ventilation, usb's working.
Didn't take pics along whole install but just know this can be done. The console went into a bighorn eco diesel. No major hitches. I'm willing to help you along the way.
Just ordered the same - that looks great/easy!I did, huskey center hump cover, doesn't look bad
Attachments
hi If you can provide the part numbers for silver bracket , trim panel, A/C duct and replacement carpet . Thanks in advanceThe next picture shows how the wiring of the back USB hub, you will need to disconnect each of these. The one with green wires if for your traditional outlet, while the other two are for the USBs.
View attachment 16430
Once everything is unplugged you will want to cut the original wiring harness at the location I showed in the previous picture, where the bundle of wires go to the lid USB. You will then discard the main part of the harness and the part that you see above. Then lay your new wiring harness in place of the old one:
View attachment 16431
Now we start the fun in the back portion of the new harness to get it connected properly. I have made two pictures which detail how/where you will need to cut and re-wire. I think they are pretty straight forward so I'll let the pictures speak for themselves. I know it doesnt seem right to cut into the brand new replacement wiring harness that you just bought but this is what it took to make everything work and power up properly.
View attachment 16434
View attachment 16436
Once I made all the connections I re-wrapped the wires using all the wrap that I could pull from the discarded wires, making it look like factory again:
View attachment 16437
Again the 3 plugs you see go to the back USB hub and power port, the next strand of wires above that are what go to the lid UBS and the main harness snakes back under the HVAC vents and back towards the front of the seat. Next, you need to make sure the USB plugs go back through the proper access point to reach to back USB area, so you need to pull that back through the access hole that they originally came through, as shown below:
View attachment 16438
Now the rest if easy and pretty much do everything in reverse order, reconnect the 3 plugs above to the USB/power connections, re-attach that back panel. I did not attach the wiring harness to any anchor points under the seat because I actually needed the entire length of the harness to reach the plugs that it connects to in the center console, so I could not afford any slack in the line. Once you plug your main harness to the dash wiring harness, you will have left over ports to connect to your new front USB ports and new power switch that you got as part of the kit to close out the big gaping hole that was left in your console after removing your dash.
View attachment 16439
Then make sure you new jump seat is bolted down properly. You will need two bolts in the front and 3 in the back, one on the driver side and two on the passenger side.
View attachment 16440
Once your seat is bolted down you can pat yourself on the back and enjoy the finished product (after you turned your car back on and made sure all our new power ports/USBs power up properly:
View attachment 16441
I have to say that I would not have tacked this project if there was not another forum member to swap parts with, it looked to be prohibitively expensive if trying to buy all the parts new/online. So be confident and swap out those parts in confidence because it can be done and everything can work 100% like its supposed to.
RAM_Hannes
New Member
- Joined
- Sep 17, 2020
- Messages
- 1
- Reaction score
- 0
- Points
- 1
- Age
- 37
Hi all,
hope all doing well!
Is anyone interested in swapping his jumpseat with me?
Have got an ram 1500 Laramie sport my 2020 with black leather and a center console.
The only thing is - I'm from Germany.
Or is anyone here to help me purchase all parts from the US?
Thanks
Joe
hope all doing well!
Is anyone interested in swapping his jumpseat with me?
Have got an ram 1500 Laramie sport my 2020 with black leather and a center console.
The only thing is - I'm from Germany.
Or is anyone here to help me purchase all parts from the US?
Thanks
Joe
64-Hurricane
New Member
- Joined
- Dec 1, 2021
- Messages
- 3
- Reaction score
- 1
- Points
- 3
- Age
- 39
For clarification. The limited jump seat with the shoulder style belt is only available for 1500's correct? The 2500-3500 are the lap belts only?
64-Hurricane
New Member
- Joined
- Dec 1, 2021
- Messages
- 3
- Reaction score
- 1
- Points
- 3
- Age
- 39
Is this a 1500 jump in a 2500?Folks,
Did the Console to Jump Seat swap - however, seem to be missing the beefier Floor Bracket that holds down the JumpSeat.
Here is what my swap looks like at the moment - not exactly sure which Dodge Part No I need to properly bolt the back of the jumpseat onto the floor/frame.
View attachment 104226Help appreciated.
If so, the bolt patterns won't line up perfectly. You could try and use the brackets from a 2500 jumper with some modifications. I would love to see a photo of how your sit fit from the top with the back folded up. I plan to do this swap, usint the 1500 jumper into a 2500 in a few months. I will be making custom tabs to pull it off though.
Last edited:
64-Hurricane
New Member
- Joined
- Dec 1, 2021
- Messages
- 3
- Reaction score
- 1
- Points
- 3
- Age
- 39
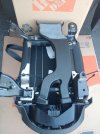
Here's a photo of the bottom of a 2500 jumper. At the bottom of the photo you can see the rear brackets are completely different. If you can get a set of these brackets they could be modified to fit the 1500 Jumper pretty easily and in my non safety engineering opinion provide adequate strength and safety just like OEM.I need some help - can't figure out the jumpseat back bracket installation... what am I missing here?
Just ordered the same - that looks great/easy!
Attachments
Here's a photo of the bottom of a 2500 jumper. At the bottom of the photo you can see the rear brackets are completely different. If you can get a set of these brackets they could be modified to fit the 1500 Jumper pretty easily and in my non safety engineering opinion provide adequate strength and safety just like OEM.
Appreciate the help - I have a 1500 jumpseat installed into a 1500 replacing the console.
I am happy to order the correct 1500 jumpseat bracket/parts, but I cannot even locate these online???
Users who are viewing this thread
Total: 4 (members: 0, guests: 4)

