5thGenRams Forums

Register a free account today to become a member! Once signed in, you'll be able to participate on this site by adding your own topics and posts, as well as connect with other members through your own private inbox!

Air Ride with DAYSTAR and REVEL Links!

Installed on my Limited yesterday. My biggest issues were:
1. After trimming getting a couple of the extenders to thread on. I used the old nuts as cut stops so I know the threads were cleaned and deburred. I did not have a tap and die but for that size. It’s it’s a little tough getting it on with a 5/8” open end wrench was difficult. I should have used an old nut run down and then on with a battery impact. Of course you only think of that the day after.
2.Installing the strut with the spacer obviously needs more room. Make sure you remove the wheel speed sensor cable from its three support locations. That gives you the extraplay pushing the lower control arm down.

Starting at 2.5” On the link length had me about 1-3/4” delta front to back. Shortened the links 4 turns and were down to 1”. Just at 40 in the front at OR2. I’ll ride with this for awhile. No change in ride quality.

I’m at 40.5” front and rear in Normal height. That’s on 285/65/20 Nittos tho.


Sent from my iPhone using Tapatalk
 
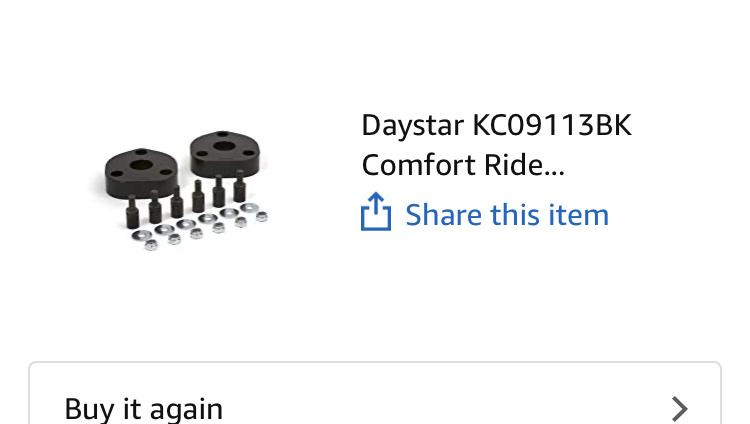
??? That’s weird. I didn’t measure mine ( shown below ) but they were definitely way bigger then 1”

85af0599e987f2216488c7968fb76243.jpg


Sent from my iPhone using Tapatalk

Even in that picture they aren’t very big. I measured mine at just over an inch.


Sent from my iPhone using Tapatalk
 
Ok, so I just did some more “googling” and your right. The leveling kit is less then 2 inch but because it’s at the strut the suspension geometry magnifies that to give you 2.5 ... that actually makes sense to me. Thank God for Google!! Mystery solved, lol


Sent from my iPhone using Tapatalk
 
I’m at 40.5” front and rear in Normal height. That’s on 285/65/20 Nittos tho.


Sent from my iPhone using Tapatalk
Yhea, I'm on the stock 22" rubber. The stance is awesome now, ride is excellent and I'm driving myself crazy searching for 35x12.5x22 Nitto Ridge Grapplers. This is going to push me to sell my extra set of BMW E60 M5 BBS 166 wheels. That should get me about halfway there.

This is a great Mod.
 
What control arm did you pick? In an earlier post, you mentioned full extension might cause damage to the sensor? Did this correct that?

I did the arms in the 2" kit from ready lift for the non air ride trucks because I did not want the urethane bushings(noisy). You could do the ready lift arm form the 09-18 trucks i believe it is. Its the same arm with different bushings. I sold the 2" spacers locally from the kit for $100. The factory arm hits the air shock on full extension. Not the end of the world but limits down travel and its not optimal. The modified ReadyLift arm is fantastic. Eliminates all clearance issues. Allows the strut to extend fully and utilize the strut extension stops like factory. I also believe it rides better with the corrected ball joint angle. Its expensive but you bought a limited so dont cheap out now...

 
I suppose I'll add some pictures of my experience here, to include working with Revel Performance and their customer service (in short: FANTASTIC).

I'm a shade tree mechanic. I have the typical harbor freight Pittsburgh mechanic tool set, some nice 18V impacts, an angle driver, and some other nice to have tools that made this job easier than it may be for some.

On to the installation. I started at 3:30pm on a Tuesday, had both air struts out in less than an hour and a half from pulling the car into the garage, and was ready to reinstall. Finished the passenger side, and thennnnnn I got sloppy.

I'll let the pictures do the talking.
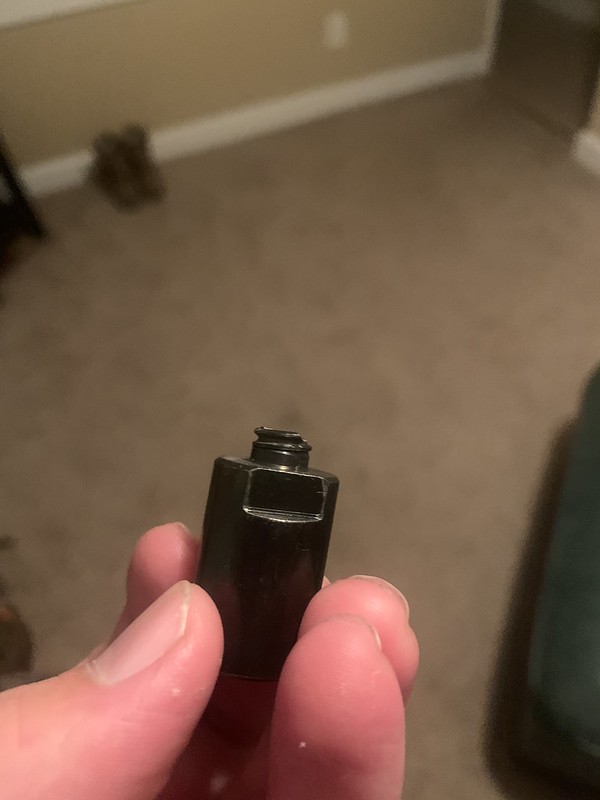
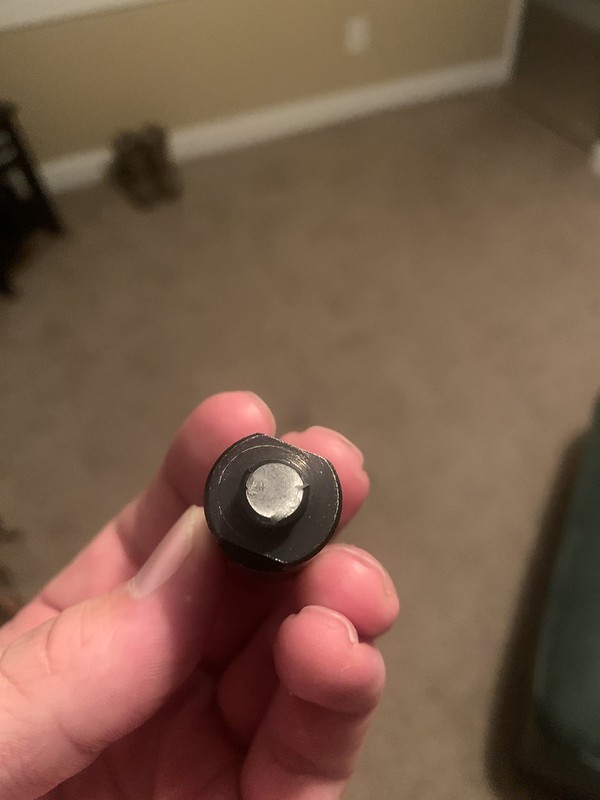
IMG_7722 by bfp9, on Flickr

IMG_7723 by bfp9, on Flickr

In short - I don't have a good adjustable torque wrench (I have since ordered one) and over torqued the top nuts on the strut and broke the thread extender. This is where Revel Performance came to the rescue. Thankfully I have a second vehicle - I emailed Revel, and in 6 days they had me a brand new one at no cost to me. Fantastic customer service. Cannot recommend them enough.

If you have tools, jack stands, a 3+ton jack, and the desire - after having completed this project once, I could probably do it again in two hours I would guess, maybe a little longer depending.

On to the statistics of the suspension height, link length, and any tips and tricks.

Please keep in mind my Limited is on the stock 20'' wheels with 305/55/20 K02s - so height variances can be attributed to that if yours aren't the same.

STOCK
Entry/Exit
Front 35''
Rear 37.5''

Aero
Front 36.5''
Rear 38.5''

Normal
Front 37.5''
Rear 39''

Offroad 1
Front 38.5''
Rear 40''

Offroad 2
Front 39.5''
Rear 41.5''

AFTER LINK AND SPACER INSTALL
Entry/Exit
Front 36''
Rear 37.5''

Aero
Front 38''
Rear 38.5''

Normal
Front 38.5''
Rear 39''

Offroad 1
Front 39.5''
Rear 40.25''

Offroad 2
Front 40.5''
Rear 40.5''


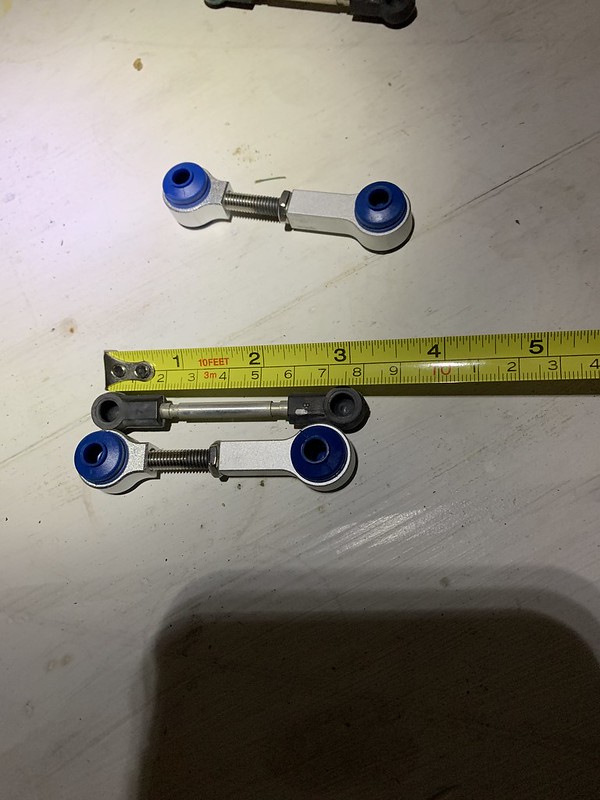
HERE ARE THE PHOTOS OF THE LENGTHS I AM INITIALLY USING FOR THE LINKS UNTIL I GET THEM FINE TUNED. I FIRST AND FOREMOST WANTED TO MAKE SURE EVERYTHING WAS BUTTONED UP PROPERLY, GET THE TRUCK UP TO SPEED, AND LISTEN FOR ANYTHING. I AM GOING TO ADJUST THE LINKS TO GET A FULL LEVEL IN NORMAL MODE.
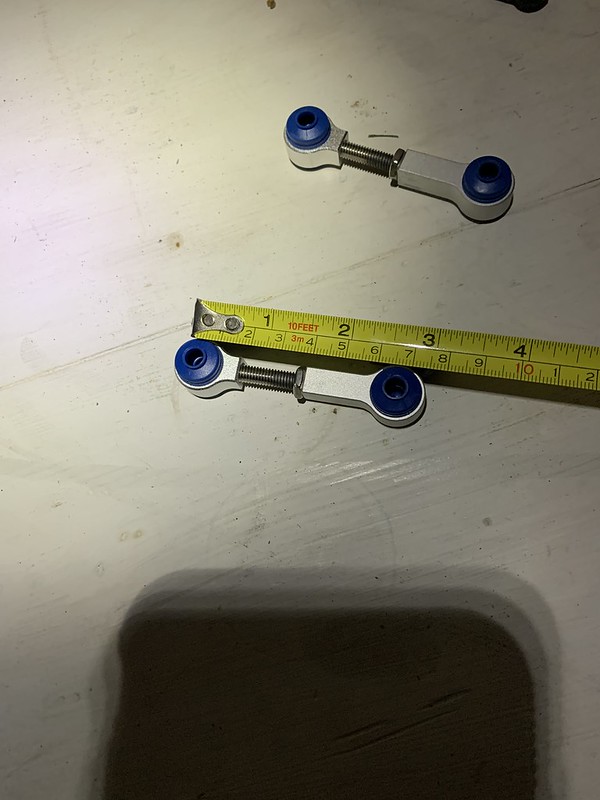
IMG_7717 by bfp9, on Flickr

IMG_7716 by bfp9, on Flickr

I am doing small gradual changes as I don't want to throw an error in the suspension by adjusting the links too much at any given time. Is that a rational idea? Probably not - but its how I operate so I am going to do that. The heights above are likely solely from the 1ish inch spacer and that's about it. I will come back and post again when I have the truck totally leveled, and I will re-measure the heights then.

Tips/Tricks:

1: A good breaker bar is a must.
2: Nice Ratchet Wrenches - the combination ones with the open end and the racket on the back end - are a game changer for the sway bar links - if you have to use a normal wrench and a socket to hold the end of the spindle, its going to take you a while, and the space is tight.
3: Trimming the studs down on the stock air strut mount - It was said here before, I took the advice and it worked - thread a stock nut onto the strut before you cut the studs down. When you're done with the Dremel and cutting wheel, take a high powered impact, and back that nut off the stock threads and it will make threading the extenders on so much easier.
4: I only removed 5 bolts from each side. 2 x upper control arm, 1 sway bar link bolt, the big bolt at the bottom that holds the strut to the lower control arm, and the outer tie rod bolt. I didn't touch the brake calipers. I watched the wheel speed sensor and the brake lines carefully and they were fine without being removed.

If any of you have watched the youtube video that has been linked around the forums of the guy installing this kit on his Rebel, thats basically what I did but I knew I wasn't going to have to touch the Brake components - there was obviously enough slack in the lines on my truck for me to feel comfortable leaving them.

If anyone has any questions or concerns, I'll be happy to answer. It really is a simple process. I have no pops. I have no funky sounds. The ride is still fantastic. The 1-1.5'' lift is noticeable when looking at the truck. I am going to fine tune the links to get a full 2-2.5'' level out of the kit and then I'll take some good pictures of the truck with my nice camera.

-Ben
 
Great write up Ben. Your experience with over torquing is why I don't feel comfortable doing myself. Last time I worked on suspension on my 17 Camaro SS I sheared off the top of the strut...on my daily driver. Luckily my mother lives close by and works from home...BMW for the win for a couple days.

I will either be taking this task on myself or having installed soon.

Did you NEED to trim the studs?

I don’t see why you would need to.

There shouldn’t be much lateral force on the studs to begin with so if they aren’t sitting flush it shouldn’t be an issue. Torqued properly, the strut is held up by a lot more than just those three small nuts. And the strut itself rests on the spacer. Not the studs. So I would say No - you don’t need to. I did because I had my dremel and cutting wheel handy.
 
Great write up Ben. Your experience with over torquing is why I don't feel comfortable doing myself. Last time I worked on suspension on my 17 Camaro SS I sheared off the top of the strut...on my daily driver. Luckily my mother lives close by and works from home...BMW for the win for a couple days.

I will either be taking this task on myself or having installed soon.

Did you NEED to trim the studs?
I was concerned with the extender bases protruding through the spacer and impacting the metal strut mount tower and making noise. Ive heard it done both ways. You dont have to cut any threads just the little nub that sticks above the threads.
 
I was concerned with the extender bases protruding through the spacer and impacting the metal strut mount tower and making noise. Ive heard it done both ways. You dont have to cut any threads just the little nub that sticks above the threads.

Even if you didn’t cut the threads, I don’t think the thicker base would protrude last the spacer - but maybe. I think there were only 2-3 threads left exposed on the stock stud without trimming.
 
I suppose I'll add some pictures of my experience here, to include working with Revel Performance and their customer service (in short: FANTASTIC).

I'm a shade tree mechanic. I have the typical harbor freight Pittsburgh mechanic tool set, some nice 18V impacts, an angle driver, and some other nice to have tools that made this job easier than it may be for some.

On to the installation. I started at 3:30pm on a Tuesday, had both air struts out in less than an hour and a half from pulling the car into the garage, and was ready to reinstall. Finished the passenger side, and thennnnnn I got sloppy.

I'll let the pictures do the talking.

IMG_7722 by bfp9, on Flickr

IMG_7723 by bfp9, on Flickr

In short - I don't have a good adjustable torque wrench (I have since ordered one) and over torqued the top nuts on the strut and broke the thread extender. This is where Revel Performance came to the rescue. Thankfully I have a second vehicle - I emailed Revel, and in 6 days they had me a brand new one at no cost to me. Fantastic customer service. Cannot recommend them enough.

If you have tools, jack stands, a 3+ton jack, and the desire - after having completed this project once, I could probably do it again in two hours I would guess, maybe a little longer depending.

On to the statistics of the suspension height, link length, and any tips and tricks.

Please keep in mind my Limited is on the stock 20'' wheels with 305/55/20 K02s - so height variances can be attributed to that if yours aren't the same.

STOCK
Entry/Exit
Front 35''
Rear 37.5''

Aero
Front 36.5''
Rear 38.5''

Normal
Front 37.5''
Rear 39''

Offroad 1
Front 38.5''
Rear 40''

Offroad 2
Front 39.5''
Rear 41.5''

AFTER LINK AND SPACER INSTALL
Entry/Exit
Front 36''
Rear 37.5''

Aero
Front 38''
Rear 38.5''

Normal
Front 38.5''
Rear 39''

Offroad 1
Front 39.5''
Rear 40.25''

Offroad 2
Front 40.5''
Rear 40.5''


HERE ARE THE PHOTOS OF THE LENGTHS I AM INITIALLY USING FOR THE LINKS UNTIL I GET THEM FINE TUNED. I FIRST AND FOREMOST WANTED TO MAKE SURE EVERYTHING WAS BUTTONED UP PROPERLY, GET THE TRUCK UP TO SPEED, AND LISTEN FOR ANYTHING. I AM GOING TO ADJUST THE LINKS TO GET A FULL LEVEL IN NORMAL MODE.

IMG_7717 by bfp9, on Flickr

IMG_7716 by bfp9, on Flickr

I am doing small gradual changes as I don't want to throw an error in the suspension by adjusting the links too much at any given time. Is that a rational idea? Probably not - but its how I operate so I am going to do that. The heights above are likely solely from the 1ish inch spacer and that's about it. I will come back and post again when I have the truck totally leveled, and I will re-measure the heights then.

Tips/Tricks:

1: A good breaker bar is a must.
2: Nice Ratchet Wrenches - the combination ones with the open end and the racket on the back end - are a game changer for the sway bar links - if you have to use a normal wrench and a socket to hold the end of the spindle, its going to take you a while, and the space is tight.
3: Trimming the studs down on the stock air strut mount - It was said here before, I took the advice and it worked - thread a stock nut onto the strut before you cut the studs down. When you're done with the Dremel and cutting wheel, take a high powered impact, and back that nut off the stock threads and it will make threading the extenders on so much easier.
4: I only removed 5 bolts from each side. 2 x upper control arm, 1 sway bar link bolt, the big bolt at the bottom that holds the strut to the lower control arm, and the outer tie rod bolt. I didn't touch the brake calipers. I watched the wheel speed sensor and the brake lines carefully and they were fine without being removed.

If any of you have watched the youtube video that has been linked around the forums of the guy installing this kit on his Rebel, thats basically what I did but I knew I wasn't going to have to touch the Brake components - there was obviously enough slack in the lines on my truck for me to feel comfortable leaving them.

If anyone has any questions or concerns, I'll be happy to answer. It really is a simple process. I have no pops. I have no funky sounds. The ride is still fantastic. The 1-1.5'' lift is noticeable when looking at the truck. I am going to fine tune the links to get a full 2-2.5'' level out of the kit and then I'll take some good pictures of the truck with my nice camera.

-Ben
60mm perfect.


Sent from my iPhone using Tapatalk
 
Got my tires put on today.

285/55R22 on stock wheels. No spacers.

I am currently leveled with Revel Links only. Approx 0.5in rake.

need to trim 2mm of fender liner that rubs in reverse.need to align the truck though so it may not run following alignment. Next up is the Daystars and maybe new upper control arms modded to fit limited air suspension.
Here are some pictures.
 

Attachments

  • 57A0F7F5-061F-4C61-A10B-7CDB07537E3C.jpeg
    57A0F7F5-061F-4C61-A10B-7CDB07537E3C.jpeg
    164.7 KB · Views: 516
  • 321F81C3-E0D7-4734-9857-C6B89F188409.jpeg
    321F81C3-E0D7-4734-9857-C6B89F188409.jpeg
    157.5 KB · Views: 537
  • 47E6E8BE-2E03-4A5F-9BEC-1F098C2E6327.jpeg
    47E6E8BE-2E03-4A5F-9BEC-1F098C2E6327.jpeg
    206.3 KB · Views: 545
Got my tires put on today.

285/55R22 on stock wheels. No spacers.

I am currently leveled with Revel Links only. Approx 0.5in rake.

need to trim 2mm of fender liner that rubs in reverse.need to align the truck though so it may not run following alignment. Next up is the Daystars and maybe new upper control arms modded to fit limited air suspension.
Here are some pictures.
That’s all I’m using and it’s perfect
 

Attachments

  • AF5A8AAA-53D3-4C6C-A013-43275CD2C777.jpeg
    AF5A8AAA-53D3-4C6C-A013-43275CD2C777.jpeg
    191.7 KB · Views: 442
Got my tires put on today.

285/55R22 on stock wheels. No spacers.

I am currently leveled with Revel Links only. Approx 0.5in rake.

need to trim 2mm of fender liner that rubs in reverse.need to align the truck though so it may not run following alignment. Next up is the Daystars and maybe new upper control arms modded to fit limited air suspension.
Here are some pictures.

All, I should add that the slight rub in reverse ONLY occurs in ENTRY/EXIT mode.
 
60mm perfect.


Sent from my iPhone using Tapatalk

This is great advice.

I went to 60mm on the front and it’s level to a millimeter front to rear from my rudimentary measuring.

Thanks Samson
 
I suppose I'll add some pictures of my experience here, to include working with Revel Performance and their customer service (in short: FANTASTIC).

I'm a shade tree mechanic. I have the typical harbor freight Pittsburgh mechanic tool set, some nice 18V impacts, an angle driver, and some other nice to have tools that made this job easier than it may be for some.

On to the installation. I started at 3:30pm on a Tuesday, had both air struts out in less than an hour and a half from pulling the car into the garage, and was ready to reinstall. Finished the passenger side, and thennnnnn I got sloppy.

I'll let the pictures do the talking.

IMG_7722 by bfp9, on Flickr

IMG_7723 by bfp9, on Flickr

In short - I don't have a good adjustable torque wrench (I have since ordered one) and over torqued the top nuts on the strut and broke the thread extender. This is where Revel Performance came to the rescue. Thankfully I have a second vehicle - I emailed Revel, and in 6 days they had me a brand new one at no cost to me. Fantastic customer service. Cannot recommend them enough.

If you have tools, jack stands, a 3+ton jack, and the desire - after having completed this project once, I could probably do it again in two hours I would guess, maybe a little longer depending.

On to the statistics of the suspension height, link length, and any tips and tricks.

Please keep in mind my Limited is on the stock 20'' wheels with 305/55/20 K02s - so height variances can be attributed to that if yours aren't the same.

STOCK
Entry/Exit
Front 35''
Rear 37.5''

Aero
Front 36.5''
Rear 38.5''

Normal
Front 37.5''
Rear 39''

Offroad 1
Front 38.5''
Rear 40''

Offroad 2
Front 39.5''
Rear 41.5''

AFTER LINK AND SPACER INSTALL
Entry/Exit
Front 36''
Rear 37.5''

Aero
Front 38''
Rear 38.5''

Normal
Front 38.5''
Rear 39''

Offroad 1
Front 39.5''
Rear 40.25''

Offroad 2
Front 40.5''
Rear 40.5''


HERE ARE THE PHOTOS OF THE LENGTHS I AM INITIALLY USING FOR THE LINKS UNTIL I GET THEM FINE TUNED. I FIRST AND FOREMOST WANTED TO MAKE SURE EVERYTHING WAS BUTTONED UP PROPERLY, GET THE TRUCK UP TO SPEED, AND LISTEN FOR ANYTHING. I AM GOING TO ADJUST THE LINKS TO GET A FULL LEVEL IN NORMAL MODE.

IMG_7717 by bfp9, on Flickr

IMG_7716 by bfp9, on Flickr

I am doing small gradual changes as I don't want to throw an error in the suspension by adjusting the links too much at any given time. Is that a rational idea? Probably not - but its how I operate so I am going to do that. The heights above are likely solely from the 1ish inch spacer and that's about it. I will come back and post again when I have the truck totally leveled, and I will re-measure the heights then.

Tips/Tricks:

1: A good breaker bar is a must.
2: Nice Ratchet Wrenches - the combination ones with the open end and the racket on the back end - are a game changer for the sway bar links - if you have to use a normal wrench and a socket to hold the end of the spindle, its going to take you a while, and the space is tight.
3: Trimming the studs down on the stock air strut mount - It was said here before, I took the advice and it worked - thread a stock nut onto the strut before you cut the studs down. When you're done with the Dremel and cutting wheel, take a high powered impact, and back that nut off the stock threads and it will make threading the extenders on so much easier.
4: I only removed 5 bolts from each side. 2 x upper control arm, 1 sway bar link bolt, the big bolt at the bottom that holds the strut to the lower control arm, and the outer tie rod bolt. I didn't touch the brake calipers. I watched the wheel speed sensor and the brake lines carefully and they were fine without being removed.

If any of you have watched the youtube video that has been linked around the forums of the guy installing this kit on his Rebel, thats basically what I did but I knew I wasn't going to have to touch the Brake components - there was obviously enough slack in the lines on my truck for me to feel comfortable leaving them.

If anyone has any questions or concerns, I'll be happy to answer. It really is a simple process. I have no pops. I have no funky sounds. The ride is still fantastic. The 1-1.5'' lift is noticeable when looking at the truck. I am going to fine tune the links to get a full 2-2.5'' level out of the kit and then I'll take some good pictures of the truck with my nice camera.

-Ben
So where you from? :LOL:
 
Installed the home made links and new wheels/tires yesterday. Minor rubbing on the little mud flaps behind the front wheels. Thinking about leaving as is and pretending it's baseball cards in my spokes. j/k. I will probably remove and trim today.
Please disregard the dirty truck, it has been very rainy lately.
Haven't installed the daystar spacers yet, and ride quality seems pretty OK actually. Used the same link length as Samson recommended. Ended up 1/8th inch higher in the back and I am good with that. Ground to fender is right around 40 3/4".
Wheels: 20x10 Fuel Militia
Tires: Atturo Trailblade XT 35x12.5R20
 

Attachments

  • 20200324_080432.jpg
    20200324_080432.jpg
    178.4 KB · Views: 453
I did the leveling links on my 2016 limited and never had a problem and got almost 2.5” of lift so I have some experience with the links but it does ride rough compared to prior links!
Waiting for the plant to open back up to get my 2020 Laramie Sport with air ride and ORP built, I had a build date of the week the plant closed down.
I am wanting to do the Revel links front and back with the Daystar spacer in the front, as this will help me out with the rough ride!
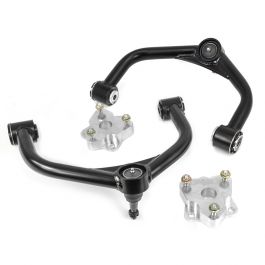
I see many guys do the Mopar 2” lift UCAs
as they are made to take the steeper angle and already have the knob for the air ride links already on them! My truck will have the off road package same as a Rebel.
Are my stock ORP UCAs the same as same as the Mopar lift ones or the same stock ones as in a non ORP truck, and do I need them anyways? I never them on my 2016 and things have been fine up to 30k miles.
Most of the info I find is on a limited truck!
Any info and recommendations on the UCA or Air ride leveling with the ORP is welcomed!
Thanks
 

Users who are viewing this thread

Back
Top