
5thGenRams Forums
You are using an out of date browser. It may not display this or other websites correctly.
You should upgrade or use an alternative browser.
You should upgrade or use an alternative browser.
Adding Passive Entry: How-to
- Thread starter MayhemMOORE
- Start date
vincentw56
Spends too much time on here
- Joined
- Aug 5, 2020
- Messages
- 4,590
- Reaction score
- 3,005
- Points
- 113
- Age
- 54
Opening the tailgate without unlocking if I remember correctly.More curious than anything. does anyone know what the point of the rear antenna is?
deeve
Ram Guru
Alfa 
vincentw56
Spends too much time on here
- Joined
- Aug 5, 2020
- Messages
- 4,590
- Reaction score
- 3,005
- Points
- 113
- Age
- 54
Just adding the sales code won't do anything and that is a dealer only thing anyway. How far are you from Indianapolis?Anyone in Michigan able to add sales code for me? Or have alpha near grand blanc?
deeve
Ram Guru
Adding the sales code would allow him to keep it after a dealer software update though, wouldn't it? I haven't done mine yet, but it would be nice to not have to worry about the dealership killing that with an update. I know it can be fixed easily though by simply reprograming it with AlfaODB later.Just adding the sales code won't do anything and that is a dealer only thing anyway. How far are you from Indianapolis?
vincentw56
Spends too much time on here
- Joined
- Aug 5, 2020
- Messages
- 4,590
- Reaction score
- 3,005
- Points
- 113
- Age
- 54
It would yes. If the dealer does a restore, it would wipe it out without the sales code. Most dealers won't add a sales code to user added equipment. You might find one that will. The best thing to do is create a backup of your config in AlfaODB after you make any changes. Then you can simply restore it yourself. Of course you have to have AlfaODB and the bypass cables.Adding the sales code would allow him to keep it after a dealer software update though, wouldn't it? I haven't done mine yet, but it would be nice to not have to worry about the dealership killing that with an update. I know it can be fixed easily though by simply reprograming it with AlfaODB later.
vincentw56
Spends too much time on here
- Joined
- Aug 5, 2020
- Messages
- 4,590
- Reaction score
- 3,005
- Points
- 113
- Age
- 54
Make sure it goes over the white plastic part completely. You just have to work it over it. I did it before pushing the connector back into the door jamb.Does anyone have any tips for getting the rubber boot to sit flush again over the cab to door connection in the door jamb? Thanks
Finished the whole project. Took me about 8 hours all set and done. 5 of the hours was just the passenger door. Once I figured it out it went much faster. Thanks to Jimmy for the wiring. And for the huge write up, couldn’t have done it without it.
@MayhemMOORE @Jimmy07If you are going to use the numbers below to order parts, double check them as things can change over time, so it's going to be up to you to verify you're getting the correct part when ordering. If you find a mistake please let me know so I can correct it.
5th Gen 1500 Handle and Cap Part Numbers
These should work on any of the 2019 and newer 5th gen 1500 trucks. Harnesses are going to be more specific based on your options, or you can just add the 2 wires and plugs to your existing stuff and save a good bit of money.
COLOR BODY COLOR HANDLE, L & R BODY COLOR/CHROME HANDLE L & R HANDLE CAP, LEFT HANDLE CAP, RIGHT Bright White 6CV64GW7AD 6CV361W7AD 6CV50GW7AC 6CV52GW7AB Ivory White 6CV64KGZAD 6CV361WDAD 6CV50JWDAC 6CV52JWDAB Diamond Black Crystal 6CV64KXJAD 6CV361XJAD 6CV50KXJAC 6CV52KXJAB Maximum Steel Metallic 6CV64KARAD 6CV361ARAD 6CV50KARAC 6CV52KARAB Granite Crystal Metallic 6CV64LAUAD 6CV361AUAD 6CV50LAUAC 6CV52LAUAB Billet Silver Metallic 6CV64JSCAD 6CV361SCAD 6CV50JSCAC 6CV52JSCAB Patriot Blue Pearl 6CV64RPXAD 6CV361PXAD 6CV50RPXAC 6CV52RPXAB Blue Streak Pearl 6CV64KCLAD 6CV361CLAD 6CV50KCLAC 6CV52KCLAB Flame Red 6CV64PR4AD 6CV361R4AD 6CV50PR4AC 6CV52PR4AB Olive Green 6CV64KFPAD 6CV361FPAD 6CV50KFPAC 6CV52KFPAB
Replacement Clips for the 1500 door panels
Door Interior Trim Panel Retainer (Yellow): 6510747AA
Door Interior Trim Panel Retainer (White): 6510359AA
HD Part Numbers
Thank you to @01Time for providing the more comprehensive list below for the HD trucks than I had originally posted.
COLOR BODY COLOR, FRONT LEFT BODY COLOR, FRONT RIGHT BODY COLOR, REAR LEFT BODY COLOR, REAR RIGHT BODY COLOR/CHROME, FRONT LEFT BODY COLOR/CHROME, FRONT RIGHT BODY COLOR/CHROME, REAR LEFT BODY COLOR/CHROME, REAR RIGHT BILLET SILVER METALLIC 1UJ81JSCAI 1UJ86JSCAI 1GH19JSCAF 1GH18JSCAF 6NV571SCAD 6NV561SCAC 6NV591SCAC 6NV581SCAC BLACK FOREST GREEN PEARL 1UJ81KGZAI 1UJ86KGZAI 1GH19KGZAF 1GH18KGZAF 6NV571GZAD 6NV561GZAC 6NV591GZAC 6NV581GZAC BLUE STREAK PEARL 1UJ81KCLAI 1UJ86KCLAI 1GH19KCLAF 1GH18KCLAF 6NV571CLAD 6NV561CLAC 6NV591CLAC 6NV581CLAC BRIGHT SILVER METALLIC 1UJ81WS2AI 1UJ86WS2AI 1GH19WS2AF 1GH18WS2AF 6NV571S2AD 6NV561S2AC 6NV591S2AC 6NV581S2AC BRIGHT WHITE 1UJ81GW7AI 1UJ86GW7AI 1GH19GW7AF 1GH18GW7AF 6NV571W7AD 6NV561W7AC 6NV591W7AC 6NV581W7AC BRILLIANT BLACK PEARL 1UJ81AXRAI 1UJ86AXRAI 1GH19AXRAF 1GH18AXRAF 6NV571XRAD 6NV561XRAC 6NV591XRAC 6NV581XRAC DELMONICO RED 1UJ81NRVAI 1UJ86NRVAI 1GH19NRVAF 1GH18NRVAF 6NV571RVAD 6NV561RVAC 6NV591RVAC 6NV581RVAC DIAMOND BLACK CRYSTAL PEARL 1UJ81KXJAI 1UJ86KXJAI 1GH19KXJAF 1GH18KXJAF 6NV571XJAD 6NV561XJAC 6NV591XJAC 6NV581XJAC FLAME RED 1UJ81PR4AI 1UJ86PR4AI 1GH19PR4AF 1GH18PR4AF 6NV571R4AD 6NV561R4AC 6NV591R4AC 6NV581R4AC GRANITE CRYSTAL METALLIC 1UJ81LAUAI 1UJ86LAUAI 1GH19LAUAF 1GH18LAUAF 6NV571AUAD 6NV561AUAC 6NV591AUAC 6NV581AUAC MAXIMUM STEEL METALLIC 1UJ81KARAI 1UJ86KARAI 1GH19KARAF 1GH18KARAF 6NV571ARAD 6NV561ARAC 6NV591ARAC 6NV581ARAC PATRIOT BLUE PEARL 1UJ81RPXAI 1UJ86RPXAI 1GH19RPXAF 1GH18RPXAF 6NV571PXAD 6NV561PXAC 6NV591PXAC 6NV581PXAC PEARL WHITE 1UJ81PWQAI 1UJ86PWQAI 1GH19PWQAF 1GH18PWQAF 6NV571WQAD 6NV561WQAC 6NV591WQAC 6NV581WQAC TRUE BLUE PEARL 1UJ81KBUAI 1UJ86KBUAI 1GH19KBUAF 1GH18KBUAF 6NV571BUAD 6NV561BUAC 6NV591BUAC 6NV581BUAC WALNUT BROWN METALLIC 1UJ81RUWAI 1UJ86RUWAI 1GH19RUWAF 1GH18RUWAF 6NV571UWAD 6NV561UWAC 6NV591UWAC 6NV581UWAC HYDRO BLUE METALLIC 1GH19MBJAF 1GH18MBJAF 6NV571BJAD 6NV561BJAC OLIVE GREEN METALLIC 1GH19KFPAF 1GH18KFPAF 6NV571FPAD 6NV561FPAC
The following is a breakdown of the parts you will need to assemble your own 2-wire harnesses for the doors, as well as the rear antenna. All of the connectors and terminals can be found at Mouser or Digikey, except for the Yazaki stuff.
Rear Antenna Wiring Parts
22AWG wire (2 colors to make it easy)
Heat shrink tubing (recommended)
Braided wire sleeve (recommended)
Rear PE Antenna: 52112204AA or 56046957AA should work in this location
2019 & 2020 Rear Fascia Connector Terminals: TE Connectivity 1241380-1
2019 & 2020 Rear Fascia Connector Wire Seals: TE Connectivity 828904-1
2021 Rear Fascia Connector Terminals:
2021 Rear Fascia Connector Wire Seals:
2019+ Rear Antenna Connector Shell: TE Connectivity 1-1438608-5
2019+ Rear Antenna Connector Shell Terminals: TE Connectivity 1355717-1
2019+ Wire Seals for Antenna Terminals: TE Connectivity 963530-1
Door Handle Wiring Parts
18AWG wire (2 colors to make it easy)
Heat shrink tubing (recommended)
Braided wire sleeve (recommended)
Door Connector Terminals: Aptiv 10762775
Door Handle Connector Shell: Yazaki 7283-6079-30
Door Handle Connector Shell Terminals: Yazaki 7116-4720-02
Yazaki parts are hard to find without ordering minimum quantities. One option is to call SMD Inc, and see if they’ll send you free samples (2 connectors, 4 terminals).
Please clarify Door Handle Wiring Parts for HD. It looks as though the cavities for the HD uses smaller blades at 3 locations

Adding Passive Entry: How-to
If you've seen the original thread on adding passive entry, HERE, you are likely well aware of the issues with getting it to work on the newer trucks that didn’t come with it from the factory. This thread will walk you through getting it to work on the 5th gen DT’s (and the HD trucks) just as it...
 5thgenrams.com
Thank You!
how much for the 3 cables I live in Ontario, Canada, Thanks.If anybody doesn’t want to spend the money for the entire door harnesses and rear facia harness, and doesn’t feel like building the add on harnesses with the parts, let me know and I can build them for you-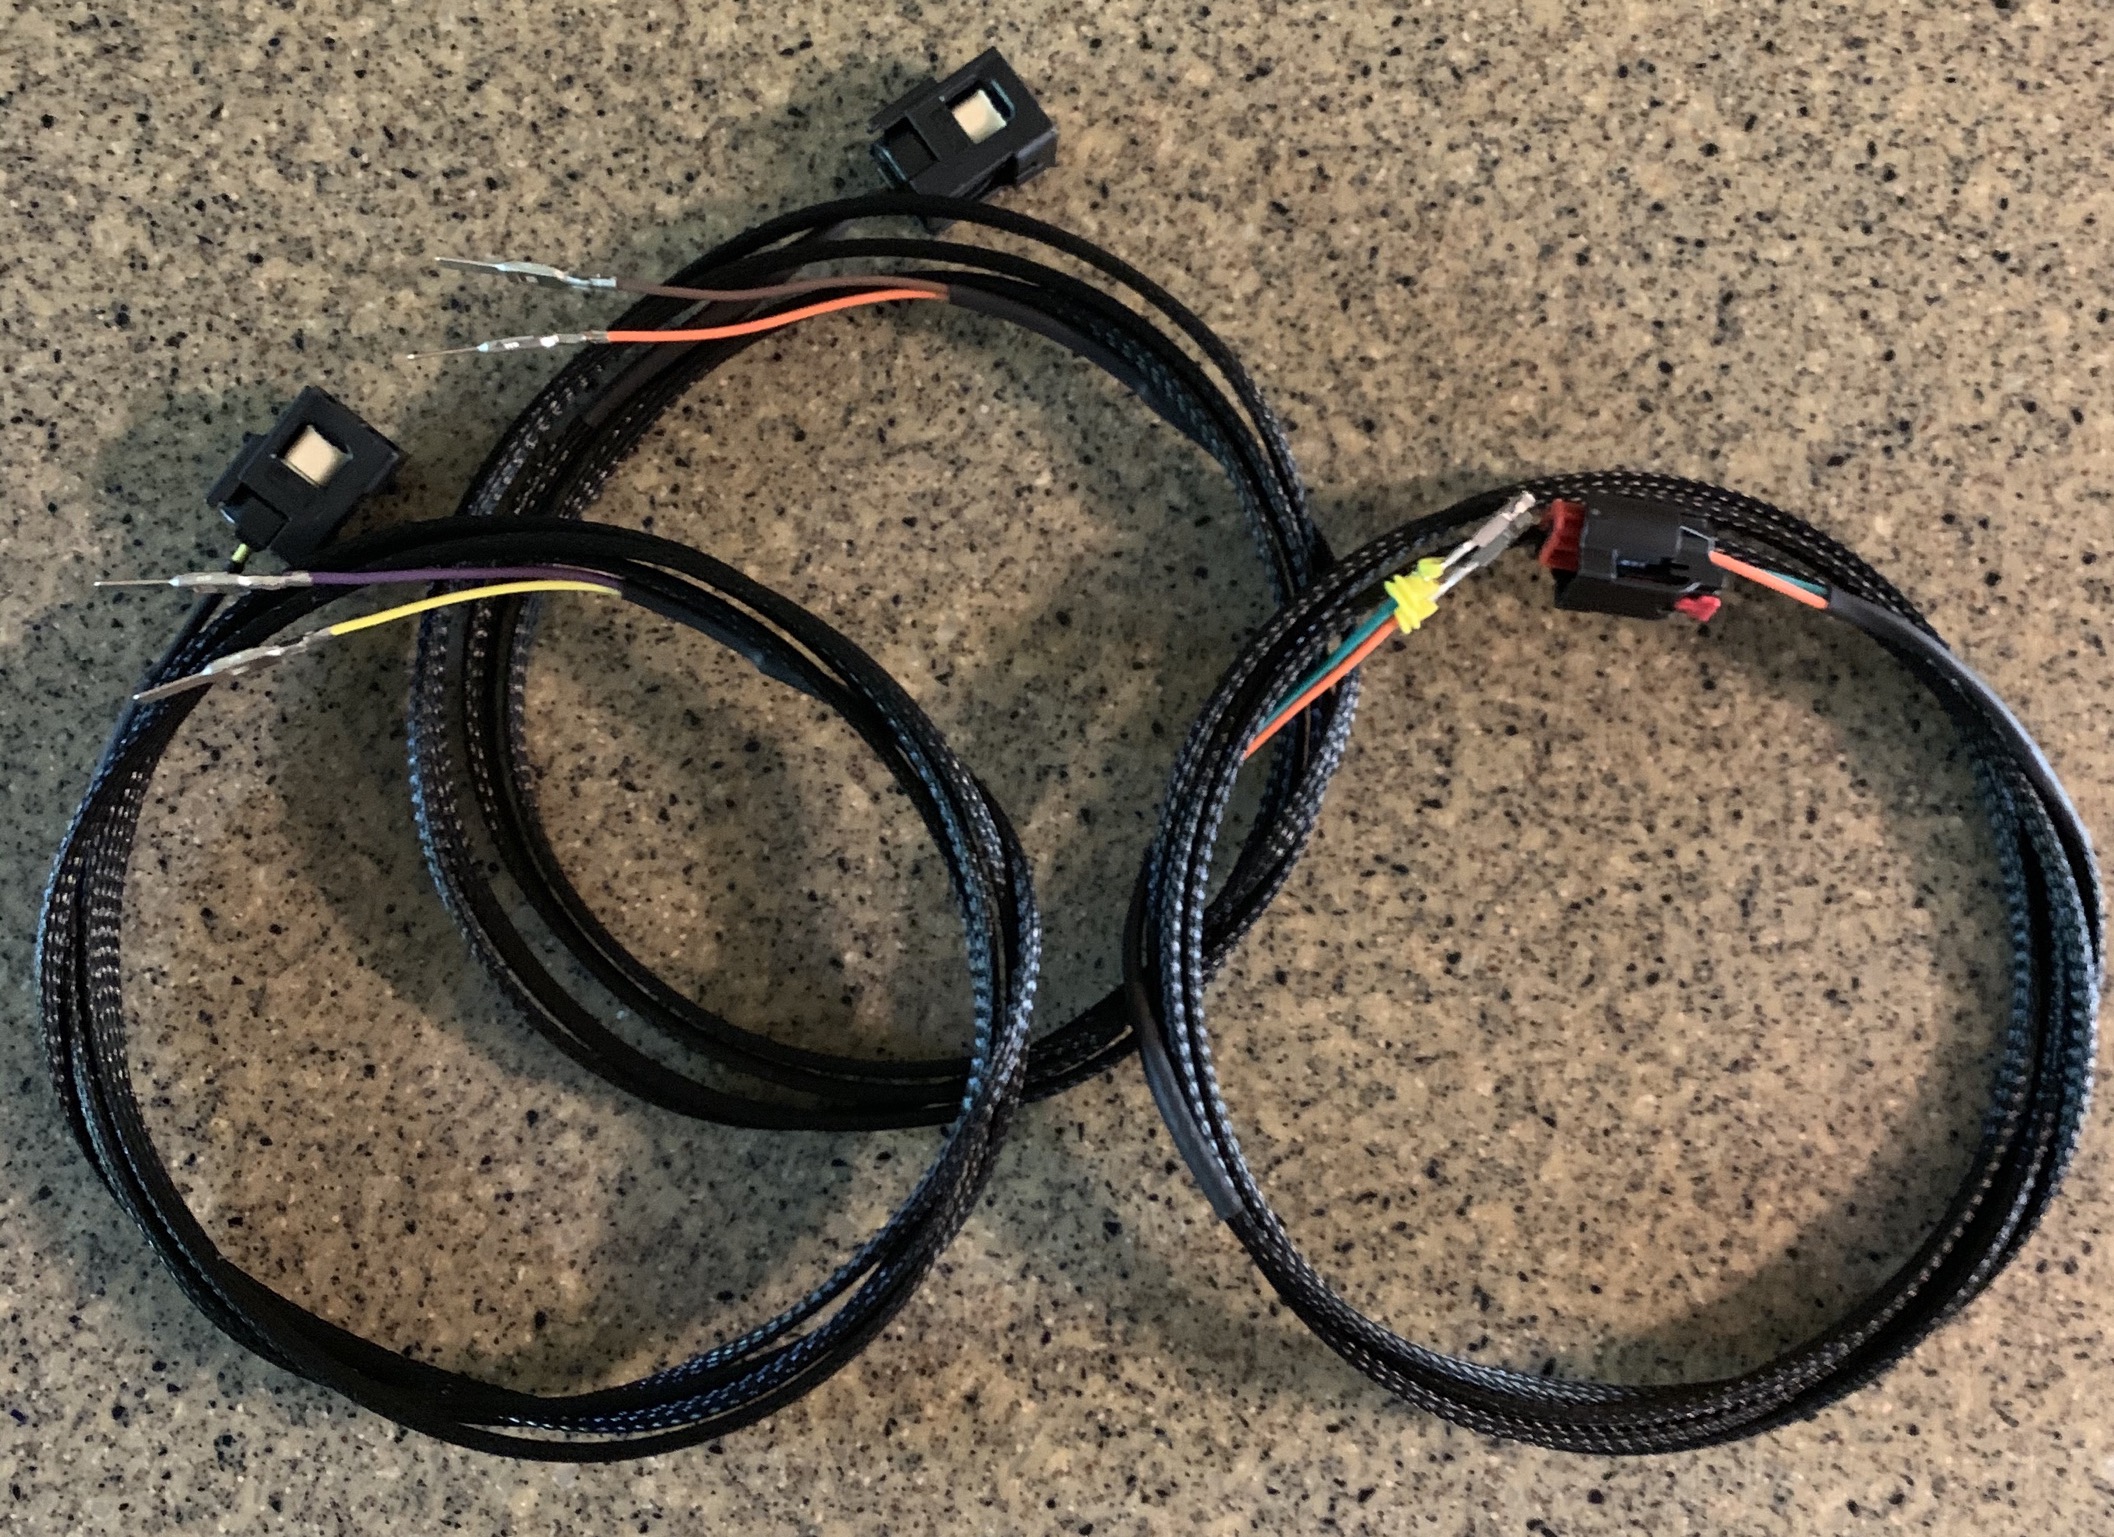
salmonbum
Member
- Joined
- Sep 4, 2019
- Messages
- 24
- Reaction score
- 7
- Points
- 3
- Age
- 50
I have a 2020 2500 PW Max Steel with the black textured door handles. Anyone have part numbers for the handles and caps? Local dealer can only find the handles and RH cap, no LH cap. I don't want to change all 4 to body color. I'm fine with the cheap black.
hbrob
New Member
- Joined
- Oct 31, 2022
- Messages
- 2
- Reaction score
- 0
- Points
- 1
- Age
- 51
Ill add a couple pointers for future installers based on my experience:
1) only use hand tools on the torx screws. the one for the handle (holds the door lock) is only is cast aluminum. strips easily. ask me how I know. One M6 tap later..
2) ensure that the handle panel on the interior of the door is securely attached by the tab on the lock hole before tightening the torx screw below the handle. i didnt realize on the first door that this wasn't locked in place, which drove me crazy trying to figure out what the lock wouldn't set. Hence #1.
Other than that went good, second door was substantially easier.
Like many others used Jimmy's wiring. It was perfect. Quick shipping and very fairly priced.
badal38257
New Member
- Joined
- Jan 5, 2023
- Messages
- 4
- Reaction score
- 1
- Points
- 3
- Age
- 45
Ive contacted two shops and a dealership. All have shot me down to do this, so to make the misses happy I'm gonna have to do this myself. Can anybody tell me what the cost is all in to do this?
vincentw56
Spends too much time on here
- Joined
- Aug 5, 2020
- Messages
- 4,590
- Reaction score
- 3,005
- Points
- 113
- Age
- 54
Yep, no stealership will do it. I don't know exactly, but you can figure it up by the parts list. But best guess is less than $500.Ive contacted two shops and a dealership. All have shot me down to do this, so to make the misses happy I'm gonna have to do this myself. Can anybody tell me what the cost is all in to do this?
Add me to the group who has successfully completed this mod - massive thanks to @MayhemMOORE and @Jimmy07 for the initial write up and the harnesses. Brilliant research to determine the mod process and the wire harnesses are top notch, factory grade units.
In my case the handles worked the moment I closed AlphaOBD and the Passive Entry option was also present right away in the UConnect settings.
The driver’s door would have taken me an hour less if I had paid enough attention to Tyler Potter’s video and his mention of how to release the two connectors that plug into the door harness. To remove those connectors press a small tab at the top of the white connector and the bottom of the brown one using a 90 degree pick or something similar - then pull the connectors from the harness. With that knowledge my passenger door only took about 45 minutes.
Again, thanks to all who contributed to this mod. I love working on my vehicles, and really enjoyed this project too. Forum posts like this are an awesome resource!
Cheers,
Bob
Biggiehorn
Ram Guru
Just knocked out the rear passenger side. I’m going to do the driver’s side rear tomorrow morning. This video was a huge help with following along the process. I actually think the rear door was easier than the fronts, but I’m only half way through this process so I may be speaking prematurely here. I found that everything was just a lot more cooperative. Especially those stubborn door connectors that we’ve all dealt with on the front doors. The rear doors release much more easily, at least in my experience they did.I now have sets of harnesses for the rear doors for anyone interested in making those passive entry. They are as plug n play as possible, aside from having to tap the wires for the front door handles (tapped under the front door sill trim).
Here’s a video of someone installing them:
View attachment 136151
I realistically could have had the rear passenger side done in about 1.5 hours but of course I jinxed myself and made a simple mistake during reassembly. Something was continuously catching on my window, preventing it from going all the way down. Logically thinking, I figured it had to be the new section of harness I installed, so I removed and re-routed it 3 or 4 times and still was running into the same issue. After a good 45 minutes of digging, I realized I stupidly installed the main door harness/grommet into the door upside down. Just as a FYI, the orientation arrows are there for a reason! Installing it upside down will cause the harness to catch on the window glass. Lol, just don’t be a bonehead like me and you should be fine with this project.
One other thing I noticed with the passenger side is that one wire from Jimmy’s harness has instructions to tap into a green wire with purple stripe. As the video Jimmy linked above indicates, the wires you want are both together right towards the top of the bundle on both the passenger and driver side. I just wanted to call this out because I did find another purple and green wire that could easily be mistaken as the wire to tap into if you’re not cautious (see photo below).
Once I complete the driver’s rear, I’ll update this post if I find anything else worth mentioning, but overall, the video from Jimmy’s post does an awesome job at breaking down the entire process.
Thanks again for the harnesses @Jimmy07. Amazing quality as usual.


Last edited:
GTG2022
Active Member

For those thinking of tackling this job, here is a pic of what the door panel looks like when it is removed from the frame. Red indicates the clips where the wire harness should be routed to prevent the window from snagging the harness. The Blue circle shows the torx bolt towards the front of the door handle and can be seen when the handle is removed from the car. The Green circle shows the back of where the door handle was. It uses the T25 torx bolt that you have to access on the side but cannot see because it is located inside the door. The Yellow circle shows the bolts I had to remove to route the harness through a rubber boot. Hope this helps/clarifies how to route the harness.
Biggiehorn
Ram Guru
Just knocked out the rear passenger side. I’m going to do the driver’s side rear tomorrow morning. This video was a huge help with following along the process. I actually think the rear door was easier than the fronts, but I’m only half way through this process so I may be speaking prematurely here. I found that everything was just a lot more cooperative. Especially those stubborn door connectors that we’ve all dealt with on the front doors. The rear doors release much more easily, at least in my experience they did.
I realistically could have had the rear passenger side done in about 1.5 hours but of course I jinxed myself and made a simple mistake during reassembly. Something was continuously catching on my window, preventing it from going all the way down. Logically thinking, I figured it had to be the new section of harness I installed, so I removed and re-routed it 3 or 4 times and still was running into the same issue. After a good 45 minutes of digging, I realized I stupidly installed the main door harness/grommet into the door upside down. Just as a FYI, the orientation arrows are there for a reason! Installing it upside down will cause the harness to catch on the window glass. Lol, just don’t be a bonehead like me and you should be fine with this project.
One other thing I noticed with the passenger side is that one wire from Jimmy’s harness has instructions to tap into a green wire with purple stripe. As the video Jimmy linked above indicates, the wires you want are both together right towards the top of the bundle on both the passenger and driver side. I just wanted to call this out because I did find another purple and green wire that could easily be mistaken as the wire to tap into if you’re not cautious (see photo below).
Once I complete the driver’s rear, I’ll update this post if I find anything else worth mentioning, but overall, the video from Jimmy’s post does an awesome job at breaking down the entire process.
Thanks again for the harnesses @Jimmy07. Amazing quality as usual.
View attachment 150090
View attachment 150091
So just to provide an update to the driver's side rear door. I put this project on hold due to some uncertainty with the wiring portion. Specifically at the step with tapping the new passive entry harness from the rear door into the existing vehicle wiring by the driver's seat under the front door sill trim. The video Jimmy07 included above only illustrates the passenger side, which was simple enough to figure out and replicate. On the driver's side, one wire from the new passive entry harness is supposed to tap into a green/yellow wire while the other one is supposed to tap into a green/white wire.
I'm running into two issues here.
1. I'm not finding a definite green/yellow wire. I do see a green/tannish yellow but I’m not certain that is the correct one.
2. There are several variations of green/white wires in this grouping, and I'm not sure which is the correct one to tap into.

I have everything else complete and ready to go, so once I get this last piece of the puzzle sorted out I should be good. I haven't had much time this past week to really dig into it, but if possible, I may try and see if I can trace the wires back from the front door connector so that I can identify the proper wires I need. Once completed, I'll grab updated photos and try to clarify this step of the install for anyone else that may be interested in taking on this project. If anyone has this info already available and can save me the time, please bring me up to speed!
Edit: Jimmy07 is helping me work through this and he has ruled out several wires already. He has a few thoughts in mind that he is working to verify. Will update once resolved.
Last edited:
Users who are viewing this thread
Total: 1 (members: 0, guests: 1)
Site Vendors


