Biggiehorn
Ram Guru
Update on the driver’s side rear door. Massive shoutout to @Jimmy07! He was able to help guide me in the right direction. All four doors are now working and operational.
Resolution: So the wires that are needed to tap into are located under the plastic sill panel by the driver’s seat. Due to limited working space, I originally tried breaking into the harness just before that plastic cover. Well, the two wires needed to tap into run from under the driver’s seat and join the rest of the harness under that plastic cover. Therefore, neither wire I needed were located in the section of wiring I was originally working with.
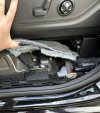
In the photo below, you can see the section of wires coming from under the driver’s seat (just below my thumb) and you can see that it joins the other section of harness below the plastic sill cover. Note: Pay no attention to the four wires running on top of this harness. Those wires were from my blind spot monitoring retrofit with Jimmy’s harness, so you won’t have those on your truck unless you’ve added blind spot monitoring like I have.

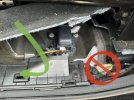
This photo below shows the same thing as above, but I wanted to illustrate it more clearly. Do not attempt to tap into the wires back where I circled in red. You will not find what you’re looking for. The wires needed for this follow the path of the green arrow I included below.

Pop the plastic sill cover off entirely. A small pick or flat blade screwdriver is all that is needed to release the tabs along the front and back piece of the plastic cover.
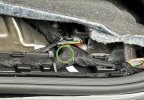
Once the cover was removed, I peeled back the tape from the harness in the section I have circled below in green. Use caution when cutting and peeling back the tape so that you do not damage any of the wires within the harness.

The green circle is just showing where I peeled the tape away, but you could certainly do this further down the run of wires if desired. Jimmy provides plenty of length on his harness to do so. I just chose to do it there because there is a little more room available to neatly place the wire taps in that plastic channel after the connections were made.
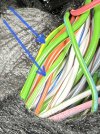
This photo is a close up section of the green circle I indicated above once I had peeled the tape away. The two wires needed can be found right near the top. Both have been indicated with the blue arrows below.

Everything was tested after the connections were made and like I said above, passive entry is working perfectly now on all four of the doors. I hope this explanation helps provide clarity for the driver’s side rear and hope that it will save time for anyone else looking to add this to their truck.
Again massive massive thank you to @Jimmy07 for the help and follow up with this!
Resolution: So the wires that are needed to tap into are located under the plastic sill panel by the driver’s seat. Due to limited working space, I originally tried breaking into the harness just before that plastic cover. Well, the two wires needed to tap into run from under the driver’s seat and join the rest of the harness under that plastic cover. Therefore, neither wire I needed were located in the section of wiring I was originally working with.
In the photo below, you can see the section of wires coming from under the driver’s seat (just below my thumb) and you can see that it joins the other section of harness below the plastic sill cover. Note: Pay no attention to the four wires running on top of this harness. Those wires were from my blind spot monitoring retrofit with Jimmy’s harness, so you won’t have those on your truck unless you’ve added blind spot monitoring like I have.

This photo below shows the same thing as above, but I wanted to illustrate it more clearly. Do not attempt to tap into the wires back where I circled in red. You will not find what you’re looking for. The wires needed for this follow the path of the green arrow I included below.

Pop the plastic sill cover off entirely. A small pick or flat blade screwdriver is all that is needed to release the tabs along the front and back piece of the plastic cover.
Once the cover was removed, I peeled back the tape from the harness in the section I have circled below in green. Use caution when cutting and peeling back the tape so that you do not damage any of the wires within the harness.

The green circle is just showing where I peeled the tape away, but you could certainly do this further down the run of wires if desired. Jimmy provides plenty of length on his harness to do so. I just chose to do it there because there is a little more room available to neatly place the wire taps in that plastic channel after the connections were made.
This photo is a close up section of the green circle I indicated above once I had peeled the tape away. The two wires needed can be found right near the top. Both have been indicated with the blue arrows below.

Everything was tested after the connections were made and like I said above, passive entry is working perfectly now on all four of the doors. I hope this explanation helps provide clarity for the driver’s side rear and hope that it will save time for anyone else looking to add this to their truck.
Again massive massive thank you to @Jimmy07 for the help and follow up with this!
Last edited:


