
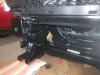
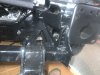
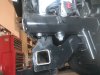
I was talking to you before about if you thought a Western Plow mount assembly would interfere with your winch plate. I have gotten the mount installed on the front of my Rebel and took a few quick pictures last night to show how this is mounted. I looked at the installation instructions on one of the links and it was kind of hard to see how the winch plate mounts to the front frame. With this mount I have had to remove the tow hooks for clearance. I have included a couple of pictures, knowing your product first hand you maybe able to see issues right away. The plow mount attaches directly behind the bumper horns and bolts to the inside of the frame rails. Let me know your thoughts and thanks.Figured I'd make an Official Thread for our Integrated Winch Mount Kit for the 5th Gen 1500's. In my opinion one of the most functional upgrades you can bolt on your RAM truck. Be prepared whenever and wherever you are.
Building on what I learned designing our very popular 4th Gen Rebel Winch kits, this kit has so many handy features that make it fit and function like factory. Even better - its available for all new body style 1500's!
View attachment 36992
Above: 2019 RAM 1500 DT SPORT with a Smittybilt X20 12,000lbs Winch with a Clutch Relocation Kit, and our Sensor Grill Insert Plate
My favorite addition to the Integrated Winch Mount is the Clutch Relocation Kit. Accessing the clutch control on your hidden Smittybilt or Warn Winch has never been easier! With this kit, the winch's clutch handle is positioned directly beside the fairlead giving you rapid and safe access to the engage or disengage the clutch. this is currently available for the Warn VR EVO and Smittybilt X20 Winches.
View attachment 36993
Above: 2019 RAM REBEL with a Smittybilt X20 12,000lbs Winch with a Clutch Relocation Kit, and our dual 8" LED Light Kit
Another NEW component included in the kit is the Hook Anchor. No longer worry about rattles and scratching the paint on your bumper by letting your winch hook dangle and flap around. Simply slid the hook over the securely mounted Anchor, and tension the line. Securely mounted, and easily accessed.
View attachment 36994
Above: 2019 RAM REBEL with a Smittybilt X20 12,000lbs Winch with a Clutch Relocation Kit, and our Sensor Grill Insert Plate
There are three options for Grill Inserts. Each made from stainless steel and powdercoated black to match the bumper.
I filmed an installation video which I'll post up once I've finished editing. Written installation instructions are on my website at the following links:
- LED Light Kit - Cleanly position two 8” SD Single Row Light-bars , each packing 3000 lumens, beside your winch fairlead. Also included is a complete pre-wired harness with switch.
- Sensor Version - Retain the use of your factory front parking sensors!
- Blank - For those who don’t require the additional lights, or parking sensors.
2019 RAM Rebel - https://www.vicedesign.ca/integrated-winch-systems/2019-ram-rebel-winch
2019 RAM 1500 DT - https://www.vicedesign.ca/integrated-winch-systems/2019-ram-1500-winch
You can also check out my shop and behind the scenes action if you're on the gram @vice.design
Post up your 5th Gen with our Winch Kit, post Tips and Tricks you found when installing yours, and ask Questions. Ill do my best to answer them.
-Quinton
5thGenRams Forums
You are using an out of date browser. It may not display this or other websites correctly.
You should upgrade or use an alternative browser.
You should upgrade or use an alternative browser.
5th Gen Hidden Winch
- Thread starter VICE design
- Start date
Looks like I may have answered my own question.....looking above at AnthonyD1978 pictures above it appears like your plates mount to the inside of the frame rails just like the Western Plow mount....directly behind the bumper horns.

R
Rob5589
Guest
Looks good overall. Not a huge fan of the replacement grill panel but it wouldn't be a deal breaker, either.
Looks like I may have answered my own question.....looking above at AnthonyD1978 pictures above it appears like your plates mount to the inside of the frame rails just like the Western Plow mount....directly behind the bumper horns.
Yeah it will interfere - here's a pic of it mounted without the bumper on.

Now I have to ask - was that plow mount designed for that truck or was it modified to fit. It looks like the later
Prep work done Purolator says delivery tomorrow. Mounted controller high next to fuse box. Lines to winch extended lines to battery shortened lol.
View attachment 37267
Really Like this Idea. Nice work on a clean install. One note - looks like you rotated the sensors 90 degrees from factory - thats maybe why you ran into the slight fitment issue. If you're not getting any false positives then the're fine to leave that way ( on the older gens you couldnt do this because the beam pattern is different in the X and Y plane ). Here's a reference pic of the bezels orientation.

Nicely done! I'm thinking relocating the controller too. Maybe to inside the cab.....?
Let me know if you have any questions. You will also get a copy of the instructions in the box. The only update I saw was that the printed copy has higher TQ specs when compared to the online version of the instructions. I went with the hard copy and it's higher TQ specs for the mount (85 lb vs 65 lb). But I referenced some of the online instruction pics because they were easier to see on my phone Vs. the printed copy.

Good Eye. the Higher Torque spec that were sent along with the packages are the correct value. The online instructions have been updated to the current revision now
")
Chippy
Ram Guru
- Joined
- Nov 16, 2018
- Messages
- 551
- Reaction score
- 620
- Points
- 93
- Age
- 57
Well now I know why my front sensors keep going off more than before!! Thank you for catching that it will be easy to break that silicone bead and re clock them..I assume the plug is on the left on each side?Really Like this Idea. Nice work on a clean install. One note - looks like you rotated the sensors 90 degrees from factory - thats maybe why you ran into the slight fitment issue. If you're not getting any false positives then the're fine to leave that way ( on the older gens you couldnt do this because the beam pattern is different in the X and Y plane ). Here's a reference pic of the bezels orientation.
View attachment 37481
AnthonyD1978
Well-Known Member
Really Like this Idea. Nice work on a clean install. One note - looks like you rotated the sensors 90 degrees from factory - thats maybe why you ran into the slight fitment issue. If you're not getting any false positives then the're fine to leave that way ( on the older gens you couldnt do this because the beam pattern is different in the X and Y plane ). Here's a reference pic of the bezels orientation.
View attachment 37481
That's how I did my sensors, but the plastic inserts, that the sensor goes into, just don't have a snug fit into your panel. Honestly, it's an easy fix with a bead of silicone.
Well now I know why my front sensors keep going off more than before!! Thank you for catching that it will be easy to break that silicone bead and re clock them..I assume the plug is on the left on each side?
I have my plugs both facing inwards to the middle of the bumper. I don't think it matters though; as long as you have them horizontal.
Last edited:
Been getting questions to whether the winch mount is compatible with the air dam.
It totally is!")

It totally is!
Panhandle Ram
Active Member
- Joined
- Feb 14, 2019
- Messages
- 50
- Reaction score
- 63
- Points
- 18
View attachment 36992
Above: 2019 RAM 1500 DT SPORT with a Smittybilt X20 12,000lbs Winch with a Clutch Relocation Kit, and our Sensor Grill Insert Plate
Post up your 5th Gen with our Winch Kit, post Tips and Tricks you found when installing yours, and ask Questions. Ill do my best to answer them.
-Quinton
Hey Quinton, did you guys paint the original aluminum fairlead that comes with the smitty x20 shown in all these photos or did you buy a similiar black one?
Hey Quinton, did you guys paint the original aluminum fairlead that comes with the smitty x20 shown in all these photos or did you buy a similiar black one?
I bought a basic black one. Standard 10"
Here's the link: Ranger 10" Black Fairlead - Amazon.ca
No built by Western Plow. Mount number 33950 I believe for the 2019 Rams.Yeah it will interfere - here's a pic of it mounted without the bumper on.
View attachment 37480
Now I have to ask - was that plow mount designed for that truck or was it modified to fit. It looks like the later
Tex_Ram
Active Member
Will these bolt up with a 2020 1500?
I havnt tested it out on the new eco diesel but all other engines have remained unchanged. What trim package do you have?Will these bolt up with a 2020 1500?
Tex_Ram
Active Member
It's a 2020 1500 5.7 Lone Star, or big horn I guess they're called not in TexasI havnt tested it out on the new eco diesel but all other engines have remained unchanged. What trim package do you have?
+1000 on the sliders.@VICE design your market for the hidden winch is the same market that’s looking for decent skid plates and rock sliders.
I would replace my OEM skid plates with something of your quality and design. At the least a skid plate to protect the winch would be awesome.
Winch skid plate and rock sliders would be priority for me. Please consider.
These trucks aren’t rock crawlers, but some of us use these trucks for more than commuting and the mall.
JBeckman
Well-Known Member
Question for those who have already installed. How far was the fairlead mount from the bumper?
I would assume it is extremely close if not touching. Due to the filler plate just being sandwiched between the fairlead and mount.
I would assume it is extremely close if not touching. Due to the filler plate just being sandwiched between the fairlead and mount.
AnthonyD1978
Well-Known Member
Question for those who have already installed. How far was the fairlead mount from the bumper?
I would assume it is extremely close if not touching. Due to the filler plate just being sandwiched between the fairlead and mount.
The fairlead mount touches the Vice filler plate since they are all bolted together using the fairlead bolts. The only way to create the proper support the fairlead requires.
Fairlead > filler plate <> Fairlead mount <> Winch mount <> Truck frame = Awesome
JBeckman
Well-Known Member
I know the filler plate touches the mount, was curious to how far the mount was away from the bumper opening. I have my kit in the garage, just waiting till I get a day off. LolThe fairlead mount touches the Vice filler plate since they are all bolted together using the fairlead bolts. The only way to create the proper support the fairlead requires.
Fairlead > filler plate <> Fairlead mount <> Winch mount <> Truck frame = Awesome
Users who are viewing this thread
Total: 1 (members: 0, guests: 1)
Site Vendors


