Continued...
Now your old switch is removed, its time to swap the trim ring and reinstall. The silver ring still needs to be swapped. Additionally, if you want to paint that silver trim ring, now is the time!
View attachment 88892
To remove this trim ring, you can just pull it forward easily off the button, don't worry about prying up on the side tabs.
View attachment 88891
Then just slide it over the new button.
View attachment 88893
Now we reinstall! Just press the button from the cab side back through the trim panel and reconnect the power plug.
View attachment 88894
You will snap the trim piece back into these holes, you may need to play with it, remember it needs to slide under the cluster trim piece.
View attachment 88895
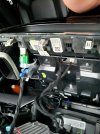
Once that's in, just reverse everything above. Reconnect the screen cables, press the screen back in to the dash (no trick, just line up and press straight in), and reinstall screws and rubber mat. You should be ready to go!
View attachment 88896
Hope this helps anyone who was unsure.


") , you never know what you need until you come to this site lol
, you never know what you need until you come to this site lol