5thGenRams Forums
You are using an out of date browser. It may not display this or other websites correctly.
You should upgrade or use an alternative browser.
You should upgrade or use an alternative browser.
What did you do to your Ram today???
- Thread starter 19BlkRam
- Start date
Ram-a-Kin
Well-Known Member
- Joined
- Jan 27, 2022
- Messages
- 239
- Reaction score
- 128
- Points
- 43
- Age
- 65
I have the 4Knines hammock in my Limited.
This is a little expensive, but it works with the seats up and gives the pet more room, and it handles my white Lab really well.
Lpsouth1978
Well-Known Member
- Joined
- Nov 30, 2021
- Messages
- 364
- Reaction score
- 440
- Points
- 63
- Age
- 47
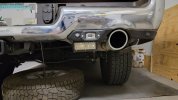
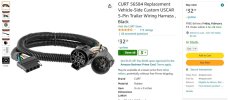
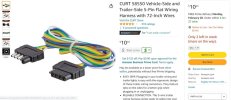
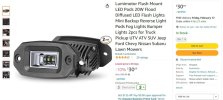
I actually ran these into the cab and have a switch mounted inside. I wanted these to be used only when I chose. I also mounted a couple lights in the bumper flares that are additional backup lights. These come on only when I put the Truck in reverse. These are wired to the rear of the trailer wiring plug, using Curt adapters. This allows me to easily remove it and didn't require me to splice into any factory wiring. I have attached all of those parts below.Thanks!
I think I need those brackets. They fit great there. Did you tap into a plug and play trailer harness?
Belvedere
Ram Guru
- Joined
- Feb 28, 2022
- Messages
- 1,017
- Reaction score
- 1,379
- Points
- 113
- Age
- 48
Curious how bright these are. I could put two per bracket. One each pointing at a tire and one pointed back.I like this from diode dynamics but also thinking about giving this auxbeam set a chance and run the wire to the blazer controller. If its too much light maybe just one would be enough. I think there are options to drill or mount it in the bumper.
So there's an off road club that you have to run rear yellow lights to join. I was hoping to get something to mount in the rear bed rail stake pockets, and plug into the trailer plug. Anyone done something like this before? I can make custom rubber expanding tie down type mounts for the stake pockets if they aren't readily available as such yet. Pics? Thanks.
Edit to add: A mount idea?
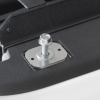
Edit to add: A mount idea?

Last edited:
Jako
Spends too much time on here
Just adding this 7 pin Curt in case auxiliary power is wanted.I actually ran these into the cab and have a switch mounted inside. I wanted these to be used only when I chose. I also mounted a couple lights in the bumper flares that are additional backup lights. These come on only when I put the Truck in reverse. These are wired to the rear of the trailer wiring plug, using Curt adapters. This allows me to easily remove it and didn't require me to splice into any factory wiring. I have attached all of those parts below.
View attachment 151891View attachment 151892View attachment 151893View attachment 151894
wacopolumbo
Well-Known Member
RebelWraith
Polymath
@Shifts And Grins Fab is working on something just like this. I'm anxiously awaiting the completion of the mounts for the same reason you need them.So there's an off road club that you have to run rear yellow lights to join. I was hoping to get something to mount in the rear bed rail stake pockets, and plug into the trailer plug. Anyone done something like this before? I can make custom rubber expanding tie down type mounts for the stake pockets if they aren't readily available as such yet. Pics? Thanks.
Edit to add: A mount idea?
View attachment 151907
alphajaguars
Member
- Joined
- Mar 3, 2022
- Messages
- 18
- Reaction score
- 10
- Points
- 3
- Age
- 51
What seat cover is that?Took my husky (shed master 9000) for a nail trim
View attachment 151860
View attachment 151861
The seat and door covers seem to work well
ETA: Already asked and answered. Thanks!
Last edited:
jl13
Ram Guru
- Joined
- May 28, 2021
- Messages
- 1,240
- Reaction score
- 1,155
- Points
- 113
- Age
- 44
- Location
- boyle heights, CA
keep me posted if you move forward with this set, It will be a while before I pulled the trigger on anythingCurious how bright these are. I could put two per bracket. One each pointing at a tire and one pointed back.
Mopar_maxi
Ram Guru
- Joined
- Feb 22, 2020
- Messages
- 648
- Reaction score
- 1,183
- Points
- 93
- Age
- 37
Belvedere
Ram Guru
- Joined
- Feb 28, 2022
- Messages
- 1,017
- Reaction score
- 1,379
- Points
- 113
- Age
- 48
Will do. I think I may just order the brackets and a set of lights to play with.keep me posted if you move forward with this set, It will be a while before I pulled the trigger on anything
I contacted Rough Country about just getting two more lights. They said they only offer as the kit with four and harness.
Shifts And Grins Fab
Ram Guru
I am test fitting a set next Thursday. We are almost there. I am currently without my truck so relying on friends and customers to test fit new products.@Shifts And Grins Fab is working on something just like this. I'm anxiously awaiting the completion of the mounts for the same reason you need them.
jimothy
Ram Guru
I re-did the wiring from my truck to my rooftop tent.
Underneath then tent, I've got this LED light strip that I've had for a while. Inside the tent, I've got a small plastic box with a fuse block, four USB-C ports for charging phones and stuff, and two DC ports; I use one to power a small electric mattress pad we use for cold weather camping.
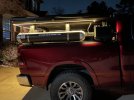
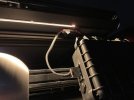
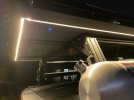
Prior to my recent mods, I would run wires from inside the tent to the junction box on the side of my truck, then another pair of wires from the LED strips to the same junction box. I'd have to get up in the tent to feed the wiring through and opening in the tent, and both pairs of wires would need to be undone before driving (meaning I'd need to get back up in the tent and pull the wires back inside before closing the tent.
None of that is the end of the world, but if I arrive at camp late, particularly when it's cold, I'd rather not have to do that.
So with this new setup, I ran the wiring for the under-tent light strip into the tent. This involved drilling a small hole through the tent floor, and using rubber grommets to protect the wires and keep the hole mostly sealed. Now, instead of using separate wires to connect to the junction box, the under tent lights run to the fuse block inside the tent. That drops the number of wires I need to connect from two to one.
Further, instead of having to feed wires out an opening the tent, I drilled another hole to run those wires, then terminated them with an Anderson SB50 connector. That's enclosed in a spring-loaded cover from Trailer Vision. That's probably overkill, since the connector is already on the underside of the tent and protected from rain.
Now, I've got a short (~2 foot) cable, with SB50 connectors on both ends, that connects to another SB50 connector on the junction box. That junction box connector also has a spring loaded connector on it, so when I don't have my tent on my bed rack, it keeps the connector protected. And a great thing about Anderson connectors is they hold strong, so I don't have to undo connections before hitting the road. And that, of course, means that when we make it to camp, we're good to go.
(Underneath the SB50 connector in the second photo is a pair of covered Anderson Powerpole connectors. This is how I used to connect power to the tent and lights. Powerpole connectors are great, but they aren't as robust as SB50 connectors, which is one reason I'd have to disconnect them before hitting the road).
The best improvement was a dimmer switch (the small glowing blue circle in the last image) to the bottom of the tent, near the tailgate. This controls the under-tent lights. I previously had a different dimmer switch, but I had it near the cab of the truck, which made it much less convenient to use. I'll typically want the lights on when I'm cooking on the tailgate, so having the dimmer right there is super convenient. Plus, I can now reach out from the tent to turn off the lights instead of having to turn them on before getting into the tent. Or, if nature calls in the middle of the night, I can turn on the lights before heading down.
Not shown in these pictures, I also added an LED light strip inside the tent, along with a dimmer switch. The tent came with a velcro lightstrip, which would hook up to a portable USB battery pack. So that was three connections I'd have to make. It might seem trivial, but eliminating these setup and break down tasks will make camping more enjoyable. My wife and our two dogs are going camping this weekend, so we'll get to try all this out.
Astute observers may notice the light pods (not turned on in these photos) near the tailgate. More to come on these later, but I also got around to wiring them up this week.
Underneath then tent, I've got this LED light strip that I've had for a while. Inside the tent, I've got a small plastic box with a fuse block, four USB-C ports for charging phones and stuff, and two DC ports; I use one to power a small electric mattress pad we use for cold weather camping.


Prior to my recent mods, I would run wires from inside the tent to the junction box on the side of my truck, then another pair of wires from the LED strips to the same junction box. I'd have to get up in the tent to feed the wiring through and opening in the tent, and both pairs of wires would need to be undone before driving (meaning I'd need to get back up in the tent and pull the wires back inside before closing the tent.
None of that is the end of the world, but if I arrive at camp late, particularly when it's cold, I'd rather not have to do that.
So with this new setup, I ran the wiring for the under-tent light strip into the tent. This involved drilling a small hole through the tent floor, and using rubber grommets to protect the wires and keep the hole mostly sealed. Now, instead of using separate wires to connect to the junction box, the under tent lights run to the fuse block inside the tent. That drops the number of wires I need to connect from two to one.
Further, instead of having to feed wires out an opening the tent, I drilled another hole to run those wires, then terminated them with an Anderson SB50 connector. That's enclosed in a spring-loaded cover from Trailer Vision. That's probably overkill, since the connector is already on the underside of the tent and protected from rain.
Now, I've got a short (~2 foot) cable, with SB50 connectors on both ends, that connects to another SB50 connector on the junction box. That junction box connector also has a spring loaded connector on it, so when I don't have my tent on my bed rack, it keeps the connector protected. And a great thing about Anderson connectors is they hold strong, so I don't have to undo connections before hitting the road. And that, of course, means that when we make it to camp, we're good to go.
(Underneath the SB50 connector in the second photo is a pair of covered Anderson Powerpole connectors. This is how I used to connect power to the tent and lights. Powerpole connectors are great, but they aren't as robust as SB50 connectors, which is one reason I'd have to disconnect them before hitting the road).
The best improvement was a dimmer switch (the small glowing blue circle in the last image) to the bottom of the tent, near the tailgate. This controls the under-tent lights. I previously had a different dimmer switch, but I had it near the cab of the truck, which made it much less convenient to use. I'll typically want the lights on when I'm cooking on the tailgate, so having the dimmer right there is super convenient. Plus, I can now reach out from the tent to turn off the lights instead of having to turn them on before getting into the tent. Or, if nature calls in the middle of the night, I can turn on the lights before heading down.
Not shown in these pictures, I also added an LED light strip inside the tent, along with a dimmer switch. The tent came with a velcro lightstrip, which would hook up to a portable USB battery pack. So that was three connections I'd have to make. It might seem trivial, but eliminating these setup and break down tasks will make camping more enjoyable. My wife and our two dogs are going camping this weekend, so we'll get to try all this out.
Astute observers may notice the light pods (not turned on in these photos) near the tailgate. More to come on these later, but I also got around to wiring them up this week.
boogielander
Spends too much time on here
- Joined
- Jun 29, 2022
- Messages
- 3,520
- Reaction score
- 5,610
- Points
- 113
that is really clean. cleaner that what I did lolllI re-did the wiring from my truck to my rooftop tent.
Underneath then tent, I've got this LED light strip that I've had for a while. Inside the tent, I've got a small plastic box with a fuse block, four USB-C ports for charging phones and stuff, and two DC ports; I use one to power a small electric mattress pad we use for cold weather camping.
View attachment 151999View attachment 152000
View attachment 152001
Prior to my recent mods, I would run wires from inside the tent to the junction box on the side of my truck, then another pair of wires from the LED strips to the same junction box. I'd have to get up in the tent to feed the wiring through and opening in the tent, and both pairs of wires would need to be undone before driving (meaning I'd need to get back up in the tent and pull the wires back inside before closing the tent.
None of that is the end of the world, but if I arrive at camp late, particularly when it's cold, I'd rather not have to do that.
So with this new setup, I ran the wiring for the under-tent light strip into the tent. This involved drilling a small hole through the tent floor, and using rubber grommets to protect the wires and keep the hole mostly sealed. Now, instead of using separate wires to connect to the junction box, the under tent lights run to the fuse block inside the tent. That drops the number of wires I need to connect from two to one.
Further, instead of having to feed wires out an opening the tent, I drilled another hole to run those wires, then terminated them with an Anderson SB50 connector. That's enclosed in a spring-loaded cover from Trailer Vision. That's probably overkill, since the connector is already on the underside of the tent and protected from rain.
Now, I've got a short (~2 foot) cable, with SB50 connectors on both ends, that connects to another SB50 connector on the junction box. That junction box connector also has a spring loaded connector on it, so when I don't have my tent on my bed rack, it keeps the connector protected. And a great thing about Anderson connectors is they hold strong, so I don't have to undo connections before hitting the road. And that, of course, means that when we make it to camp, we're good to go.
(Underneath the SB50 connector in the second photo is a pair of covered Anderson Powerpole connectors. This is how I used to connect power to the tent and lights. Powerpole connectors are great, but they aren't as robust as SB50 connectors, which is one reason I'd have to disconnect them before hitting the road).
The best improvement was a dimmer switch (the small glowing blue circle in the last image) to the bottom of the tent, near the tailgate. This controls the under-tent lights. I previously had a different dimmer switch, but I had it near the cab of the truck, which made it much less convenient to use. I'll typically want the lights on when I'm cooking on the tailgate, so having the dimmer right there is super convenient. Plus, I can now reach out from the tent to turn off the lights instead of having to turn them on before getting into the tent. Or, if nature calls in the middle of the night, I can turn on the lights before heading down.
Not shown in these pictures, I also added an LED light strip inside the tent, along with a dimmer switch. The tent came with a velcro lightstrip, which would hook up to a portable USB battery pack. So that was three connections I'd have to make. It might seem trivial, but eliminating these setup and break down tasks will make camping more enjoyable. My wife and our two dogs are going camping this weekend, so we'll get to try all this out.
Astute observers may notice the light pods (not turned on in these photos) near the tailgate. More to come on these later, but I also got around to wiring them up this week.
jimothy
Ram Guru
Thanks. It took me a couple of iterations to arrive at this setup, but I think I mostly nailed it this time.that is really clean. cleaner that what I did lolll
There's another advantage to having these Anderson connections: I can temporarily disconnect the tent and hookup my air compressor. Previously, I'd have to connect the air compressor to the battery box I keep in the bed, but having an external connector should be much more convenient. (If I wanted to keep the tent connected while using the air compressor, I could build a simple Anderson Y-cable).
They are also stackable and have a variety of useful accessories available, like bulkhead feedthroughs, weather seal boots, etc.There's another advantage to having these Anderson connections: I can temporarily disconnect the tent and hookup my air compressor. Previously, I'd have to connect the air compressor to the battery box I keep in the bed, but having an external connector should be much more convenient. (If I wanted to keep the tent connected while using the air compressor, I could build a simple Anderson Y-cable).
Users who are viewing this thread
Total: 4 (members: 1, guests: 3)
Staff online
-
EightyModerator / Dream Killer


