RAM Patriot
Ram Guru
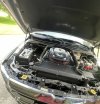
Looking Good...Thanks! I just got the mods done to the battery holder and the battery installed. Now to wire it up and add the Redarc battery isolator.
")

Looking Good...Thanks! I just got the mods done to the battery holder and the battery installed. Now to wire it up and add the Redarc battery isolator.
Thanks! Where did you route the positive cable between batteries?Looking Good...
I took the front beauty cover off and strapped it to the frame above the radiator.Thanks! Where did you route the positive cable between batteries?
Thanks!I took the front beauty cover off and strapped it to the frame above the radiator.
whats the part # for the battery shield/cover? great write up btw
Here is the parts list:whats the part # for the battery shield/cover? great write up btw
| REDARC Smart Start Battery Isolator & Wiring Kit 12V | Part # SBI12KIT |
| Bolt-Hex Flange Head | Part # CH6104378AA |
| Bracket - Battery | Part # CH68082538AB |
| Insulated Battery Shield | Part # CH56029822AD |
| Battery Tray | Part # CH68350658AC |
| 12V 750AMP Flooded Battery | Part# CHBBH7F001AA |
You can still add a distribution center to either battery. The reason for doing this was to take the load off the primary battery, for accessories such as dashcams, refrigerator coolers, and other accessories that you might need to power while the engine is off and do not want to drain the starter battery.I got to say this is very interesting and great job on putting all of this together seriously but I have a question why do it this way instead of hard wiring, taping, or going into internal/external power distribution centers?
What is the life range for the batteryIm also thinking about doing a dual battery setup. I've done it on several other vehicles. Check out Blue Sea Systems 7622 ACR. It's bulletproof and marine grade.
That's going to depend on the battery you end up going with.What is the life range for the battery

The battery isolator connects directly to the main start battery and the second battery...there are no connections elsewhere. I suggest you go to the Redarc web site...and send/ask your question...their isolator is designed and built in Australia, (they have distributors worldwide...USA), they will be able to tell you if there are any electrical restrictions using their isolator...FYI RAM trucks are sold in Australia, so they should be able to give you accurate info with regards to the e-torque model.Can this be done to the Ram 1500 etorque models?
YesCan this be done to the Ram 1500 etorque models?
Nice work, and a great write up!Got the battery tray & Battery installed this weekend.
After some serious thought and no other options, I decided to modify / fabricate the Mopar 2500 Passenger Side (Right) Battery Tray - Mopar (68350658AC).
The first thing that I had to do was cut off the bottom hangers from the battery tray since they did not have a place to mount to the frame and they were in the way for setting the tray on the wheel well liner.
View attachment 58493
The next step was to sit the tray down in the wheel well and see how it lined up.
View attachment 58502
After sitting the tray down in the wheel well. I had several more challenges:
So back to the work bench for another round of cutting and some fabrications.
- The wheel well holes did not line up with the holes in the bottom of the battery tray.
- The front bottom of the battery tray did not touch the bottom of the wheel well.
- The hood shock is hitting the lip of the top battery bracket.
View attachment 58503
Cut the top hanger from the battery tray. (I had to add a T-Strap)
View attachment 58504
The next step was to add a heel to the front bottom part of the tray so that it would sit on the wheel well and allow me to drill a hole for the wheel well screw.
View attachment 58505
I had a 3/4 in. Schedule 40 PVC Type-T Conduit Body on the shelf left over from a wiring project and it happen to be the perfect size.
Mixed up some J-B Weld and the next day it was ready to go.
I also should mention that I had to cut off the wheel well factory towers that lined up with the 2500 so that the battery tray would sit flat on the back part of the wheel well.
View attachment 58511
Since I lost the top battery bracket I had to fabricate a T-Strap to work to hold the top part of the battery tray. Lined it up with the factory hole on the frame. drilled a hole in the tray for the bottom of the T-Strap and bolted it on.
Used a 6 in. x 5 in. 14-Gauge Galvanized T Strap
View attachment 58512
I had to drill two holes for the front brackets to the frame. Used the factory bolts that I took from the air filter tray.
The factory bolts are: M8. 1.0
I used a Drill Bit: 1/4”
Then used a Tap thread bolt M8. 1.0
View attachment 58514
View attachment 58515
View attachment 58516
Got the battery tray & Battery installed this weekend.
After some serious thought and no other options, I decided to modify / fabricate the Mopar 2500 Passenger Side (Right) Battery Tray - Mopar (68350658AC).
The first thing that I had to do was cut off the bottom hangers from the battery tray since they did not have a place to mount to the frame and they were in the way for setting the tray on the wheel well liner.
View attachment 58493
The next step was to sit the tray down in the wheel well and see how it lined up.
View attachment 58502
After sitting the tray down in the wheel well. I had several more challenges:
So back to the work bench for another round of cutting and some fabrications.
- The wheel well holes did not line up with the holes in the bottom of the battery tray.
- The front bottom of the battery tray did not touch the bottom of the wheel well.
- The hood shock is hitting the lip of the top battery bracket.
View attachment 58503
Cut the top hanger from the battery tray. (I had to add a T-Strap)
View attachment 58504
The next step was to add a heel to the front bottom part of the tray so that it would sit on the wheel well and allow me to drill a hole for the wheel well screw.
View attachment 58505
I had a 3/4 in. Schedule 40 PVC Type-T Conduit Body on the shelf left over from a wiring project and it happen to be the perfect size.
Mixed up some J-B Weld and the next day it was ready to go.
I also should mention that I had to cut off the wheel well factory towers that lined up with the 2500 so that the battery tray would sit flat on the back part of the wheel well.
View attachment 58511
Since I lost the top battery bracket I had to fabricate a T-Strap to work to hold the top part of the battery tray. Lined it up with the factory hole on the frame. drilled a hole in the tray for the bottom of the T-Strap and bolted it on.
Used a 6 in. x 5 in. 14-Gauge Galvanized T Strap
View attachment 58512
I had to drill two holes for the front brackets to the frame. Used the factory bolts that I took from the air filter tray.
The factory bolts are: M8. 1.0
I used a Drill Bit: 1/4”
Then used a Tap thread bolt M8. 1.0
View attachment 58514
View attachment 58515
View attachment 58516
Good Job!Excellent write-up. Followed everything you did and now have a second battery under my hood. However my factory hardware was M8x1.25 and it was a 17/64 drill bit that I had to use to get the tap started.