5thGenRams Forums

Register a free account today to become a member! Once signed in, you'll be able to participate on this site by adding your own topics and posts, as well as connect with other members through your own private inbox!

Headlight Customization (DIY)

RebelWraith

Polymath
Joined
May 3, 2019
Messages
849
Reaction score
712
Location
Montclair, Va.
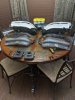
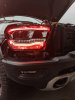
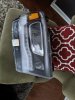
This is a quick write up of how I removed a lens from a spare ram 1500 mid range headlight. There are other ways of removing them, but this is a DIY method.

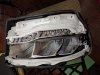
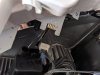
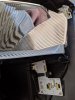
The ram 1500 headlights use a permaseal type of sealer to keep moisture out and keep the lens attached to the rear assembly. This is a bit more difficult to separate than the old type of Butyl rubber. Remove all the factory clips and any attached electronics or brackets.

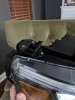
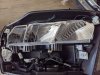
So, all you need is an oven and some flat head screwdrivers or pry tools. Turn your oven on to 220 fahrenheit. Once the oven is to temperature place the headlight assembly in the oven as close to the middle as possible. Placing your rack at the lowest setting should work on all ovens. These lights are huge by the way. I generally put a towel on a large flat pan under the headlight to keep the headlight from taking any damage. DO NOT PUT THE LENS FACE DOWN!

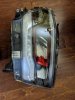
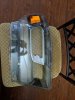
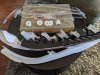
After 15-20 minutes of cooking remove the headlight with oven mitts and start prying at a corner. The larger the pry tool face the better. Small flat heads will cut in to the plastic. Warning the plastic of the rear housing will be soft and your pry tool will most likely bend it back slightly. This is normal and can be pushed back once the lens is reinstalled. Work your way around the lens untill you can get your glove covered hands inside to pry the two portions apart. This may take a few cycles of heating the headlight again. As the sealant cools it is very hard to remove.

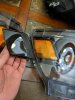
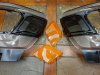
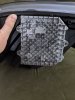
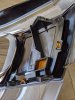
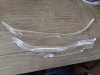
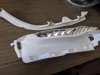
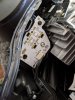
As seen in the pictures the inner surround is attached to the front lens with screws. Some people think there are screws holding the lens to the rear surround and this just isn't accurate (Hammerdown Motorsports).

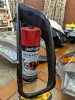
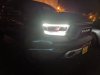
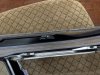
Once you have separated the lens from the rear surround do any customizations you like and remove any old sealant from the channel. Get yourself some new headlight sealant of your choice and reattach the headlights by baking them according to the sealant you have acquired and reinstall the factory clips, electronics, and brackets.

Feel free to ask any questions.
 

Attachments

  • IMG_20191030_125602.jpg
    IMG_20191030_125602.jpg
    165.3 KB · Views: 649
  • IMG_20191031_103839.jpg
    IMG_20191031_103839.jpg
    145.5 KB · Views: 637
  • IMG_20191031_103828.jpg
    IMG_20191031_103828.jpg
    106.4 KB · Views: 620
  • IMG_20191031_134554.jpg
    IMG_20191031_134554.jpg
    177.9 KB · Views: 615
  • IMG_20191031_134605.jpg
    IMG_20191031_134605.jpg
    255.2 KB · Views: 628
  • IMG_20191031_134749.jpg
    IMG_20191031_134749.jpg
    177.7 KB · Views: 639
Last edited:

RebelWraith

Polymath
Joined
May 3, 2019
Messages
849
Reaction score
712
Location
Montclair, Va.
Some tools and items that help:


Last edited:

Dr. Jim

Ram Guru
Joined
Aug 16, 2018
Messages
757
Reaction score
553
Thank you for the information and photos. Obviously not a "half-baked" idea. Do you recommend using Butyl rubber (over the permaseal type of OEM sealer) when reassembling to make it easier if you have to take apart again?
 

RebelWraith

Polymath
Joined
May 3, 2019
Messages
849
Reaction score
712
Location
Montclair, Va.
Thank you for the information and photos. Obviously not a "half-baked" idea. Do you recommend using Butyl rubber (over the permaseal type of OEM sealer) when reassembling to make it easier if you have to take apart again?
Definitely Butyl rubber for reassembly! The factory permaseal is a pain in the a$$!! LOL
 

RebelWraith

Polymath
Joined
May 3, 2019
Messages
849
Reaction score
712
Location
Montclair, Va.
Clear markers installation:

Once you have the outer lens removed there are 4 T20 screws holding the inner bezel to the lens. Remove the 4 T20 screws and locate any sealant that may have oozed on to the inner bezel. Cut any excess sealant with a knife and free the bezel from the lens.

Now see attached photo. There are three Amber tabs that need to be bent in that are part of the Amber marker itself. There are three plastic welded tabs on the bracket holding the marker in place. Simply cut the welds off with a Dremel tool. Now the Amber marker will be free to remove.

Clip the new clear marker purchased from https://klearz.com/products/dodge
in to place. Move the marker bracket back in to place on the inner bezel. Two options for attachment are, 1. Plastic Weld (Soldering Iron) or 2. Epoxy. Now your clear markers are installed.
 

Attachments

  • IMG_20191031_134554.jpg
    IMG_20191031_134554.jpg
    177.9 KB · Views: 261
  • IMG_20191031_134605.jpg
    IMG_20191031_134605.jpg
    255.2 KB · Views: 257
  • IMG_20191102_125540.jpg
    IMG_20191102_125540.jpg
    191.3 KB · Views: 271
Last edited:

RebelWraith

Polymath
Joined
May 3, 2019
Messages
849
Reaction score
712
Location
Montclair, Va.
Diode Dynamics LED board installation:

So, we've got the sealant from Hell removed and your lenses are separated from the rear housing. The hard part is over!

Start by removing two T20 screws from the upper LED diffuser. The diffuser can now be unclipped from the white plastic clips holding it to the LED board at each end. Once that is removed you can remove three T20 screws from the white plastic diffuser bracket that is behind the LED diffuser.
Move down to the lower LED diffuser and remove two T20 screws and unclip the ends from the LED board at each end. With that out of the way remove four T20 screws from the diffuser bracket that also holds the Amber blinker assembly. When removing the blinker assembly you will notice there is a wire bundle attached to the back side. Simply pull it away as it is on with just a slip coupling.

Now you have access to remove the factory LED boards. The two inner boards are secured with T20 screws and a small bracket. Remove those and once again slide off the electrical slip coupling for the LED board. The two outer boards for some odd reason are held in with T15 screws. Remove the screws and slip off the electrical connections. You'll have to unclip the white LED diffuser brackets from each board and attach them to the Diode Dynamics LED boards.

Reassemble the inner headlight assemblies you removed in the previous steps and TEST your work out before resealing the lens.


Attachments

  • IMG_20191031_134749.jpg
    IMG_20191031_134749.jpg
    177.7 KB · Views: 263
  • IMG_20191102_125641.jpg
    IMG_20191102_125641.jpg
    172.4 KB · Views: 260
  • IMG_20191102_125709.jpg
    IMG_20191102_125709.jpg
    110.7 KB · Views: 256
  • IMG_20191102_125916.jpg
    IMG_20191102_125916.jpg
    85.3 KB · Views: 260
  • IMG_20191102_125856.jpg
    IMG_20191102_125856.jpg
    165.9 KB · Views: 259
  • IMG_20191102_124551.jpg
    IMG_20191102_124551.jpg
    134.9 KB · Views: 252
  • IMG_20191102_124542.jpg
    IMG_20191102_124542.jpg
    134.4 KB · Views: 264
  • IMG_20191102_124625.jpg
    IMG_20191102_124625.jpg
    159.4 KB · Views: 268

RebelWraith

Polymath
Joined
May 3, 2019
Messages
849
Reaction score
712
Location
Montclair, Va.
Over the next couple weeks we will be modifying @lrobbi and my headlights. Both will have smoke tinted marker lenses and Diode Dynamic LED boards installed. Both of our trucks are black so they will keep their blacked out housings. No custom painting needed. Well, maybe.....

Pics and notes will accompany the installs. Feel free to ask any questions or post comments. These projects can be very rewarding if done well or expensive if you mess up.
 

RebelWraith

Polymath
Joined
May 3, 2019
Messages
849
Reaction score
712
Location
Montclair, Va.
Ok, so one set of headlights torn open. Tomorrow the Diode Dynamics boards will get installed. All the permaseal will get scraped out of the channels and off the lenses. Amber side marker lenses will be replaced with the pictured smoked side marker lenses and a little custom painting to the pictured part. The color will be Metal Speck Retro Red to match the interior of the Rebel.

Some testing will be done before the lenses are reattached with Butyl rubber and then pictures and videos will follow up to show how everything comes out.
 

Attachments

  • IMG_20191130_002945.jpg
    IMG_20191130_002945.jpg
    166.2 KB · Views: 320
  • IMG_20191130_003145.jpg
    IMG_20191130_003145.jpg
    161.4 KB · Views: 317
  • IMG_20191130_003304.jpg
    IMG_20191130_003304.jpg
    164.5 KB · Views: 316

All_Black_Lone_Star

Active Member
Joined
May 7, 2019
Messages
117
Reaction score
74
Location
Dallas, TX
Ok, so one set of headlights torn open. Tomorrow the Diode Dynamics boards will get installed. All the permaseal will get scraped out of the channels and off the lenses. Amber side marker lenses will be replaced with the pictured smoked side marker lenses and a little custom painting to the pictured part. The color will be Metal Speck Retro Red to match the interior of the Rebel.

Some testing will be done before the lenses are reattached with Butyl rubber and then pictures and videos will follow up to show how everything comes out.
Where did you get the smoked side marker from?
 

Scott_65

Ram Guru
Joined
Sep 1, 2019
Messages
521
Reaction score
414
Location
SC
Looking forward to seeing the finished results. Hopefully DD will have these available for the Limited in the near future.
 

RebelWraith

Polymath
Joined
May 3, 2019
Messages
849
Reaction score
712
Location
Montclair, Va.
Testing went flawlessly. Got all the wiring hidden and looking as factory as possible. Now to finish the lenses. Truck will be buttoned back up tomorrow morning.
 

Attachments

  • IMG_20191130_152036.jpg
    IMG_20191130_152036.jpg
    140.5 KB · Views: 326
  • IMG_20191130_152006.jpg
    IMG_20191130_152006.jpg
    124.1 KB · Views: 315

Lize

Well-Known Member
Joined
Jan 16, 2019
Messages
357
Reaction score
228
Location
England
Thanks for sharing and a great write up. Nice to see someone doing something different than the usual off road type mods.

I split a fog light unit off another car the other day as needs re-silvering and cannot get replacement, it was butyl and used a hairdryer as oven not working at the minute. Anyway, this made me a bit nervous as never tackled one before so good on you for tackling such a large and expensive unit.

I've got some bigger lights to do too so think I'll see if I can get those seal splitter pliers you list, very helpful you included tools as part of your tips.

Keenly await further photos in dark once finished :)
 

RebelWraith

Polymath
Joined
May 3, 2019
Messages
849
Reaction score
712
Location
Montclair, Va.
Here are some night time photos. Ran the truck most of the day in the rain and no visible water or condensation inside the lenses.
 

Attachments

  • IMG_20191201_202138.jpg
    IMG_20191201_202138.jpg
    83 KB · Views: 244
  • IMG_20191201_202535.jpg
    IMG_20191201_202535.jpg
    75.3 KB · Views: 245
  • IMG_20191201_202209.jpg
    IMG_20191201_202209.jpg
    47.9 KB · Views: 246
  • IMG_20191201_202250.jpg
    IMG_20191201_202250.jpg
    52.6 KB · Views: 240

Lize

Well-Known Member
Joined
Jan 16, 2019
Messages
357
Reaction score
228
Location
England
They look great, nice and bright, love the way it highlights to red you added (y)

Think when I’ve got my other projects on another car finished I’ll look into this.
 

Users who are viewing this thread

Top