
5thGenRams Forums
You are using an out of date browser. It may not display this or other websites correctly.
You should upgrade or use an alternative browser.
You should upgrade or use an alternative browser.
FitCamX dashcam
- Thread starter Idahoktm
- Start date
Le_Slacker
Ram Guru
Because I ordered the front 4K only, I asked about ordering the rear... and was told that a rear cannot be added to a front-only... would have to order a whole front-rear set
Csjumper2003
Active Member
That is true. For rear to work the board is all one piece and the rear can’t be addedBecause I ordered the front 4K only, I asked about ordering the rear... and was told that a rear cannot be added to a front-only... would have to order a whole front-rear set
davidn0021
Well-Known Member
It's too bad there's no way to splice into the digital rearview camera's feed as the rear source instaed of connecting another unit.
smashweights
Well-Known Member
I've wondered why you can't do that with both the front and back...It's too bad there's no way to splice into the digital rearview camera's feed as the rear source instaed of connecting another unit.
Idahoktm
Spends too much time on here
I got the front and rear 4k, I plan to install this weekend.
Anyone have a a resource on how to take apart the driver's side A-pillar cover so I can run the rear cable?
thanks
Wouldn't it be easier to run it along the edge of the headliner? Unless you're going to mount it to the bottom of the rear window.
bigdodge
Happy Ram Owner
- Joined
- Aug 25, 2021
- Messages
- 4,560
- Reaction score
- 2,881
- Points
- 113
- Location
- southwest. where majority rules
did anyone ask @Jimmy07I've wondered why you can't do that with both the front and back...
I tagged Him before as i had the exact same questions. Don’t think her replied. Would be sweet if this could be figured out, the view angle is awesome on the rear camera for the digital rearview.did anyone ask @Jimmy07
FitCamX arrived today - two weeks from China to my door which was faster than I expected. Install was going really well and easy with the included pry tool, until I tried to connect the Y adapter. It's much easier to connect the round black camera wire before plugging in the other two ends. After that it was click, click and it was installed. Turned on the truck, it fired up and started recording. I took a short drive to check out video quality and it's very good, and fit and finish is so close to factory you can't tell the difference - they did an excellent job making the mold to copy the factory part. Highly recommended.
")
reapur
Active Member
- Joined
- Jul 11, 2022
- Messages
- 72
- Reaction score
- 23
- Points
- 8
- Age
- 60
I'm not sure, It looks like the headliner tucks under the A pillar cover so I'm not sure how I'd get past that. but I agree if I could figure this out it would be much easierWouldn't it be easier to run it along the edge of the headliner? Unless you're going to mount it to the bottom of the rear window.
6of36
Spends too much time on here
YouTube is your friend. I may be wrong, but nobody else is answering. I think the pull straps have a couple of I believe 10mm bolts, and then just clips hold it on. Again, bad memory, but that's what I remember.I got the front and rear 4k, I plan to install this weekend.
Anyone have a a resource on how to take apart the driver's side A-pillar cover so I can run the rear cable?
thanks
Le_Slacker
Ram Guru
I did that for my first dashcam, very easy to run up there all he way to the back.... so easy that when my truck was broken into, the thief took both front and rear cameras and the wiring.Wouldn't it be easier to run it along the edge of the headliner? Unless you're going to mount it to the bottom of the rear window.
reapur
Active Member
- Joined
- Jul 11, 2022
- Messages
- 72
- Reaction score
- 23
- Points
- 8
- Age
- 60
finally got it installed. I went by the driver's side headliner, had to remove the door molding to pull the headliner down to push the wire through to the back. Working fine now.
Strange the rear cam can only be mounted with the wire toward the passenger side. The rear cam could use a better mounting design.
Strange the rear cam can only be mounted with the wire toward the passenger side. The rear cam could use a better mounting design.
Any pictures of the rear camera? Nobody has posted any yet, and I'm interested in the design and how it mounts to the glass.finally got it installed. I went by the driver's side headliner, had to remove the door molding to pull the headliner down to push the wire through to the back. Working fine now.
Strange the rear cam can only be mounted with the wire toward the passenger side. The rear cam could use a better mounting design.
reapur
Active Member
- Joined
- Jul 11, 2022
- Messages
- 72
- Reaction score
- 23
- Points
- 8
- Age
- 60
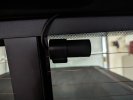
Since it's already mounted, the tint prevents a good picture from the outside. here's one from the inside. The wire is tucked up into the headliner and follows the contour all the way to the front.
not really the way I would've designed this mount, I would've done one that allowed more adjustments up/down/left/right. the way it is, the camera barrel rolls on the long axis that you you see, so up/down. the app doesn't have the ability to flip or mirror the image so this basically is the only way to install it. This results is a larger view of the side where the cam is installed, in my case the drivers side, not by much but if you're OCD like me and like symmetry, you'll notice.
also, that rectangular mount you see has a two sided VHB tape on it, should be good for a long time.
Attachments
Belvedere
Ram Guru
- Joined
- Feb 28, 2022
- Messages
- 1,017
- Reaction score
- 1,379
- Points
- 113
- Age
- 48
The fact that it's not mounted quite parallel to the window would drive me crazy...Since it's already mounted, the tint prevents a good picture from the outside. here's one from the inside. The wire is tucked up into the headliner and follows the contour all the way to the front.
not really the way I would've designed this mount, I would've done one that allowed more adjustments up/down/left/right. the way it is, the camera barrel rolls on the long axis that you you see, so up/down. the app doesn't have the ability to flip or mirror the image so this basically is the only way to install it. This results is a larger view of the side where the cam is installed, in my case the drivers side, not by much but if you're OCD like me and like symmetry, you'll notice.
also, that rectangular mount you see has a two sided VHB tape on it, should be good for a long time.

- Joined
- Jun 8, 2021
- Messages
- 5,467
- Solutions
- 1
- Reaction score
- 10,474
- Points
- 113
I'm confused - can you open your rear sliding window now?Since it's already mounted, the tint prevents a good picture from the outside. here's one from the inside. The wire is tucked up into the headliner and follows the contour all the way to the front.
not really the way I would've designed this mount, I would've done one that allowed more adjustments up/down/left/right. the way it is, the camera barrel rolls on the long axis that you you see, so up/down. the app doesn't have the ability to flip or mirror the image so this basically is the only way to install it. This results is a larger view of the side where the cam is installed, in my case the drivers side, not by much but if you're OCD like me and like symmetry, you'll notice.
also, that rectangular mount you see has a two sided VHB tape on it, should be good for a long time.
reapur
Active Member
- Joined
- Jul 11, 2022
- Messages
- 72
- Reaction score
- 23
- Points
- 8
- Age
- 60
fixedThe fact that it's not mounted quite parallel to the window would drive me crazy...
") It looked fine but the camera twisted the view muahahaha
It looked fine but the camera twisted the view muahahahareapur
Active Member
- Joined
- Jul 11, 2022
- Messages
- 72
- Reaction score
- 23
- Points
- 8
- Age
- 60
Oh my goodness. I thought it opened the other way, I think my old 2015 open to the passenger. I'll test it and fix it, shouldn't be too big of a deal, there is plenty of wire tucked into the headliner.I'm confused - can you open your rear sliding window now?
thanks for catching that. I think I've opened that window once since I got the truck
Users who are viewing this thread
Total: 1 (members: 0, guests: 1)


