5thGenRams Forums

Register a free account today to become a member! Once signed in, you'll be able to participate on this site by adding your own topics and posts, as well as connect with other members through your own private inbox!

Desert Dawg Ram Rebel Build

"Linex" the skid plate a matte black or leave the factory silver color?

  • Paint or Linex skid plate matte black

    Votes: 62 71.3%
  • Leave skid plate silver

    Votes: 24 27.6%
  • Other (reply in thread)

    Votes: 1 1.1%

  • Total voters
    87
  • Poll closed .

Desert Dawg

Well-Known Member
Joined
Aug 16, 2018
Messages
494
Reaction score
1,313
Location
Albuquerque, NM
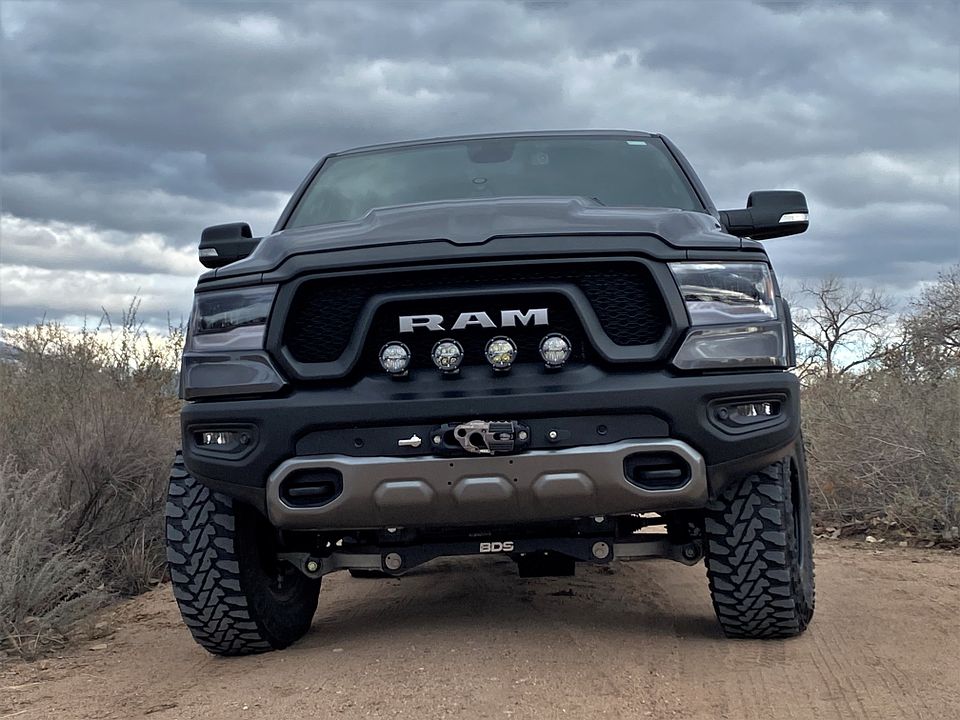
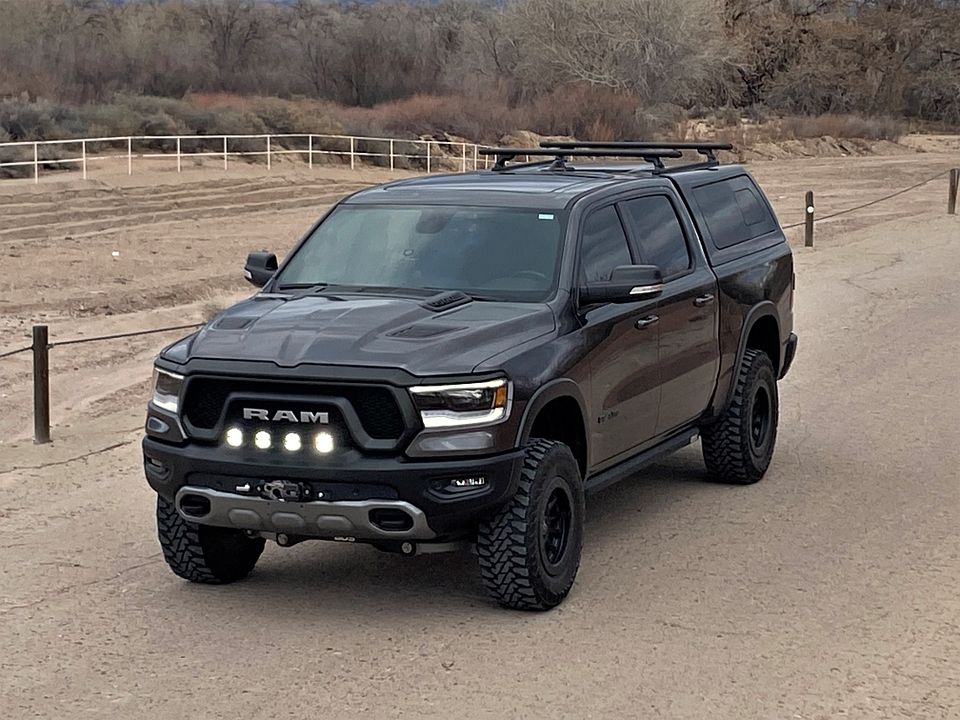
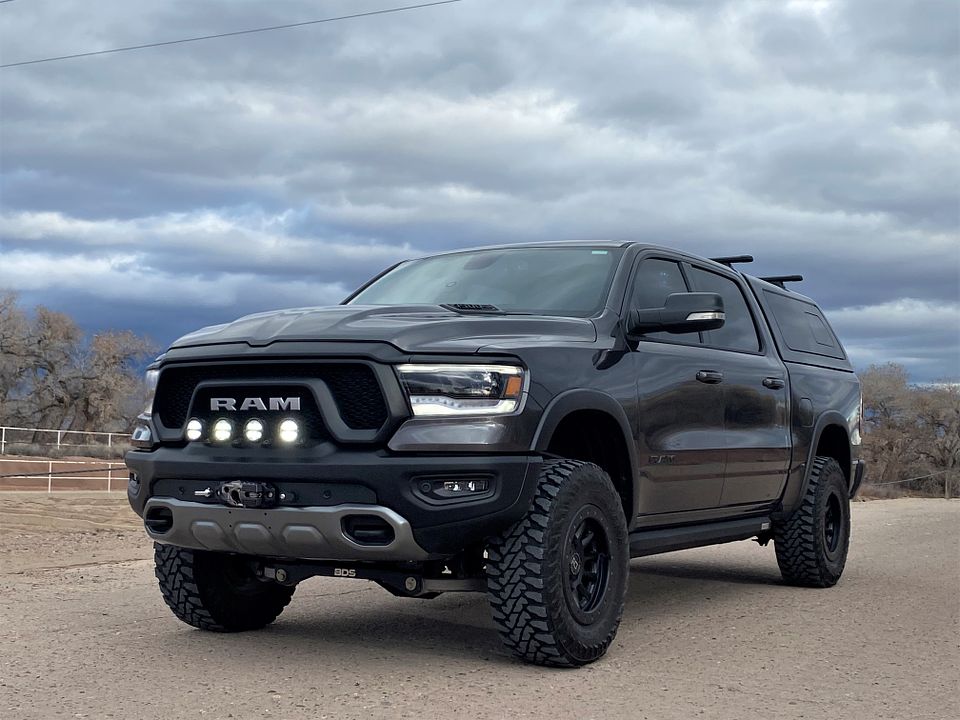
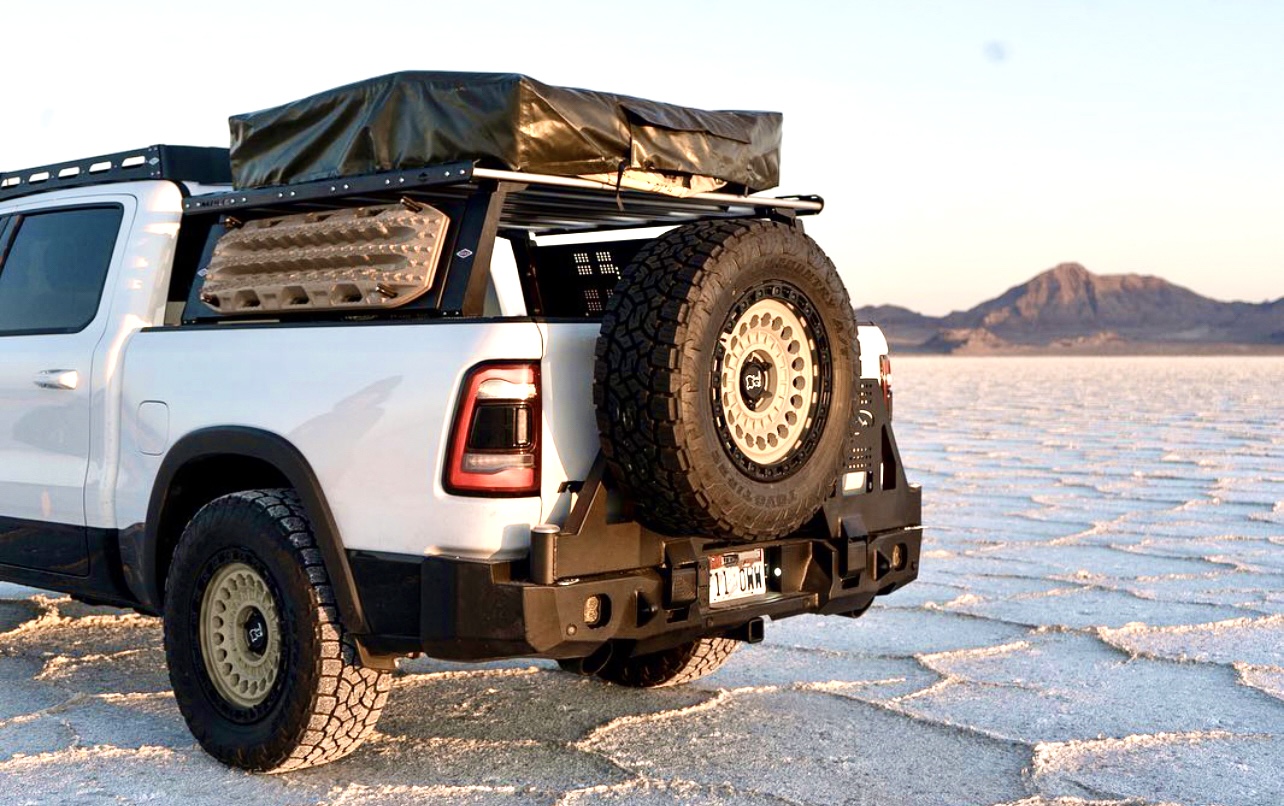
Finally able to get a quick photo shoot of the finished suspension.

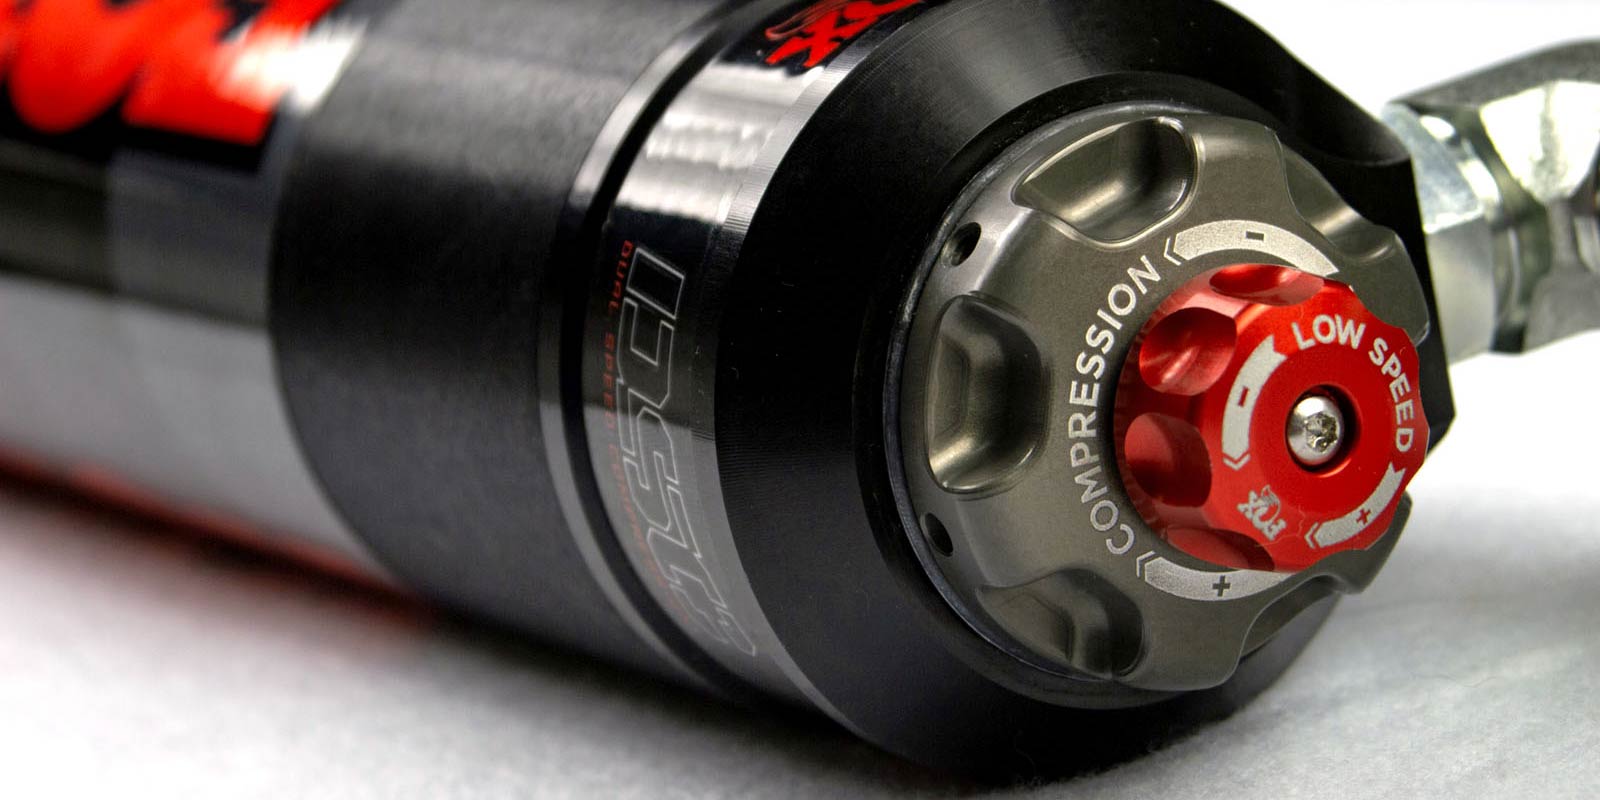
As mentioned previously, I decided upon the BDS 3-inch lift with Fox 2.5 Performance Elite Adjustable Coil-overs with remote reservoirs and dual speed compressors (DSC) paired with new BDS UCAs for the front and Fox 2.5 Shocks with remote reservoirs and DSC in the rear paired with a set of new longer springs. The system comes with the drop brackets, cross members, steering knuckles, and other hardware needed to correct the front geometry (so CV angles are back to factory angles) and keep the drive shaft aligned properly. The rear suspension geometry is corrected with control arm relocation brackets, bolt-on rear track bar relocation bracket to re-center the axle, and extended length sway bar links to correct the operating angle as well. BDS also provides bump stop extensions (limiting up travel).

Overall, I am very, very happy that I waited for this new system to finally come out. Although technically, I didn't really wait as I went through 3 other suspension systems in my attempt for the perfect setup that would achieve the stance I wanted while maintaining the truck's daily drivability and usability but also enhancing its off-road performance...lol. But I finally have a mild lift that is very strong, has the correct steering and drive shaft/differential angles, and provides plenty of clearance and articulation for 34-35 inch tires for moderate off-road use. The 3-inch lift system for the Rebel is actually the 4-inch system for the base 1500 with some hardware specifically for the Rebel.


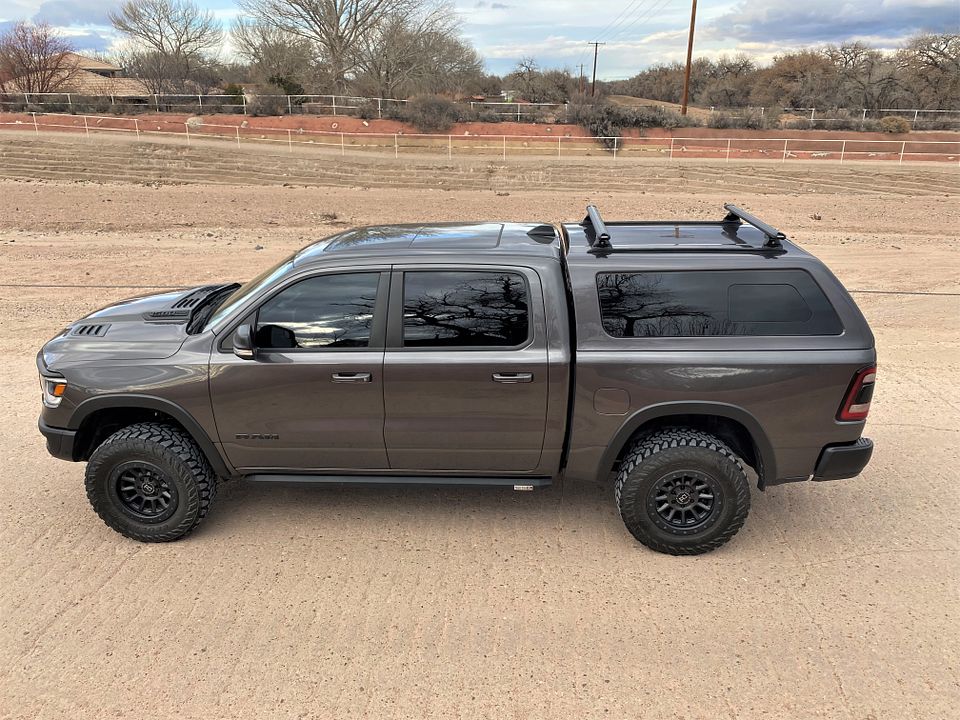
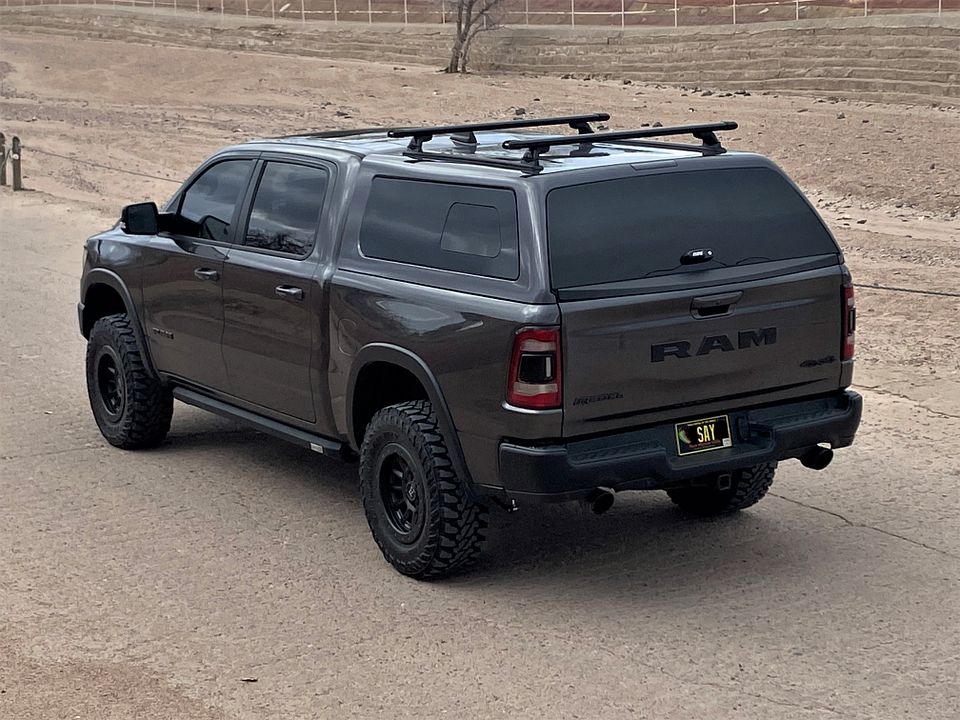
Again, I am happy with the results as the truck does not have that "over-lifted" look that the BDS 4-inch spacer or 6-inch coil-over lifts have on the Rebel as well as keeping my raised center of gravity within reason for high speed highway driving or off-canter wheeling. The Fox shocks are fantastic although I still have to play with the adjustments to get the ride I want while in town, but no doubt will perform well when adjusted for off-roading. I took the Rebel on a road near my home that has a series of high speed bumps and barely knew they were there at high speed.


Last edited:

Desert Dawg

Well-Known Member
Joined
Aug 16, 2018
Messages
494
Reaction score
1,313
Location
Albuquerque, NM
dam nice looks good what is rhe measurements for front ? did you get full 3 inch ?

Thanks.

I only took a front measurement so have to finish taking the rest. But I wanted to do a quick comparison against the other suspension systems that I tried. End result is I got just a tad over 3-inches of actual net lift over the Rebel's factory ride height (or 4-inches over a non-Rebel) or just over 3-5/8" of total lift when you factor back in the larger tire size that I am currently running. So very happy that I finally achieved a true 3-inches of lift on the Rebel.


Edit: All true net lift heights are on the Rebel which sits about an inch higher than the base Ram 1500. Some of these measurements may not seem consistent against earlier posts and/or vendor advertised heights since some were taken before or after I installed my Vice Design hidden winch system and Smittybilt 12K winch as that added some significant weight to the front end.

For example, on the Fabtech-Dirt Logic setup, measurements shown in the table were taken soon after installation, but I later reported total lift height as appreciably lower after the system had settled. And on the Bilstein 6112 setup, I should have seen 1-1.25 inches of front lift (for the Rebel) but really only netted just under an inch due to the extra weight of the hidden winch system. So I am assuming that once the front end settles in again with the newly installed BDS-Fox lift, my net lift height will be closer to 2.75-2.85 inches of lift before adding taller tires that would being me back over 3 inches of total lift height.
 
Last edited:

Desert Dawg

Well-Known Member
Joined
Aug 16, 2018
Messages
494
Reaction score
1,313
Location
Albuquerque, NM
I have the Fox 2.5 front and rear but no BDS stuff. Here's what I do with the DSC and i find it perfect:
For road/ on pavement: Low speed max, High speed 1 click only
For offroad, especially higher speed washboards: low speed max, high speed max.

for some reason my high speed is really hard to turn and maxes out at 8 clicks. is it the same for you?

Yeah, the larger high speed adjuster was really hard to turn at first but seems like it is a bit easier to do now. The smaller low speed adjuster is almost too easy and hard to feel the clicks.

Right now, I am running the low speed at 2 clicks from fully open and the high speed at 3 clicks. I haven't tried maxing out either yet.

My low speed at 2 clicks seems to ride nice and soft for most of the on-road ride although when I hit hard ruts in the road too fast, the truck slams into them so thinking I need to increase the high speed adjuster to prevent too much compression on the down travel at higher speeds. Or maybe I have that backwards as you said you're running your low speed at max and high speed at only 1 click; how's your ride on pavement and over ruts?

I haven't tried any on road excursions yet to see how they do but I need to figure this system out soon as I am planning to take the Rebel out to Moab this spring.
 

boogielander

Ram Guru
Joined
Jun 29, 2022
Messages
1,791
Reaction score
2,536
Yeah, the larger high speed adjuster was really hard to turn at first but seems like it is a bit easier to do now. The smaller low speed adjuster is almost too easy and hard to feel the clicks.

Right now, I am running the low speed at 2 clicks from fully open and the high speed at 3 clicks. I haven't tried maxing out either yet.

My low speed at 2 clicks seems to ride nice and soft for most of the on-road ride although when I hit hard ruts in the road too fast, the truck slams into them so thinking I need to increase the high speed adjuster to prevent too much compression on the down travel at higher speeds. Or maybe I have that backwards as you said you're running your low speed at max and high speed at only 1 click; how's your ride on pavement and over ruts?

I haven't tried any on road excursions yet to see how they do but I need to figure this system out soon as I am planning to take the Rebel out to Moab this spring.
Here's how I try to explain what my butt dyno tells me into English, hopefully it helps you understand the logic behind:

To better communicate my ideas, I think it's important to go through some terminologies so we both can confirm we're referring to the same things.
  • The "speed" of DSC refers to the frequency in which the shock cycles itself, we can refer "shock cycle" as: shock starting length -> shock movement (whether it is extend or compress) ->shock counter movement (going the opposite of what you just experienced) ->shock starting length. That whole process is 1 shock cycle.
  • The higher the frequency, the higher the "speed" for your shock.
  • Low Speed: less frequent for your shock to be cycling, think of on pavement driving, or even when crawling. Smooth landing falls in low speed territory as well.
  • High speed: more frequent for your shock to be cycling, think of going down a washboard road, or even going through big dips and whoops continuously (think trophy trucks bombing down Baja with their wheels going up and down)
  • Max out: refers to firmest setting, or turn the knob clockwise all the way
  • Firm: when turning the knob clockwise
  • Soft: when turning the knob counter clockwise
For on pavement
Unless you are in California where the government charges you all kinds of tax and fees to not fix the road but pay themselves, your on pavement setting can be on the softer side and still have a plushy and comfortable ride (which you have already). This is because at this stage the piston is pretty much experiencing the least amount of force needed for it to dampening your ride, and the valving of the pistol allows quite a lot of shock fluid to flow through during these less frequent events.
However, you said that you experience harshness/ bottoming out when hitting a rut. That is also because the shock settings are too "soft" to handle the sudden force applied when going through a rut. If you firm up your setting and hit the same rut, the shocks now will require more force to push the piston to dampen the rut, which cancels out and it will be more comfortable.
For high speed compression, you will want to soften it as much as possible on road, as there's not enough force to push the high speed valves. If you firm up your high speed, you will feel that your on road performance stiffens more. Because there's not enough high speed events going on during on pavement, the suspension will ride stiff.

For off pavement
If you are crawling, more low speed and less high speed is desired, due to same principles behind on pavement. Your shock travel is not as frequent during crawling.
If you're going down washboard, crank that high speed up and it's ok to leave low speed alone. This way, the speed of shock cycle can allow the valving to do its job during both washboard areas and if you are traveling at speed off pavement there's a very low chance that you will encounter low speed events anyways.

My settings:
For on pavement, I max out my low speed because although CA road suck, it's not like washboards. There are potholes, dips, and ruts everywhere especially after it rains. That's why firmest setting on low speed works. I do hit ruts and dips at speed here, but even on this current setting the landing is very controlled. There was one time I caught air, but still landing was smooth. For cornering, firmest on low speed is firm enough for me to boast enough confidence to overtake slow passenger cars on curved 2 lane highway overpasses.
However, there was one time I pre crank my high speed at home before I head out to the desert, and the ride was too stiff. I felt every road imperfection and it was not a comfortable ride. Going curved overpass with that setting actually slowed me down, as the bumpiness actually robs traction when turning.

My suggestion for you is to start from setting low speed at the firmest and test drive, then slowly crank it down to where you want it. I wouldn't turn high speed aside from 1 clock clockwise from the end of the softest setting (turn counter clockwise until the end and then 1 clock clockwise) unless your road is so bad it's like washboard.

Shock Surplus has an article better explains what each adjustment does:


Hope all these info help!
 

Desert Dawg

Well-Known Member
Joined
Aug 16, 2018
Messages
494
Reaction score
1,313
Location
Albuquerque, NM
Here's how I try to explain what my butt dyno tells me into English, hopefully it helps you understand the logic behind:

To better communicate my ideas, I think it's important to go through some terminologies so we both can confirm we're referring to the same things.
....My suggestion for you is to start from setting low speed at the firmest and test drive, then slowly crank it down to where you want it. I wouldn't turn high speed aside from 1 clock clockwise from the end of the softest setting (turn counter clockwise until the end and then 1 clock clockwise) unless your road is so bad it's like washboard.

Shock Surplus has an article better explains what each adjustment does:


Hope all these info help!

@boogielander - great write up and suggestions. I had the basic understanding but putting that into practice when first using new equipment is another thing, so hearing about your actual experience and preferences is greatly helpful as well. I think a lot of readers would appreciate reading this!
 

boogielander

Ram Guru
Joined
Jun 29, 2022
Messages
1,791
Reaction score
2,536
@boogielander - great write up and suggestions. I had the basic understanding but putting that into practice when first using new equipment is another thing, so hearing about your actual experience and preferences is greatly helpful as well. I think a lot of readers would appreciate reading this!
thanks! i did the testings and almost popped airbag on rough landings a couple times before so yall don't have to ;)
 

Desert Dawg

Well-Known Member
Joined
Aug 16, 2018
Messages
494
Reaction score
1,313
Location
Albuquerque, NM
Just got some new meats mounted on the wheels too! After an exhaustive spreadsheet analysis, I pulled the trigger on some Mickey Thompson Baja Boss A/T LT305/70R18s (35.3 inches tall x 12 inches wide on my 18x8.5 Black Rhino wheels).


Even under load when mounted, the new Baja Bosses are notably taller than my previous Yokohama Geolander G003 MTs (34.4 inches tall) unmounted!


Anyway, the ride comfort, low noise, and on-road grip is amazing. I can't wait to try them out off-road when I hit the trails at Moab later next month!I do have some minor trimming to do as I get slight rub when reversing at full lock but that's an easy fix.


I have a full-sized matching tire mounted on the spare tire wheel.
 
Last edited:

tabber02

Well-Known Member
Joined
Dec 10, 2022
Messages
435
Reaction score
248
Location
land o lakes, florida
I have a full-sixed matching tire mounted on the spare tire wheel. So, next is a removable spare tire carrier and a Pro Eagle jack that I want to mount in the truck bed.​
was it a lot of grinding to get the full size 35” on the mount under the bed? is it on the same wheel?
 

ayoslickxd

Ram Guru
Joined
Feb 7, 2021
Messages
787
Reaction score
313
Just got some new meats mounted on the wheels too! After an exhaustive spreadsheet analysis, I pulled the trigger on some Mickey Thompson Baja Boss A/T LT305/70R18s (35.3 inches tall x 12 inches wide on my 18x8.5 Black Rhino wheels).


Even under load when mounted, the new Baja Bosses are notably taller than my previous Yokohama Geolander G003 MTs (34.4 inches tall) unmounted!


Anyway, the ride comfort, low noise, and on-road grip is amazing. I can't wait to try them out off-road when I hit the trails at Moab later next month!I do have some minor trimming to do as I get slight rub when reversing at full lock but that's an easy fix.


I have a full-sixed matching tire mounted on the spare tire wheel. So, next is a removable spare tire carrier and a Pro Eagle jack that I want to mount in the truck bed.
cant wait to see it
 

Desert Dawg

Well-Known Member
Joined
Aug 16, 2018
Messages
494
Reaction score
1,313
Location
Albuquerque, NM
was it a lot of grinding to get the full size 35” on the mount under the bed? is it on the same wheel?

I mounted the spare tire on the factory spare tire wheel but did not try to place the new spare tire back into its factory location under the truck bed.; the inflated tire is just way too big as it is 35.3-inches in diameter. Instead, I am going to secure it in the truck bed under the topper. Also, by placing the tire inside the bed, it will sit almost directly over the rear axle rather than hanging near the rear bumper. This gives much better weight balance and keeps the rear from sagging more.

I wanted to try the 454 Motorsport single tire cage but they have been non-responsive to to date. I need to ensure the mounting locations and overall dimensions (with tire mounted) will leave me enough room to fit with my AMP Research bed extender that I also want to use. Their system is removable when you need full use of the truck bed and the cage provides for securing gas cans, jacks, etc. depending on the model. It really is a slick system and would love to purchase it but not going to order something that I can't get specific info on. I am going to try calling them directly this week to see if I get some information and hopefully be able to place an order in time since my Moab trip is coming up fast.

Single Tire with Jack Mount (my preference):


Dual Tire Mount option:


If not, I will go ahead and order the Fabtech spare tire carrier that mounts the tire flat in the truck bed when in use. The cool thing is their flat mounting system is also removable when I want to use the full bed for hauling. The other advantage is that the Fabtech system is significantly less expensive and much easier to install with less drilling through the truck bed (and fact that you have less under bed clearance issues to worry about). The disadvantage is that there are no additional mounting options for jacks or gas cans like the 454 Motorsport version.

Fabtech Spare Tire Mount (flat):


But either way, the spare tire will be secured while four wheeling so no bouncing around and having the larger tire in the truck bed will allow me to quickly slide the tire out if I ever need it. My previous solution for lifting the truck to change out a tire, especially when off-road, is to use my inflatable jack:


However, it is a time consuming process. So while I will keep it as a backup, I am going to invest in a Pro Eagle 2-ton Big Wheel Off-Road Jack "The Beast" that will be great in the shop but also designed to keep itself stable in soft sand and fully lift my lifted truck with the 35-inch tires:

 
Last edited:

ayoslickxd

Ram Guru
Joined
Feb 7, 2021
Messages
787
Reaction score
313
I mounted the spare tire on the factory spare tire wheel but did not try to place the new spare tire back into its factory location under the truck bed.; the inflated tire is just way too big as it is 35.3-inches in diameter. Instead, I am going to secure it in the truck bed under the topper.

I wanted to try the 454 Motorsport tire cage Delta Cage | 454 Motorsports-"]Delta Cage | 454 Motorsports but they have been totally non-responsive to my inquiry as I need to ensure the mounting locations and overall dimensions (with tire mounted) will still leave me enough room to work with my AMP Research bed extender that I also want to use. Their system is removable when you need the bed but the cage provides for securing gas cans, jacks, etc. depending on the model.

But since they are not responding, and I am running out of time since my Moab trip is coming up fast, I am opting for the Fabtech spare tire carrier that mounts the tire flat when in use Universal Spare Tire Flat Mount - FTT10001BK. The cool thing is their flat mounting system is also removable when I want to use the full bed for hauling. The tire will be secure while four wheeling so no bouncing around but the new location allows me to quickly slide the tire out if I ever need it. I am also toying with the idea of making a removable aluminum rack that will span across the front of the bed over the tire to securely mount other items like a Pro Eagle jack 2 Ton Off Road Jack "OG" , gear boxes, etc. for when off-roading but probably won't have that figured out in time. But it's nice having a topper as I can stack things and keep them secure.
you have a set up like mines i just ordered this bumper you may like it pricey but it will fit what i need done with out losing space in bed


Desert Dawg

Well-Known Member
Joined
Aug 16, 2018
Messages
494
Reaction score
1,313
Location
Albuquerque, NM
you have a set up like mines i just ordered this bumper you may like it pricey but it will fit what i need done with out losing space in bed


I did look at that bumper! It's a sweet setup but I determined that since I am constantly accessing my truck bed, it would limit my ability to haul things with the tailgate down as well as being kind of annoying to have to keep moving it aside to access under the topper (especially when in the shop or tight parking areas). Also, it still keeps all the weight over the rear bumper so not as [arguably] ideal when off-roading. But if you're setting the rig purely for off-roading gear and not really using the bed for hauling things, then that's a great solution!
 

ayoslickxd

Ram Guru
Joined
Feb 7, 2021
Messages
787
Reaction score
313
yes well since. its removeable i plan to just removed it when not off roading and attach it when i am, also will have a small little tent ontop of diamond back cover but now you gave me a idea i was thinking of just drilling two holes thru it and being able to secure two tires to diamond back cover… and less expensive …. and it will fit my two tires on the bed rack coverand have my bed completely empty for what ever i want or need and will have the weight over the axles and not the bumper
 

Desert Dawg

Well-Known Member
Joined
Aug 16, 2018
Messages
494
Reaction score
1,313
Location
Albuquerque, NM
yes well since. its removeable i plan to just removed it when not off roading and attach it when i am, also will have a small little tent ontop of diamond back cover but now you gave me a idea i was thinking of just drilling two holes thru it and being able to secure two tires to diamond back cover… and less expensive …. and it will fit my two tires on the bed rack coverand have my bed completely empty for what ever i want or need and will have the weight over the axles and not the bumper

I didn't catch that it was removable, which is great; you'd think they would highlight that! I did see it adds 200 lbs of extra weight plus the tire/wheel weight which could send the whole assembly north of 300 lbs over the back bumper...that's quite a bit of extra weight for sure! But if someone is using the truck for true expedition off-roading like yourself (so actually camping with your rig), that setup makes perfect sense rather than having your spare in the bed as it doesn't leave you much room for all the other gear. I don't camp with mine so I just need recovery and day trip gear when off-roading.
 

ayoslickxd

Ram Guru
Joined
Feb 7, 2021
Messages
787
Reaction score
313
I didn't catch that it was removable, which is great; you'd think they would highlight that! I did see it adds 200 lbs of extra weight plus the tire/wheel weight which could send the whole assembly north of 300 lbs over the back bumper...that's quite a bit of extra weight for sure! But if someone is using the truck for true expedition off-roading like yourself (so actually camping with your rig), that setup makes perfect sense rather than having your spare in the bed as it doesn't leave you much room for all the other gear. I don't camp with mine so I just need recovery and day trip gear when off-roading.
i caught it when reading and saw that you can order cap covers … which would mean it had to be removeable… but you gave me idea of saying screw the bumper and just throw the flat surface mounts on my diamond back cover (drill holes ) and have the two tires mounted on the cover(its rated to hold a atv 🤣 
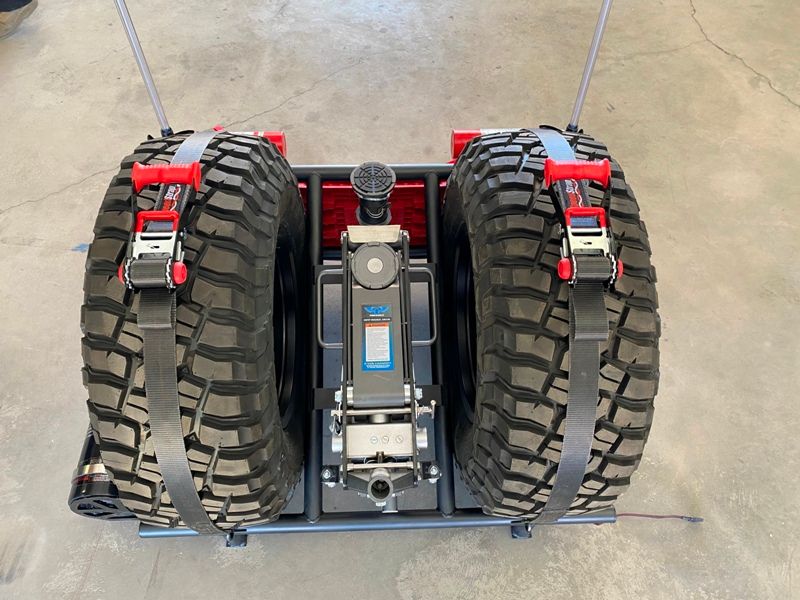
and i have tested some loads on it so im sure two tires can fit on it … i dont think i need or wanna spend 4k on something i dont need
 

tabber02

Well-Known Member
Joined
Dec 10, 2022
Messages
435
Reaction score
248
Location
land o lakes, florida
I mounted the spare tire on the factory spare tire wheel but did not try to place the new spare tire back into its factory location under the truck bed.; the inflated tire is just way too big as it is 35.3-inches in diameter. Instead, I am going to secure it in the truck bed under the topper. Also, by placing the tire inside the bed, it will sit almost directly over the rear axle rather than hanging near the rear bumper. This gives much better weight balance and keeps the rear from sagging more.

I wanted to try the 454 Motorsport single tire cage but they have been non-responsive to to date. I need to ensure the mounting locations and overall dimensions (with tire mounted) will leave me enough room to fit with my AMP Research bed extender that I also want to use. Their system is removable when you need full use of the truck bed and the cage provides for securing gas cans, jacks, etc. depending on the model. It really is a slick system and would love to purchase it but not going to order something that I can't get specific info on. I am going to try calling them directly this week to see if I get some information and hopefully be able to place an order in time since my Moab trip is coming up fast.

Single Tire with Jack Mount (my preference):


Dual Tire Mount option:


If not, I will go ahead and order the Fabtech spare tire carrier that mounts the tire flat in the truck bed when in use. The cool thing is their flat mounting system is also removable when I want to use the full bed for hauling. The other advantage is that the Fabtech system is significantly less expensive and much easier to install with less drilling through the truck bed (and fact that you have less under bed clearance issues to worry about). The disadvantage is that there are no additional mounting options for jacks or gas cans like the 454 Motorsport version.

Fabtech Spare Tire Mount (flat):


But either way, the spare tire will be secured while four wheeling so no bouncing around and having the larger tire in the truck bed will allow me to quickly slide the tire out if I ever need it. My previous solution for lifting the truck to change out a tire, especially when off-road, is to use my inflatable jack:


However, it is a time consuming process. So while I will keep it as a backup, I am going to invest in a Pro Eagle 2-ton Big Wheel Off-Road Jack "The Beast" that will be great in the shop but also designed to keep itself stable in soft sand and fully lift my lifted truck with the 35-inch tires:


i ran an n-fab spare strap in my bed for the 37” (37x12.5x20) trail grappler in my 2500. never moved. thought about doing something similar with my 1500, but it won’t work with the tonneau cover.
 

Users who are viewing this thread

Top