5thGenRams Forums

Register a free account today to become a member! Once signed in, you'll be able to participate on this site by adding your own topics and posts, as well as connect with other members through your own private inbox!

Bilstein 5100

jeffrey5679

Active Member
Joined
Oct 2, 2020
Messages
98
Reaction score
17
Can someone verify I installed these correctly. I set it to setting #5 and only took out the long black dust cover leaving in the black metal top with bolts, the smaller black gasket looking thing and the black spring placement holder. Is this right?
 

Attachments

  • dust 1.jpeg
    dust 1.jpeg
    117.8 KB · Views: 137
  • dust 2.jpeg
    dust 2.jpeg
    107.3 KB · Views: 134
  • dust 3.jpg
    dust 3.jpg
    149.2 KB · Views: 135

Mother

Active Member
Joined
Apr 11, 2020
Messages
183
Reaction score
227
Location
Orlando, FL
It looks like the instructions say to trim the dust shield if you're going with setting 7, but otherwise you should just be installing it as is, from what I understand.
 

NewLove

Ram Guru
Joined
Jan 12, 2019
Messages
703
Reaction score
243
It looks like the instructions say to trim the dust shield if you're going with setting 7, but otherwise you should just be installing it as is, from what I understand.

He’s at setting 5 so he’s should be good then


Sent from my iPhone using Tapatalk
 

troymi

Active Member
Joined
Feb 14, 2019
Messages
66
Reaction score
28
I can't remember if I posted in this thread yet (a lot of reading!). I have a 20 Laramie Ecodiesel without ORP. I'm having Bilstein 5100s installed and putting on 275/65/20 KO2s (34"). I haven't seen many (a couple?) diesels that are leveled so I'm thinking the block is smaller/lighter than the Hemi. My thought is to go level 4 on the Bilsteins. I don't want exact level or nose high.

Any thoughts on this setup?
 

NewLove

Ram Guru
Joined
Jan 12, 2019
Messages
703
Reaction score
243
How long do you wait before you get an alinement done after install?..


Sent from my iPhone using Tapatalk
 

MJH19RAM

Member
Joined
Jun 12, 2019
Messages
18
Reaction score
29
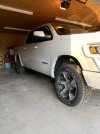
Just wanted to share my experiences with my 5100 install. It took me a little longer than expected, but all went well. I installed them at clip position #4 on my 2019 Laramie 4x4 with ORP. Got pretty close to 1.5” lift as advertised for this setting. I have a heavier ranch hand replacement bumper so I had close to 3” of rake to begin with. Ended with 1.5” of rake after install, which is what I wanted. Main advice for the install:

- Only worry about un-doing 5 things to get the strut assemblies out. Tie-rod end to knuckle, lower sway bar links at lower control arm, upper ball joint, lower strut bolt, and 3 small upper strut bolts. Unhook ABS lines from factory holders so they have some play and re-attach when you are done. I did not have problems separating the upper ball joint (though I’ve done this before on other vehicles during suspension mods). Don’t be scared to give the knuckle a good whack with a hammer from a few different angles. Just don’t hit the boot or the arm! Be prepared to hold the weight of the knuckle in place so you don’t overextend ABS/brake lines/CV axle shafts. Use bungees (or whatever you have handy) to hold the knuckle in place while you are working.
- have pry bar handy to help you get the lower strut bracket maneuvered away from the lower control arm and reinstalled.
- for the actual strut assembly/disassembly- manually compressing the springs takes a while. Obviously it would have been easier with a wall mounted spring compressor, but i did it manually.
- spray some penetrating oil onto the top nut on the factory strut. It’ll help it come off easier.
- like others have said, invest in an 18mm pass-through socket and wrench. It’s well worth it to be able to hold the 8mm stud while removing the 18mm nut off of the factory strut.
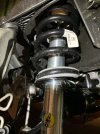
- try to line everything up as close as possible on the new 5100 struts to the original orientation of the factory struts with regards to the bottom bracket, so when you put them back in the truck the assembly is all straight like the original. Mark everything on the top like the 5100 instructions say so you can like it all back up.
- be prepared to use a floor jack to help you support and lift everything back up towards the upper control arm during installation. You may have to use some elbow grease to get the upper ball joint back together and get the nut threaded.

Everything else was pretty straight forwards. Use a torque wrench for reinstallation of everything. There are torque specs published in a few locations on this forum.

Any questions on the install feel free to ask. I can tell the struts are stiffer than the factory, but like others have said...not in a bad way. Handling is probably improved, definitely not as “wallowey” as the factory struts.

Going for an alignment this weekend. I’m pleased with the improvement.

Will get some bigger shoes sometime soon to replace the factory 275/55R20s.
 

Attachments

  • FE82298C-C965-4EC0-8D40-F25C02AD4CE2.jpeg
    FE82298C-C965-4EC0-8D40-F25C02AD4CE2.jpeg
    134.7 KB · Views: 158
Last edited:

jeffrey5679

Active Member
Joined
Oct 2, 2020
Messages
98
Reaction score
17
Did you torque the top shock tower nut while the spring was compressed? I’ve heard both. I’ve also seen a falcon install where they bottom out the nut then torque?


Sent from my iPhone using Tapatalk
 

MJH19RAM

Member
Joined
Jun 12, 2019
Messages
18
Reaction score
29
Did you torque the top shock tower nut while the spring was compressed? I’ve heard both. I’ve also seen a falcon install where they bottom out the nut then torque?


Sent from my iPhone using Tapatalk
Yes, I did torque it the best I could while the spring was still compressed. I think you would be fighting the force of the spring if you didn’t do that first. Have to use an Allen wrench to hold the shaft of the 5100 while tightening the New strut top nut. Then just periodically checked to make sure everything was still lined up while releasing the spring back to its seats, as once there is pressure on the seats, there is no more rotating anything. Hopefully this makes sense.
 

jeffrey5679

Active Member
Joined
Oct 2, 2020
Messages
98
Reaction score
17
Thank you! Have you noticed any rattling or noise. I’ve noticed a slight drivers side rattle going after my install. I’m pretty sure it’s because I didn’t torque something down correctly. Just wondering if you have any rattling


Sent from my iPhone using Tapatalk
 

MJH19RAM

Member
Joined
Jun 12, 2019
Messages
18
Reaction score
29
Thank you! Have you noticed any rattling or noise. I’ve noticed a slight drivers side rattle going after my install. I’m pretty sure it’s because I didn’t torque something down correctly. Just wondering if you have any rattling


Sent from my iPhone using Tapatalk
No sir, all quiet so far here!
 

NewLove

Ram Guru
Joined
Jan 12, 2019
Messages
703
Reaction score
243
How long do you wait to get an alignment after installing 5100’s? After they settle? Do they?


Sent from my iPhone using Tapatalk
 

NewLove

Ram Guru
Joined
Jan 12, 2019
Messages
703
Reaction score
243
What tool is used to move adjustable height Circlip?


Sent from my iPhone using Tapatalk
 

CJR28

Well-Known Member
Joined
Feb 24, 2020
Messages
351
Reaction score
176
What tool is used to move adjustable height Circlip?


Sent from my iPhone using Tapatalk
No tool needed, just move one side up to the next ring and then go around the whole circlip until its resting on the next spot. Its pretty easy to play with but i guess a flat head would help
 

NewLove

Ram Guru
Joined
Jan 12, 2019
Messages
703
Reaction score
243
No tool needed, just move one side up to the next ring and then go around the whole circlip until its resting on the next spot. Its pretty easy to play with but i guess a flat head would help

Thank you


Sent from my iPhone using Tapatalk
 

Users who are viewing this thread

Top