5thGenRams Forums

Register a free account today to become a member! Once signed in, you'll be able to participate on this site by adding your own topics and posts, as well as connect with other members through your own private inbox!

Bed Utility rail installation

Your guys that have lit in the utility rails. The manual says to torque to 10.5 Nm (7.5 ft lbs) that math does translate. 10.5nm is like 90 ft lbs.
what’s the right torque to use?

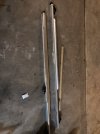
View attachment 49486
Where did you pick up the rails sir. Looks for a set for my 5'7"
 
So glad I ordered my truck with BUG.
Yes, the BUG is a good deal both in price and headaches if trying to put the rails in and had a line-x type liner installed. I was not knowledgeable enough and my salesman did not explain the benefits and price. I've spent close to $600 for the bed step and rails. I installed 2 sets of bed lights, one LED behind the utility rail and one set that I direct as I please, normally positioned to the tailgate. Very happy as the tailgate is a nice height for working and the added lighting works great for seeing what I am doing.

I also added a double pole double throw (DPDT) switch with my auxiliary reverse lights. This will turn on my auxiliary reverse lights along with the tailgate bed light set up.

See post 364
 
Anyone have a part number for the brackets that attach the rail to the bed? Pulled my rails off a tram box, there were no brackets. Thank you in advance.
 
Pulled mine off my rambox power wagon...therefore, no brackets. I will likely fabricate something to make it work. Part # or photo of vrackets?
 

Attachments

  • FBD336F8-419B-4A9C-96EB-60F8314C6DD7.jpeg
    FBD336F8-419B-4A9C-96EB-60F8314C6DD7.jpeg
    102.3 KB · Views: 60
Any advice for installing over a drop in bedliner? I guess I'll just have to locate the holes, and drill them out larger enough so the rivnut sits flush with the body
 
Any advice for installing over a drop in bedliner? I guess I'll just have to locate the holes, and drill them out larger enough so the rivnut sits flush with the body

That’s exactly what I did. The Duraliner had impressions right where the holes would be


Sent from my iPhone using Tapatalk
 
That’s exactly what I did. The Duraliner had impressions right where the holes would be


Sent from my iPhone using Tapatalk
Unfortunately, mine doesnt. Just picked it up used. Not sure what brand drop in liner it is. Its got cut outs for the tie down points/ hooks in the bed from the fractory, but no other help with things under the liner
 
Unfortunately, mine doesnt. Just picked it up used. Not sure what brand drop in liner it is. Its got cut outs for the tie down points/ hooks in the bed from the fractory, but no other help with things under the liner

So maybe take the liner out. Chalk on the bed rail where the bolt holes are. Measure how far down they go. Reinstall. Measure and chalk. Uninstall. Drill.


Sent from my iPhone using Tapatalk
 
These were a bit of a pain to install. Watched a YouTube video and that guy didn’t have nearly as much trouble as I did. I could not get the rivnuts in without taking a dremel to knock down some of the bed liner in the holes. I then tried the instructional method of just torquing the bolt (using a torque wrench), but the rivnut started to spin/round out the hole before it got anywhere close to crushing. So then I tried the poor man’s tool using two wrenches and a nut, but that was only going to strip the threads if I kept trying (lube may have been the key that I didn’t read until just now). I ended up getting the proper tool at Harbor Freight which worked wonderfully. Those rivnuts are now as secure as they could possibly be. I don’t think you’d be able to sufficiently crush the included rivnuts using any other method, at least not if you want the most secure attachment you can get with rivnuts.
 
These were a bit of a pain to install. Watched a YouTube video and that guy didn’t have nearly as much trouble as I did. I could not get the rivnuts in without taking a dremel to knock down some of the bed liner in the holes. I then tried the instructional method of just torquing the bolt (using a torque wrench), but the rivnut started to spin/round out the hole before it got anywhere close to crushing. So then I tried the poor man’s tool using two wrenches and a nut, but that was only going to strip the threads if I kept trying (lube may have been the key that I didn’t read until just now). I ended up getting the proper tool at Harbor Freight which worked wonderfully. Those rivnuts are now as secure as they could possibly be. I don’t think you’d be able to sufficiently crush the included rivnuts using any other method, at least not if you want the most secure attachment you can get with rivnuts.
I tried that too and it didn't work then I bit the bullet and bought a rivetnut tool. Now I am looking for a decent price on the rails with shipping.
 
So. I read through the whole thread. Watch the video. I have used rivnet at my prior job. What I am looking for are the hex style ones like the factory. I bought a set of used rails that did not come with the rivnuts. Does anyone know where to order the hex style from? OR do you know if the round ones will work in the hex holes that are already cut in my truck bed?
Thanks for any help you can provide.
One source is.
McMaster-Carr
 
So. I read through the whole thread. Watch the video. I have used rivnet at my prior job. What I am looking for are the hex style ones like the factory. I bought a set of used rails that did not come with the rivnuts. Does anyone know where to order the hex style from? OR do you know if the round ones will work in the hex holes that are already cut in my truck bed?
Thanks for any help you can provide.
FYI
see post 51


Last edited:
I tried that too and it didn't work then I bit the bullet and bought a rivetnut tool. Now I am looking for a decent price on the rails with shipping.
Try BAM Wholesale, that’s where I got mine for the lowest price I could find.
 
I couldn't believe how simple it was to install mine. Check box for Bed Upgrage Package, print page, hand it to salesman. Worked like magic!
 
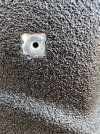
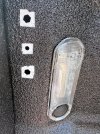
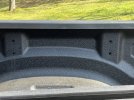
After reading through this and related threads, decided to clear Line-X around hex holes. Rivet nut tool should be here Wednesday. This took me a little over an hour. First one was by far the longest. I looked at some YouTube videos on removing spray-on bedliner. My primary tools were a utility knife and small screw driver. By the 16th hole I was a pro.

Note that spray on bedliner thickness can vary a lot. Using a makeshift caliper, I was able to verify that the material thickness around three of my rivet nut locations was greater than what the rivet nut specs would allow. That means 13 others were fine or marginal. Nonetheless, there is less risk securing the rails steadfastly with the bedliner out of the way.

Next step touch up paint. Update—added picture with touch up paint.
 

Attachments

  • BAC3EFF8-C57D-462D-82CB-CA0977EB6EAE.jpeg
    BAC3EFF8-C57D-462D-82CB-CA0977EB6EAE.jpeg
    425.2 KB · Views: 38
  • 8351F1E8-43DF-4549-929D-65AD3F5EB373.jpeg
    8351F1E8-43DF-4549-929D-65AD3F5EB373.jpeg
    385 KB · Views: 38
  • 4736D0E8-B5C2-4E7B-AD4B-85A91A3E653F.jpeg
    4736D0E8-B5C2-4E7B-AD4B-85A91A3E653F.jpeg
    264.4 KB · Views: 36
Last edited:

Users who are viewing this thread

Back
Top