5thGenRams Forums

Register a free account today to become a member! Once signed in, you'll be able to participate on this site by adding your own topics and posts, as well as connect with other members through your own private inbox!

Anyone done the big 3 yet?

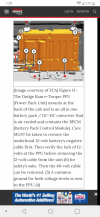
Ok. So spent some time researching tonight. If im reading this diagram right then I imagine a full big 3 would be quite pricey. However what must be done and all. I plan to add a 2/0 run of power from #6 to front battery. Also a run on the 48v side to its connection point on passenger firewall if possible without hacking into the connector. The common ground back by the power pack I plan to run up to the engine block.
 

Attachments

  • Screenshot_20210501-012854.png
    Screenshot_20210501-012854.png
    393.1 KB · Views: 143
Waiting on how to for etorque as well


Sent from my iPhone using Tapatalk
While its on my mind, what does your voltahe readout on your dash? Trting to get an understanding for how the voltage is controlled
 
While its on my mind, what does your voltahe readout on your dash? Trting to get an understanding for how the voltage is controlled

Created a thread on that on its super tricky but I will give it another look


Sent from my iPhone using Tapatalk
 
While its on my mind, what does your voltahe readout on your dash? Trting to get an understanding for how the voltage is controlled

What Voltage Should Etorque Be at?


Sent from my iPhone using Tapatalk
 
What Voltage Should Etorque Be at?


Sent from my iPhone using Tapatalk
I cant get a defiinitive answer. Mine varies from 12.5v to 13.7ish. Rarely it will climb to 14. Mostly seems to hover around 13.0.
 
I used the bolt right under the alternator case and added another 4awg to the stock frame mount. Both blue arrows in the pick. Im running about 2000 watts to subwoofers and door speakers with 2 amplifiers. I have no voltage drops even at max volume since i did the big 3
The bolt under the alt case, did you run a ground from there to frame?? Or from alt case to battery? Im trying to find a good location for my 2nd ground. I ran from battery to the ground right by the battery and my alt to battery positive. Still have dimming issues with headlights and all. Only running 1200 ish watts. Im hoping getting this other ground on cures it.
 
The bolt under the alt case, did you run a ground from there to frame?? Or from alt case to battery? Im trying to find a good location for my 2nd ground. I ran from battery to the ground right by the battery and my alt to battery positive. Still have dimming issues with headlights and all. Only running 1200 ish watts. Im hoping getting this other ground on cures it.
Have you considered adding a 2nd battery or upgrading the stock one?

I had a sundown 1500 pushing a DD9512 with a 2nd battery, all 0 gauge wiring and no big 3 or any other electrical upgrades and had no dimming or funky idling. This was in a small 4 door sedan with a weaker alternator than what is in these Rams.
 
Found this on YT


Is anyone selling the pre-made wiring kit for our 5th gen Rams?
 
Last edited:
Have you considered adding a 2nd battery or upgrading the stock one?

I had a sundown 1500 pushing a DD9512 with a 2nd battery, all 0 gauge wiring and no big 3 or any other electrical upgrades and had no dimming or funky idling. This was in a small 4 door sedan with a weaker alternator than what is in these Rams.
Extra batteries are for when the vehicle isn't running. If you plan to have a lot of accessory run-time with engine off then this would be the way to go.

If you have an alternator that's not up to the task then it will probably struggle to run the car and charge an extra battery.

A capacitor or higher capacity alternator (or both) would be a better option for when the car engine is running.

I had an issue years ago when I installed a large custom audio system in my Mazda MX-6 and it didn't take much to dim the headlights. It was only a momentary dimming so all I needed was a something to fill that gap on the heavy beats (large current draw) so I installed a large capacitor which solved the issue. Had that not solved my issue, or it was a constant problem instead of momentary, then I would have gotten a beefier alternator.

Just my .02
 
I assume y’all are no longer in warrant? I can see the dealer denying many issues for this type of mod if you are still in warranty period.
 
Sorry to bring this old thread up again but couldn't find another newer thread on this. Has anyone done this successfully yet. I know I need it because I installed a 400.4 JL Amp with a 1500W Mono and it sounds great but this morning to work I could see the lights dim on a good bass hit. I have turned off the bass amp until I either get a new MechMan Alternator or find a correct write up on the Big 3. Anyone know which XS Power battery will fit in these trucks? Thanks.
 
Sorry to bring this old thread up again but couldn't find another newer thread on this. Has anyone done this successfully yet. I know I need it because I installed a 400.4 JL Amp with a 1500W Mono and it sounds great but this morning to work I could see the lights dim on a good bass hit. I have turned off the bass amp until I either get a new MechMan Alternator or find a correct write up on the Big 3. Anyone know which XS Power battery will fit in these trucks? Thanks.

I did it, fixed all my light dimming issues. Still running stock battery. I ran all 1/0 KnuKonceptz colossus wire.

Tools needed:
Ground/power wire. Anything will work, the bigger the better. 1/0 is more than enough for stock alternator. I like http://www.knukonceptz.com/mobile-audio/power-wire/kolossus-fleks-kable/

6 terminals. Tinned copper is the best, but plain copper is totally fine for this application. 3/8” ring will work for most everything


A crimper.

https://www.amazon.com/IWISS-Termi...cphy=1018036&hvtargid=pla-370713145091&psc=1

Heat shrink/wire loom. Lots of options on Amazon.


I’m out of town right now but when I get home I can upload some pictures.

So first is wire from alternator to battery positive. It’ll be on the back of the alternator, covered by a red cap. If you flip the new wire terminal “upside down” and put it under the old terminal, it’ll fit better.

Stock engine block ground-to-frame is hidden up under the passenger side manifold, don’t even **** with it. I just ran a new wire from a convenient bolt on front of the engine to one of the ground points on the edge of the engine bay. Make sure you sand-clean the contact points.

Battery ground to frame: there’s a bunch of ground screw all along the edge of the engine bay. Just pick a convenient one.

Sent from my iPhone using Tapatalk
 
Last edited:
I did it, fixed all my light dimming issues. Still running stock battery. I ran all 1/0 KnuKonceptz colossus wire.

Tools needed:
Ground/power wire. Anything will work, the bigger the better. 1/0 is more than enough for stock alternator. I like http://www.knukonceptz.com/mobile-audio/power-wire/kolossus-fleks-kable/

6 terminals. Tinned copper is the best, but plain copper is totally fine for this application. 3/8” ring will work for most everything


A crimper.

https://www.amazon.com/IWISS-Termin...ocphy=1018036&hvtargid=pla-370713145091&psc=1

Heat shrink/wire loom. Lots of options on Amazon.


I’m out of town right now but when I get home I can upload some pictures.

So first is wire from alternator to battery positive. It’ll be on the back of the alternator, covered by a red cap. If you flip the new wire terminal “upside down” and put it under the old terminal, it’ll fit better.

Stock engine block ground-to-frame is hidden up under the passenger side manifold, don’t even **** with it. I just ran a new wire from a convenient bolt on front of the engine to one of the ground points on the edge of the engine bay. Make sure you sand-clean the contact points.

Battery ground to frame: there’s a bunch of ground screw all along the edge of the engine bay. Just pick a convenient one.

Sent from my iPhone using Tapatalk
any pics? I am going to do this weekend. Good idea. but a picture is worth a ton to me.
 

Users who are viewing this thread

Back
Top