Yes I did. The truck has the LED light package (except the cargo and third brake light) so I changed them to LED.Did you recently change any of your bulbs to led?
Sent from my SM-G986U using Tapatalk
5thGenRams Forums
You are using an out of date browser. It may not display this or other websites correctly.
You should upgrade or use an alternative browser.
You should upgrade or use an alternative browser.
Adding Passive Entry: How-to
- Thread starter MayhemMOORE
- Start date
- Joined
- Apr 11, 2019
- Messages
- 2,534
- Reaction score
- 3,081
- Points
- 113
Those are the culprits.Yes I did. The truck has the LED light package (except the cargo and third brake light) so I changed them to LED.
That's the problem. You can change the bulbs back to halogen until a proven bulb becomes available or as a temporary work around you can press the start button putting the truck in Acc before pressing the brake and then press the brake and start the truck. This works everytime for me but sometimes you still get the key fob not found or key fob has left the vehicle message but I just press ok and move on. I have Lasfit bulbs but I have been reading that they have a new version that doesn't cause this issue. Some people have had good luck with diode dynamics bulbs but they are pricey and I have seen several that still have the problem after using those so it's really hit or miss. Check out https://r.tapatalk.com/shareLink/to...hare_fid=2034315&share_type=t&link_source=app for more info on the bulb issue.Yes I did. The truck has the LED light package (except the cargo and third brake light) so I changed them to LED.
Sent from my SM-G986U using Tapatalk
Fishwiz
Active Member
- Joined
- Sep 5, 2020
- Messages
- 126
- Reaction score
- 148
- Points
- 43
- Age
- 40
I have LED lights in my garage and it effects the garage door opener signal. I can get it to work, but sometimes it takes a buck of tries. I'll switch back sometime when I get the chance.
I've never experienced these types of LED interference before with other cars or any other wireless tech.
My wife's 2016 Highlander doesn't have this problem.
Sent from my Pixel 3 XL using Tapatalk
I've never experienced these types of LED interference before with other cars or any other wireless tech.
My wife's 2016 Highlander doesn't have this problem.
Sent from my Pixel 3 XL using Tapatalk
Last edited:
Those are the culprits.
Thanks for the quick reply guys, would have never thought that would have been the problem.That's the problem. You can change the bulbs back to halogen until a proven bulb becomes available or as a temporary work around you can press the start button putting the truck in Acc before pressing the brake and then press the brake and start the truck. This works everytime for me but sometimes you still get the key fob not found or key fob has left the vehicle message but I just press ok and move on. I have Lasfit bulbs but I have been reading that they have a new version that doesn't cause this issue. Some people have had good luck with diode dynamics bulbs but they are pricey and I have seen several that still have the problem after using those so it's really hit or miss. Check out https://r.tapatalk.com/shareLink/to...hare_fid=2034315&share_type=t&link_source=app for more info on the bulb issue.
Sent from my SM-G986U using Tapatalk
Can anyone explain why this is effecting the FOB's?
MayhemMOORE
Ram Guru
- Joined
- Apr 6, 2020
- Messages
- 572
- Reaction score
- 526
- Points
- 93
I have aftermarket led’s in the cargo, 3rd brake light, reverse, and all interior lights. All are from lasfit, and I have had zero issues. All were installed before I started messing with the passive entry. So at least on my truck, I can confirm that these lights have caused no issues with key fob functionality.
Ok I’m starting to get everything together to do this mod I already have the harnesses but need to order the driver and passenger door handles and rear door caps as well as the antenna. And ofcourse get alpha, obd link and gateway bypass. I got a parts list from the dealer but I’m not sure it’s correct. Can someone that’s done this on a granite crystal truck confirm or provide accurate part numbers? I’m doing the body color handles in front and rear caps to get rid of the chrome strips. Thanks in advance
Attachments
Still have these cables?If anyone needs a set of the three harnesses made by Jimmy let me know. I have a set for sale $85. Upgrading to a Laramie so no need anymore. Comment on my post in the for sale section. Thanks!
If so, interested!
New to the forum and I want to add this true keyless to my 2020 Bighorn
I bought those off of zon3Still have these cables?
If so, interested!
New to the forum and I want to add this true keyless to my 2020 Bighorn
- Joined
- Apr 11, 2019
- Messages
- 2,534
- Reaction score
- 3,081
- Points
- 113
PM me if you need a set.Still have these cables?
If so, interested!
New to the forum and I want to add this true keyless to my 2020 Bighorn
z0n3
Ram Guru
- Joined
- Jun 16, 2019
- Messages
- 1,722
- Reaction score
- 1,377
- Points
- 113
- Age
- 33
Hey! Sorry I have sold these to another forum member. Best of luck! Jimmy makes some quality cables!Still have these cables?
If so, interested!
New to the forum and I want to add this true keyless to my 2020 Bighorn
I can definitely second that. Lasfit is the way to goI have aftermarket led’s in the cargo, 3rd brake light, reverse, and all interior lights. All are from lasfit, and I have had zero issues. All were installed before I started messing with the passive entry. So at least on my truck, I can confirm that these lights have caused no issues with key fob functionality.
Sent from my SM-N986U using Tapatalk
Fishwiz
Active Member
- Joined
- Sep 5, 2020
- Messages
- 126
- Reaction score
- 148
- Points
- 43
- Age
- 40
I can't confirm for you, but when I bought my parts, I confirmed my color by calling the parts department before placing my order. I used tasca parts.Ok I’m starting to get everything together to do this mod I already have the harnesses but need to order the driver and passenger door handles and rear door caps as well as the antenna. And ofcourse get alpha, obd link and gateway bypass. I got a parts list from the dealer but I’m not sure it’s correct. Can someone that’s done this on a granite crystal truck confirm or provide accurate part numbers? I’m doing the body color handles in front and rear caps to get rid of the chrome strips. Thanks in advance
Sent from my Pixel 3 XL using Tapatalk
SkittleRam
Ram Guru
this write-up is amazing! Maybe a future mod for me 
4x4OffRoad2021BigHorn
New Member
- Joined
- Nov 23, 2020
- Messages
- 3
- Reaction score
- 0
- Points
- 1
- Age
- 41
This is amazing. Does anyone know if this will work on a 2021 Big Horn EcoDiesel?
Hi, Just finished this mod successfully, thank you, thank you the folks that put it the work to figure out and post this great mod.HARDWARE INSTALLATION
Start by removing the small plastic covers behind the door handle(s) using a small flathead screwdriver or similar device. Behind those you will see a total of 3x 10mm bolts, 1 behind the top handle and 2 below the lower handle. Go ahead and remove those and put them somewhere for safekeeping. Using a trim tool, remove the window switch by carefully prying it up and out of the door panel then disconnect it. Keep it nearby as you will need it shortly to lower the window.
Before you start removing the panel, grab a bucket or something to set it on once the clips are undone, or have a pair of needle nose in arms reach so you don’t have to leave the panel hanging by a cable to go get one. The easiest way to do get the door panel off is to use a little brute force rather than trying to work a trim tool around the entire panel to each clip. Keep in mind that door panel is actually 2 pieces (upper/lower) and if you get too crazy, you could break them apart. If you are uneasy about yanking on the panel, then proceed with working your way around to each clip with a tool.
Grab ahold of the map pocket with one hand, or get in behind the corner of the panel with your fingers, while using your other hand to hold the actual door itself. Give the panel a good sharp tug and it should pop some of the clips loose. They are in there pretty snug, and it will make a lot of noise when it pops off, but you should be able to do it without breaking anything. Work your way around to release all the remaining clips. There are a few clips along the very top which can be tricky to get, but you can slide your hand back in there and work them loose. If you happen to break any of them, check the parts list for replacements. You may get a couple that don’t separate and come out of the door altogether. If that happens, just get them apart and put the halves that belong in the sheet metal back in before assembly.
Once the door panel is loose, there are some things connected to the backside you need to disconnect. The lock button should pull out pretty easily if it didn’t when the panel popped loose, but the cable to the handle can be a bit tricky. There are 2 small tabs which hold the end of the cable housing in the hole that you will need to pinch, use a pair of needle nose pliers, then slide the housing back. You can then rotate the cable out 90° and remove the end from the handle. If you have any additional wiring connected to the back of the panel, go ahead and disconnect it. That should free up the door panel and you can set it somewhere safely out of the way.
View attachment 62486
You should now be looking at the door carrier plate and be able to see most of the harness, the speaker, door module, etc… Make note of the one bolt around the edge that is missing. That’s because it’s the one from behind the door handle. This way you don’t spend 10 min crawling around thinking you lost a bolt when you go to put it back together. Also, don’t put it back in before putting the door panel back on, or you’ll be pulling it off again.
View attachment 62487
You will see two rubber plugs down by the bottom which are where you will access the bolts that hold the window to the regulator assembly. Pop them open so you can see in, plug the window switch back in and lower the window until the bolts are visible. Disconnect the window switch and set it aside for now. Remove the two bolts and disconnect the window from the regulator. Carefully lift the window all the way up and secure it using tape or a wedge. If you have tint on your windows, DO NOT use tape on the inside or you risk damaging it. With enough tape on the outside going up and over the top of the door frame, the window should stay in place.
View attachment 62488
Remove the 4 screws holding the speaker in and disconnect the plug to it. You can also disconnect the wiring going from the door module up to the mirror now and secure it out of the way.
Where the door and body harnesses connect you will need to release some tabs under the rubber boot to free it from the body of the truck. The pic below shows the top tab released. You may be able to work the boot back and get a view of the tabs, but if you just slide a thin screwdriver or something similar in between the boot and the sheet metal you should be able to get the tabs to release while wiggling the door connector. Be careful not to scratch up the paint. Just look on the new harness and you will see exactly where you need to press to release it from the body. Once released, you can unplug the connectors, and then feed the door harness through the door so will be ready to come out with the carrier plate.
View attachment 62489
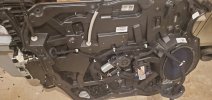
Next, remove the bolts around the edge of the carrier plate and set them aside. Do not try to remove the plate yet as there are 2 bolts hidden inside that connect it to the latch assembly. The easiest way I found to do this is to reach in through the speaker opening and remove the 2 bolts. They are located towards the left side of the plate, directly behind the 2 things that look like a + with a circle in the middle. After that is done, you should be able to pull back the carrier plate and disconnect the remaining wiring. Having a second set of hands, or a bucket to set the plate on helps when trying to disconnect the wiring going to the latch. Be careful when pulling the panel back, as there are some tabs that clip on to the metal door frame, so if it seems stuck, don’t just yank or you might break it. Once it’s all free, go ahead and remove the old harness from the plate and install the new one.
I will add one tip that maybe should be posted with the original door disassembly. The 2 hidden bolts in the door are not supposed to be removed by putting your hands in through the carrier assy. They can stay in place. Here is what you do instead:
-Remove the 3 screws from the where the door latch connects on the side of the door
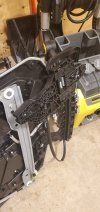
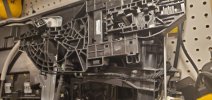 , sorry no pic.
-loosen, not remove the torx screw behind the door handle. You can then push the screw forward and the assy will slightly fall in the door.
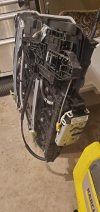
Now once you have all the screws removed from the carrier and the screws removed from the glass you can remove the entire assy including the door latch mechanism and exterior handle assy. much easier than fighting with those hidden screws inside the door. This is the way the factory assembles it I believe. Its easier to run the wires to the handles and clip them in too, just dont forget to leave about an inch of slack and push the connector out through the exterior handle bracket. This way when you have it all put back together the plug is hanging outside the door. Plug it into your handle and reass
MayhemMOORE
Ram Guru
- Joined
- Apr 6, 2020
- Messages
- 572
- Reaction score
- 526
- Points
- 93
You're correct, that is the way the service manual instructs you to disassemble that. For whatever reason, I had a hell of a time and it did not want to come out that way, so I went the way other's have shown worked and took the two bolts out to separate the pieces. I will update the original post when I get a chance and show both ways in case one is easier than the other for different people.Hi, Just finished this mod successfully, thank you, thank you the folks that put it the work to figure out and post this great mod.
I will add one tip that maybe should be posted with the original door disassembly. The 2 hidden bolts in the door are not supposed to be removed by putting your hands in through the carrier assy. They can stay in place. Here is what you do instead:
-Remove the 3 screws from the where the door latch connects on the side of the doorView attachment 75214View attachment 75222, sorry no pic.
-loosen, not remove the torx screw behind the door handle. You can then push the screw forward and the assy will slightly fall in the door.
Now once you have all the screws removed from the carrier and the screws removed from the glass you can remove the entire assy including the door latch mechanism and exterior handle assy. much easier than fighting with those hidden screws inside the door. This is the way the factory assembles it I believe. Its easier to run the wires to the handles and clip them in too, just dont forget to leave about an inch of slack and push the connector out through the exterior handle bracket. This way when you have it all put back together the plug is hanging outside the door. Plug it into your handle and reassView attachment 75211View attachment 75212
Tropigator
Member
- Joined
- Oct 31, 2020
- Messages
- 5
- Reaction score
- 1
- Points
- 3
- Age
- 63
Hi Nozzleman, I was out of town for Thanksgiving and just saw this post. I had bought all of the parts back in late Oct/early Nov, but when I had time to do it the weather was crappy. I may try to start on it tomorrow. Did you get yours done?Hey Tropigator, I see your in Pompano, hello from Sunrise. Were you able to get the mod done? If not maybe I can help, I'm planning on doing the mod soon and was hoping to at least get a feel for it or do it together with someone.
If anyone else is in South Florida and wants to do this I would be happy to participate.
Nozzleman
Well-Known Member
- Joined
- Nov 10, 2020
- Messages
- 225
- Reaction score
- 181
- Points
- 43
- Age
- 42
No, I haven't even purchased the parts yet unfortunately. Thanks for reaching back out to me. I'm a little sad over it, but I'm probably going to wait until January to do mine, a few other things have come up.
Sent from my SM-N970U using Tapatalk
Sent from my SM-N970U using Tapatalk
Users who are viewing this thread
Total: 2 (members: 0, guests: 2)
Members online
Total: 1,614 (members: 7, guests: 1,607)

