How to remove rear of center console for adding USB Port
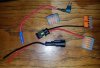
1. Pictures 1 & 2 Starting at the top, remove the trim/edge piece with a trim removal tool. Begin at one end and work your way around there are 5 clips holding it (Pict.#2 )
View attachment 46027 View attachment 46028
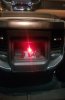
2. Picture 3 & 4 Lift out the rubber cup holder insert. There are 2 screws (Pict.#3), 1 on each side (I believe 7mm but you can use a phillips head) remove them. Now using either your fingers or a trim tool (Pict.#4) start at the bottom and pull out gently from the carpet up to pop the clips (6). When they are done the whole rear of the console will lift up away.
View attachment 46029 View attachment 46030
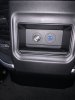
3. Pictures 5 & 6 There are 4 screws (Dark Blue in Pict.#5) that hold the center storage area in place. Remove them and you have the mounting area for your USB or whatever. The light blue screws (Pict.#5) remove the center area, there are also 2 clips (yep, I knocked mine off, overkill) if you wish to but don’t have to remove.
View attachment 46031 View attachment 46032
I hope this helps you in your project.

.jpg")
.jpg")
.jpg")
.jpg")
.jpg")
.jpg")