5thGenRams Forums
You are using an out of date browser. It may not display this or other websites correctly.
You should upgrade or use an alternative browser.
You should upgrade or use an alternative browser.
What did you do to your Ram today???
- Thread starter 19BlkRam
- Start date
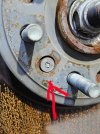
I knew better but I did it anyway
A: Grind slot and use large flat head
B: Try heating the screw
C: Weld old socket or nut on it
B: Don't change rotors and say I did
F : Buy new truck
G: Drill head out then try vice grips
Enlighten me with a new simple way to fix this. I'm leaning towards the welding way only because it never failed me...
MarPar
Takes a MoPar to catch a MoPar
- Joined
- Jan 19, 2022
- Messages
- 739
- Reaction score
- 2,585
- Points
- 93
- Age
- 49
FView attachment 208655
I knew better but I did it anyway
A: Grind slot and use large flat head
B: Try heating the screw
C: Weld old socket or nut on it
B: Don't change rotors and say I did
F : Buy new truck
G: Drill head out then try vice grips
Enlighten me with a new simple way to fix this. I'm leaning towards the welding way only because it never failed me...
TNRamGuy
Ram Guru
Drill and easy out! Pb blaster or winter green oil first.View attachment 208655
I knew better but I did it anyway
A: Grind slot and use large flat head
B: Try heating the screw
C: Weld old socket or nut on it
B: Don't change rotors and say I did
F : Buy new truck
G: Drill head out then try vice grips
Enlighten me with a new simple way to fix this. I'm leaning towards the welding way only because it never failed me...
boogielander
Spends too much time on here
- Joined
- Jun 29, 2022
- Messages
- 3,571
- Reaction score
- 5,684
- Points
- 113
usually we find a torx or allen bit and "drive" it in with a hammer, then press on it as we use a ratchet to loosen it.View attachment 208655
I knew better but I did it anyway
A: Grind slot and use large flat head
B: Try heating the screw
C: Weld old socket or nut on it
B: Don't change rotors and say I did
F : Buy new truck
G: Drill head out then try vice grips
Enlighten me with a new simple way to fix this. I'm leaning towards the welding way only because it never failed me...
if that doesn't work then grind slot and use large flat head, but spray some WD-40 before you turn with flat head.
If your rotor is not warped or damaged then there's not really a need to change rotor.
MotorcycleBoy
Active Member
- Joined
- Dec 12, 2024
- Messages
- 146
- Reaction score
- 62
- Points
- 28
- Age
- 50
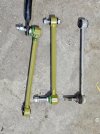
@RAM REAPER MAN, please find these specific bolts:
after the drill you will insert this bolt in reverse

after the drill you will insert this bolt in reverse

Last edited:
boogielander
Spends too much time on here
- Joined
- Jun 29, 2022
- Messages
- 3,571
- Reaction score
- 5,684
- Points
- 113
Almost forgot to grab pictures of the starlink Mini mounted:

Mounting is achieved with Trio Flat Mount's Starlink Mini Speed Mount, using their Rubber Coated Magnets.
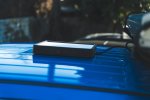
The mount itself is a two piece unit, held together with 2 button head bolts and nylon lock nuts.
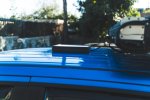
As seen from side profile, there is very little gap between the bottom of the mount and the roof, which reduces aero induced lift at high speed. The cable is routed out of the mount via a notch under the mount.

There is also an optional polycarbonate cover that is supposed to help with "protecting" the dish. However, after examining the piece and looking at how the piece is added, it is determined that the polycarbonate cover will/ can trap more dirt and moisture since there is no seal between the cover and the mount.

One workaround is to add rubber or silicone gasket to achieve a 100% water and dust proof seal, however, that could also lead to overheating issues due to poor ventilation. In addition, there are small holes on the unit itself for ventilation, so it will still not be 100% water and dust proof even with a seal.
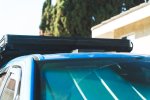
One good thing about Trio over competition is its low profile. The mount (and the unit) are really profile, so it not only helps with aerodynamics (and keeping wind noise low), but also makes it harder to spot as it does not stand out at all.

I purchased a separate, longer power cord with USB-C, and wrapped it in some wire sleeve. Then, I left some slack for when I want to remove the unit from the roof for service or cleaning, and routed the cable to the top of GFC and bundled it with my existing solar cables.
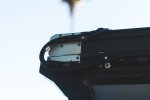
Reason why I use wire sleeve: so it blends in with the solar cables.
I went a bit overboard with the cable length, as my original plan was to route it down to the frame then go up the firewall to go into the cab, and go to my Ecoflow Delta 2. But instead, I routed it to the LiFEPO4 in the bed.
I may change the wire to the shorter one, or I may just route it to the EcoFlow's USB-C output.
That's how it will sit for now. Will decide if I want to route it to the front or not in the coming days.

Mounting is achieved with Trio Flat Mount's Starlink Mini Speed Mount, using their Rubber Coated Magnets.

The mount itself is a two piece unit, held together with 2 button head bolts and nylon lock nuts.

As seen from side profile, there is very little gap between the bottom of the mount and the roof, which reduces aero induced lift at high speed. The cable is routed out of the mount via a notch under the mount.

There is also an optional polycarbonate cover that is supposed to help with "protecting" the dish. However, after examining the piece and looking at how the piece is added, it is determined that the polycarbonate cover will/ can trap more dirt and moisture since there is no seal between the cover and the mount.

One workaround is to add rubber or silicone gasket to achieve a 100% water and dust proof seal, however, that could also lead to overheating issues due to poor ventilation. In addition, there are small holes on the unit itself for ventilation, so it will still not be 100% water and dust proof even with a seal.

One good thing about Trio over competition is its low profile. The mount (and the unit) are really profile, so it not only helps with aerodynamics (and keeping wind noise low), but also makes it harder to spot as it does not stand out at all.

I purchased a separate, longer power cord with USB-C, and wrapped it in some wire sleeve. Then, I left some slack for when I want to remove the unit from the roof for service or cleaning, and routed the cable to the top of GFC and bundled it with my existing solar cables.

Reason why I use wire sleeve: so it blends in with the solar cables.
I went a bit overboard with the cable length, as my original plan was to route it down to the frame then go up the firewall to go into the cab, and go to my Ecoflow Delta 2. But instead, I routed it to the LiFEPO4 in the bed.
I may change the wire to the shorter one, or I may just route it to the EcoFlow's USB-C output.

That's how it will sit for now. Will decide if I want to route it to the front or not in the coming days.
CH3NO2LOVER
Active Member
- Joined
- Nov 26, 2024
- Messages
- 32
- Reaction score
- 29
- Points
- 18
- Age
- 124
How do you like the Starlink? I am looking at getting one for the race trailer when we go racing as some of the tracks we go to are a bit "remote", also have you used the pause option?Almost forgot to grab pictures of the starlink Mini mounted:
View attachment 208685
Mounting is achieved with Trio Flat Mount's Starlink Mini Speed Mount, using their Rubber Coated Magnets.
View attachment 208686
The mount itself is a two piece unit, held together with 2 button head bolts and nylon lock nuts.
View attachment 208687
As seen from side profile, there is very little gap between the bottom of the mount and the roof, which reduces aero induced lift at high speed. The cable is routed out of the mount via a notch under the mount.
View attachment 208688
There is also an optional polycarbonate cover that is supposed to help with "protecting" the dish. However, after examining the piece and looking at how the piece is added, it is determined that the polycarbonate cover will/ can trap more dirt and moisture since there is no seal between the cover and the mount.
View attachment 208689
One workaround is to add rubber or silicone gasket to achieve a 100% water and dust proof seal, however, that could also lead to overheating issues due to poor ventilation. In addition, there are small holes on the unit itself for ventilation, so it will still not be 100% water and dust proof even with a seal.
View attachment 208690
One good thing about Trio over competition is its low profile. The mount (and the unit) are really profile, so it not only helps with aerodynamics (and keeping wind noise low), but also makes it harder to spot as it does not stand out at all.
View attachment 208691
I purchased a separate, longer power cord with USB-C, and wrapped it in some wire sleeve. Then, I left some slack for when I want to remove the unit from the roof for service or cleaning, and routed the cable to the top of GFC and bundled it with my existing solar cables.
View attachment 208692
Reason why I use wire sleeve: so it blends in with the solar cables.
I went a bit overboard with the cable length, as my original plan was to route it down to the frame then go up the firewall to go into the cab, and go to my Ecoflow Delta 2. But instead, I routed it to the LiFEPO4 in the bed.
I may change the wire to the shorter one, or I may just route it to the EcoFlow's USB-C output.
View attachment 208693
That's how it will sit for now. Will decide if I want to route it to the front or not in the coming days.
If he can't get the broken torx bit out of the screw, drilling will be difficult@RAM REAPER MAN, please find these specific bolts:
after the drill you will insert this bolt in reverse
MotorcycleBoy
Active Member
- Joined
- Dec 12, 2024
- Messages
- 146
- Reaction score
- 62
- Points
- 28
- Age
- 50
I agree. It's very difficult. Io farei così, partendo da una piccola punta da trapano e con tanta pazienza... and possibility of errorIf he can't get the broken torx bit out of the screw, drilling will be difficult


Inviato dal mio SM-F766B utilizzando Tapatalk
Agreed
Have drill, PB, and lots of bitsDrill and easy out! Pb blaster or winter green oil first.
I made sure to it was all the way seated with a hammer. I fooled with it some last night and the stuck bit part is wanting to come out.usually we find a torx or allen bit and "drive" it in with a hammer, then press on it as we use a ratchet to loosen it.
if that doesn't work then grind slot and use large flat head, but spray some WD-40 before you turn with flat head.
If your rotor is not warped or damaged then there's not really a need to change rotor.
I tried to use a 200 lbs. or regional equivalent magnet. I figured it wouldn't but its way to hard to pull straight out or it might come with it,
I have some but I'm also unsure I have any that small. The picture I took is blown up so it does look much larger than it is.@RAM REAPER MAN, please find these specific bolts:
after the drill you will insert this bolt in reverse
They all came out easily but this one. I can move it some with a small pick so I'd like to think it wouldn't take much to move it
Installed one of the LED hood badges from @CZmenghe_Official @CZmenghe_Team_John
Install went fairly well. The instructions aren't 100% clear on taking the old badge off. You need to pop the bottom two tabs first, not the top. Then it just comes right off.
Installing the new badge wasn't as straightforward either. The top did not want to pop in, and with the 3m tape to help hold them on took a little bit. Had to get a little aggressive to get the tabs to pop in.
Finding the connector on headlight was easy, and I chose to route the wires through the fender to hide them as much as possible. Where they çome off the hood hinge to the hole, there not much you can do. I might revisit this isn't the future to try and **** it up better.
Comparison of stock badge to the LED badge . Plastic does feel cheaper. I might miss the purple overlays, but kid of like he flagish look of the LEDs.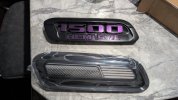
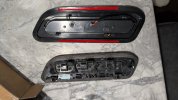
New badge installed. There is some gap on the rear I'm not 100% happy with, it it's not horrible either.
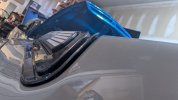
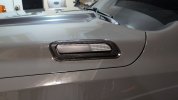
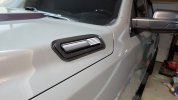
Here is my wire routing. I have a fish tape from previous job I used to pull the wire through the fender. Could use a coat hanger as well. This was connection to test the light.
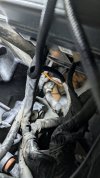
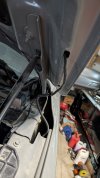
Here is the final route by the hinge.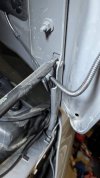
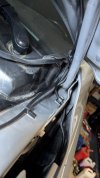
Install went fairly well. The instructions aren't 100% clear on taking the old badge off. You need to pop the bottom two tabs first, not the top. Then it just comes right off.
Installing the new badge wasn't as straightforward either. The top did not want to pop in, and with the 3m tape to help hold them on took a little bit. Had to get a little aggressive to get the tabs to pop in.
Finding the connector on headlight was easy, and I chose to route the wires through the fender to hide them as much as possible. Where they çome off the hood hinge to the hole, there not much you can do. I might revisit this isn't the future to try and **** it up better.
Comparison of stock badge to the LED badge . Plastic does feel cheaper. I might miss the purple overlays, but kid of like he flagish look of the LEDs.


New badge installed. There is some gap on the rear I'm not 100% happy with, it it's not horrible either.


Here is my wire routing. I have a fish tape from previous job I used to pull the wire through the fender. Could use a coat hanger as well. This was connection to test the light.


Here is the final route by the hinge.


Last edited:
MotorcycleBoy
Active Member
- Joined
- Dec 12, 2024
- Messages
- 146
- Reaction score
- 62
- Points
- 28
- Age
- 50
Thank you again for the indication and I ask you for another courtesy:12V 14Ah AGM battery with a group size of AUX14.
Its dimensions are approximately 5.93 x 3.50 x 5.68 inches, and it has a Cold Cranking Amps (CCA) rating of around 200 CCA
Are the AUX14 poles the same as the starter battery? I think not, and in EU I can only find the AUX14 with the poles as in the picture (like those of motorcycles).
And I'm going wrong?
Thank you

Inviato dal mio SM-F766B utilizzando Tapatalk
boogielander
Spends too much time on here
- Joined
- Jun 29, 2022
- Messages
- 3,571
- Reaction score
- 5,684
- Points
- 113
been using starlink for a while on the truck. I had the Gen 2 when I did the Alaska trip last year.How do you like the Starlink? I am looking at getting one for the race trailer when we go racing as some of the tracks we go to are a bit "remote", also have you used the pause option?
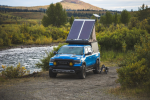
Connectivity:
Even in the north well above Arctic Circle, the Gen 2 has been great with performance as long as the receiver has clear view of the sky. Reason I have to emphasize on above Arctic Circle is because in northern hemisphere, Starlink receivers need to point to the north to receive satellites, and the more north you go, the less suitable satellites out there.That said, clear view of sky is extremely important when you are far north, but satellite count shouldn't be an issue when you're at lower 48.
The Gen 2 is an actuated unit, so is Gen 3 Standard and high performance (I suspect). That means the dish/ receiver will turn to get best connectivity, even if you're in the woods where you have partial obstruction. On the other hand, the Mini is not actuated, so placement/ clear view of sky will be more important. Some obstruction is okay, but too much obstruction will cause connectivity issues.
I have been powering my Gen 2 using my EcoFlow Delta 2, and to reduce power consumption, I have set it to be flat instead of automatic satellite tracking. This hasn't been an issue for me, even in the woods where I have partial obstruction. Which is what lead me to think the Mini's flat mounting wouldn't be an issue.
Power Consumption:
One reason I switched from Gen 2 to mini is power consumption. Gen 2 only has AC power input, whereas the Mini accepts 12V DC input. But regardless of AC or DC input, Starlink itself operates on DC power. Further, the conversion from AC to DC is at about 30% loss rate due to inefficiency, and that just reduce my available run time.Sure, there are conversion kits to both flat mount Gen 2 Actuated units and convert them to 12V DC input, but lets be honest... that would end up costing me more than buying a mini on Black Friday sale ($229+tax, free shipping @ Home Depot. Add $2 for same day delivery) and buying the Trio mount combined. That is like getting a 4"+ lift kit to fit 35s or 37s... all the extra work and money spent for no better performance.
To power my Starlink Gen 2 (or Gen 3 Standard/ High Performance), an AC outlet is needed. This means a dedicated power station (costs $$, but Ecoflow Delta 2 is on sale for $349 right now, basically half off) or a separate battery plus inverter (inverter is such old school tech. I said what I said, and I will die on that hill). Using AC power, Starlink Gen 2 pulls around 60W of power peak and around 50W of power during normal usage.
On the other hand, Mini (or the Gen 3s if they have USB-C/ DC in put capability), a PD certified power bank/ power station can be used. You can use a Anker 300W laptop power brick and call it a day, though your run time will be limited to a few hours. Mini draws about 20-40W, but I am seeing around 20W of consumption only via my LiFEPO4's onboard BMS.
Do NOT, and I repeat, do NOT try to get power from the trailer hitch or your starting battery. It is a good practice that any time you add additional electrical components you do it OUTSIDE of the vehicle's OE wiring. You want to get a fused external loop, just so IF something goes wrong, your vehicle's wiring system is not damaged.
Cable Management, Organization, and Storage:
I have the Starlink Official Carry Case for the Gen 2, which holds the Dish, the Router, the AC cable, and the Router to Dish cable. The case is foam padded inside and is enormous: it is about the size of two ATX PC cases stacked. Not really an issue for me, since I travel solo and have plenty of space in the truck.However, setting up the unit at camp every time I stop gets old and annoying. I gotta hook up the router and run the cables, then put the dish on the mount on GFC BEFORE I open the GFC. If I open the GFC before I set it up, then I gotta close the GFC and do it again. The router sits in the cab, so the router to dish cable is pinched in the door when I close the door. The hanging cable when Gen 2 is in use also makes opening the door and GFC panel an annoying task, since I have to make sure the cable is not in the way of anything.
With the Mini, none of those issues exist. Cables are neatly tied down, and there's no setup or take down.
Usage:
Because Gen 2 & Gen 3 Standard/ High Performance has a dedicated router, the usable range for WiFi Connection is much further than Mini. At the highest, I had over 15 devices connected to my Gen 2 and connectivity still allows for high def video streaming and FaceTime calls.The Mini, because of its built in router, the usable range for Wifi Connection is shorter, but still can handle over 10 devices connection with high def video streaming and FaceTime calls.
Pricing:
The Roam plan is at $50 per month for 50G of data, and the Roam Unlimited is at $165 per month for unlimited data. I have the Unlimited because when shared with other people, 50G runs out very quickly and the additional per GB price is just not feasible with group setting. Even when I am solo, my nightly photo dump backup is at at least 15GB per night, so Unlimited makes more sense to me.Pausing has been my secret weapon when I don't have trips planned. However, they did away with the Pausing plan and replaced it with the monthly $5 Standby Plan. The difference here is, when paused, you will need internet connectivity to unpause your account, which basically requires you to do so before you lose cell signal or before you head out. With the Standby Plan, your Starlink will be connected still, though in a extremely low data mode, and you can unpause it whenever, even in the wild.
Monthly charge is prorated, so you have opportunities to save even more. In my case, my billing date is on the 5th of every month, so if I only turn it back on on the 20th for a weekend, I just need to pay for the amount between this month's 20th until next month's 5th. I don't have to pay the full $165. Therefore, I tend to schedule my trips either toward the end of the month or beginning of the month, before the 5th. What I usually do is I resume service, pay for it, then pause it right away so it will still operate until the billing date, and then the service will automatically pause on the 5th. That way, I will not forget to pause it before new bill is calculated.
Pausing and resuming service is simple, can be done via the app or the web portal.
Hope that helps.
I have never once successfully used these dang things@RAM REAPER MAN, please find these specific bolts:
after the drill you will insert this bolt in reverse
MurphBigHorn
Ram Guru
- Joined
- Jun 25, 2021
- Messages
- 588
- Reaction score
- 636
- Points
- 93
- Age
- 40
Installed a jump seat. Miss the center console but it not my daily. And family first. Needed the extra seat sometimes. Didn’t realize carpet was an issue. Will order new to replace.


Sent from my iPhone using Tapatalk


Sent from my iPhone using Tapatalk

