5thGenRams Forums

Register a free account today to become a member! Once signed in, you'll be able to participate on this site by adding your own topics and posts, as well as connect with other members through your own private inbox!

What did you do to your Ram today???

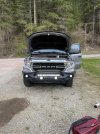
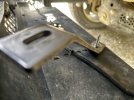
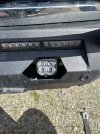
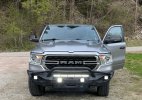
Had a solid start to the weekend - installed a set of Baja Designs LP6 Lights on my 2025 Rebel using our new OEM+ Light Mounting Kit. Love how the amber backlight matches all the marker lights and how the 6" light fills the open grille area.

https://www.vicedesign.ca/collections/2025-ram-1500-rebel/products/oem-led-bumper-light-mount-set-2025-ram-rebel-rho
IMG_8170.jpg


VICE OEM+ 2025 LIGHT MOUNTS LP6 001.JPG

Also received my new Toyo's, Methods, Bilstein's and BDS parts.. Let the next stage of the build begin! 😃
 
at 11PM:
looked at my leaky washer bottle to see if it's a loose connection causing the leak or a crack on the bottle. Couldn't see anything. Determined if I was gonna take the bottle out to check I might as well just replace it.
Started to take apart the front, then 15 minutes later as I got the grille loose I realized I need to remove the LP9s on the bumper to fully remove the front to gain access. Reconsidered my options, and decided I can probably live with leaky washer bottle and refilling it every 4-5 days until I get annoyed enough to remove the whole front end. said F it and put everything back and called it a night.

also i found like 20 dead bees (road kills from Alaska trip) and heavy layer of dust/ dirt in the front. i'll hose all that when I redo it... just don't know when.

oh also upgraded my wireless charger in the OE phone holder location (I do not have the MOPAR wireless charger, never did. I just put a wireless charger there) and upgraded the 110v -> USB-C adapter. Now i have true 15w wireless charging on my iphone. Never understand why people with wireless carplay/ android auto need to put their phone on the top with dash mounts so they can see it...
Maybe as a temporary fix, if you find where leak is, use some butyl tape to stop leak, warm it up and will stick forever. Is cheap, same stuff people use to seal rv roofs. Could put water with some color in it to see leak better or tape top and put pump on it to pressurize it a little so leaks easy to see.
 
New shoes for the 2020 Laramie Longhorn. I was still on the original Bridgestone Duelers with a bit less than 25K, but had gotten some uneven wear on the passenger side pair.

Replaced them with a set of Bridgestone Dueler AT Ascent on Saturday, will be going in for alignment on Monday.

Old tires
PXL_20250416_135915558c.jpg
PXL_20250416_135938279c.jpg
They were being rotated at about a 5K interval.

New tires
PXL_20250427_124951365.jpg

PXL_20250427_125003479.jpg

So far I haven't noticed any road noise to speak of.
 
New shoes for the 2020 Laramie Longhorn. I was still on the original Bridgestone Duelers with a bit less than 25K, but had gotten some uneven wear on the passenger side pair.

Replaced them with a set of Bridgestone Dueler AT Ascent on Saturday, will be going in for alignment on Monday.

Old tires
View attachment 200276
View attachment 200277
They were being rotated at about a 5K interval.

New tires
View attachment 200278

View attachment 200279

So far I haven't noticed any road noise to speak of.
Looks good, that is what I am thinking about going with, let us know how they do. I looked at my stock Alenza's today and they do look almost half worn only at 10,500 miles so will probably need them by 25K.
 
Maybe as a temporary fix, if you find where leak is, use some butyl tape to stop leak, warm it up and will stick forever. Is cheap, same stuff people use to seal rv roofs. Could put water with some color in it to see leak better or tape top and put pump on it to pressurize it a little so leaks easy to see.
oh yeah if i had the patience to take the bottle out and didn't already have the dealer deliver new bottle already hahaa honestly for under $50 for the bottle that comes with new sensor and new pump I can't complain ahhaha
 
Well, nothing to my 1500, but I had to remove the seats in my families 2500 (2019). Something failed under the seat and it got stuck in the forward position. Of course it happened after they had moved the seat all the way forward to vacuum under it. Those rear bolts were RUSTED. wow. Had to get up under the truck and clean off as much of the rust as I could and still use a torch to loosen them.

No idea what caused the issue, everything looks fine. No frayed wires, nothing caught on the tracks, fuses are good (checked the passenger one too and even swapped them and the passenger still worked), nothing disconnected or loose.

Any ideas? Maybe I missed something aside from testing every wire and trying to trace a bunch of electronics. Either way, they are taking it in tomorrow (going to be an uncomfortable drive) so we'll see what they say.

And then I disabled mine again lol.

Mine has given me nothing but problems and constantly even loses it's entire memory settings where I press "1" and nothing happens. So I just disabled it, again. I caved not long ago as I was cleaning it out because I like the feature and it helps reduce the tearing up of the seat on that side where I slide in and out or even turn to get out, but it's obviously not worth this level of crap so I'm just going to disable it and never buy that feature again. Manual cloth seats from here on out.
Possibly bad switch panel
 
I ....... WANT.....THAT!!!

was it hard to do?
If you meant me....

I'm no mechanic by any stretch and it's not hard. It's the usual little things that are tough like fishing wires through those really tight boots between the door and cab, working in tight spaces, making sure you have the right tools (a long T25 to get the door handle off).

It did take a while, several hours in my case, but I was taking my time. I also managed to damage one of the connections so I took some time trying to find one at the auto parts stores (3 of them) before coming home and just rigging it up. I ordered replacements in case this one fails.

All of my cars have had that feature for the last decade plus, this was a MUST HAVE as far as I'm concerned.

I used wires from Jimm07 and followed a combo of the dedicated thread and the video out there by Infotainment.
 

Users who are viewing this thread

Back
Top