
5thGenRams Forums
You are using an out of date browser. It may not display this or other websites correctly.
You should upgrade or use an alternative browser.
You should upgrade or use an alternative browser.
What did you do to your Ram today???
- Thread starter 19BlkRam
- Start date

TheLegend
Ram Guru
- Joined
- Feb 11, 2023
- Messages
- 504
- Reaction score
- 440
- Points
- 63
- Age
- 34
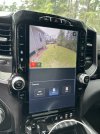
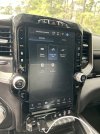
Installed the @SKT Customs Center Console Switch Panel Mount + Cupholder. Looks OEM and probably my favorite spot I’ve had my Switch Panel by far! Ended up moving my tablet and tablet holder into the new Cupholder and my wife is now super thankful.  It slides all the way forward and back as well if you want and works with a lockbox if you have one. The cable gets tucked up under the center console with clips provided from SKT, tucked down the left channel where the phone holders/wireless charges are, and goes behind the Screen for a clean looking install.
It slides all the way forward and back as well if you want and works with a lockbox if you have one. The cable gets tucked up under the center console with clips provided from SKT, tucked down the left channel where the phone holders/wireless charges are, and goes behind the Screen for a clean looking install.Attachments


TheLegend
Ram Guru
- Joined
- Feb 11, 2023
- Messages
- 504
- Reaction score
- 440
- Points
- 63
- Age
- 34

OMG. if i was your passenger i would be silently losing my mind and as soon as you ran in to get something at the gas station i would peel every single film in there off and put them in window squeegee water bin near the pump so you could not get them back.oh yeah that will go on once the factory film falls off. (edit: or when I get tired of that film making the screen laggy... for now i don't really use the screen much so it hasn't bother me just yet. unless someone tells me if i don't take that thing off it will mess with my screen then it's coming off today)
i still have the film on the shifter
jimothy
Ram Guru
I replaced my stock battery with a dual purpose (starter and deep cycle) lithium (LiFePO4) battery. Dakota Lithium 135Ah, 1000 CCA. I need to do some more testing with it and tweak some IBS parameters with JScan, but so far, so good.
I went with Dakota Lithium over Antigravity for three main reasons: Capacity (135Ah vs 60 or 80), it's self heating for charging in the cold, and price—though it still wasn't cheap! But the Antigravity would have a much easier install, since it's available in the same H7 size of the stock battery. The DL is a Group 24F size battery (same depth, but narrower and taller than than H7).
I may do a more detailed write up later of the install process, but the short version is, I had to cut and splice two 2 AWG wires and one 4 AWG wire and crimp new battery lugs. Fortunately, I have a hydraulic crimper already, so this wasn't too bad. Just a major leap of faith when you make that first cut.
I am a bit concerned about how heat under the hood will impact the battery. I'm also concerned if my eTorque DC-DC charger could ever provide too much current to the battery; it's best to charge it lower than 40A, and 135A is the maximum sustained charge. I'll keep an eye on charging current and temperature.
The battery has Bluetooth (oddly, they don't advertise this), and you can use their app to track current, voltage, state of charge, and other parameters. Oddly, it doesn't display temperature, though since it has a self-heating feature, it must include a thermometer. But, you can monitor battery temperature from the IBS via JScan.
During my first test drive, before I tweaked any IBS parameters in JScan, it mustly didn't charge. Rather, during this evening trip (thus, headlights and taillights on), it was mostly draining at around 20A. It did see it charging as high as 80A for a brief moment; still safe, but higher than I like.
Since then, I tweaked the IBS settings, especially setting the battery voltage at which it'll be recharged; it defaults to 10V, which is a very dead LFP battery. I changed it to 13.4V, just below the fully charged, resting (i.e., not currently charging) voltage of an LFP. What this means is, the charger will kick in earlier and more often, but, I believe, at a lower current. (Ohm's Law also plays in here: LFP batteries internal resistance rises with voltage, so current will drop as voltage rises).
I haven't yet taken another test drive after these tweaks, but I'll be keeping an eye on things this week.
(The finally install is the one with the black felt on top and the wires wrapped in loom).
Last edited:
Good job on the wall. Those things suck to build. Lots of manual workTruck did a lot of work hauling stones and rock to my back yard for my retaining wall build. Handles half a scoop of #57 rock like a champ.
View attachment 181079
GrandpaBob
Member
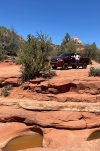
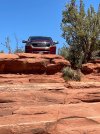
I added some pinstripes to my 'pavement princess' when I took her off-road on the Soldier's Pass trail in Sedona, AZ. We went to the parking area for the Seven Sacred Pools. On the way in, I visited with the driver of one of the pink tour jeeps coming out - he was a little reluctant to tell me I'd be okay with my stock Ram. Based on his advice, I did decide against going down the turnoff to the Devils Kitchen Sinkhole. It did look a little too dicey to me as we passed it. Instead, we hiked back to it from the pools. I was a little nervous driving up out of the pools parking area. Shortly before we left, I witnessed a Jeep spinning it's tires trying to get out. But, my Ram just crawled right out in 4 low. I didn't air down my tires because I felt like I might need the extra clearance more than the traction. That turned out to be a good decision as clearance was close in a few spots. If I didn't spend 99.9% of my time on-road, I'd have to consider bigger tires and a lift. Anyway, other than brushing up against the vegetation in a couple of narrow spots, the truck performed great and we had a lot of fun. We passed the same pink tour jeep driver on our way out of the gate and he seemed a little surprised to see that we made it in and back again ;-)
Attachments
Grape_Ape
Ram Guru
- Joined
- May 12, 2020
- Messages
- 809
- Reaction score
- 1,082
- Points
- 93
- Age
- 34
Thanks! Was my first one and may be my last lol. Good learning experience regardless.Good job on the wall. Those things suck to build. Lots of manual work
heat will destroy that battery over time.I replaced my stock battery with a dual purpose (starter and deep cycle) lithium (LiFePO4) battery. Dakota Lithium 135Ah, 1000 CCA. I need to do some more testing with it and tweak some IBS parameters with JScan, but so far, so good.
I went with Dakota Lithium over Antigravity for three main reasons: Capacity (135Ah vs 60 or 80), it's self heating for charging in the cold, and price—though it still wasn't cheap! But the Antigravity would have a much easier install, since it's available in the same H7 size of the stock battery. The DL is a Group 24F size battery (same depth, but narrower and taller than than H7).
I may do a more detailed write up later of the install process, but the short version is, I had to cut and splice two 2 AWG wires and one 4 AWG wire and crimp new battery lugs. Fortunately, I have a hydraulic crimper already, so this wasn't too bad. Just a major leap of faith when you make that first cut.
I am a bit concerned about how heat under the hood will impact the battery. I'm also concerned if my eTorque DC-DC charger could ever provide too much current to the battery; it's best to charge it lower than 40A, and 135A is the maximum sustained charge. I'll keep an eye on charging current and temperature.
The battery has Bluetooth (oddly, they don't advertise this), and you can use their app to track current, voltage, state of charge, and other parameters. Oddly, it doesn't display temperature, though since it has a self-heating feature, it must include a thermometer. But, you can monitor battery temperature from the IBS via JScan.
During my first test drive, before I tweaked any IBS parameters in JScan, it mustly didn't charge. Rather, during this evening trip (thus, headlights and taillights on), it was must draining at around 20A. It did see it charging as high as 80A for a brief moment; still safe, but higher than I like.
Since then, I tweaked the IBS settings, especially setting the battery voltage at which it'll be recharged; it defaults to 10V, which is a very dead LFP battery. I changed it to 13.4V, just below the fully charged, resting (i.e., not currently charging) voltage of an LFP. What this means is, the charger will kick in earlier and more often, but, I believe, at a lower current. (Ohm's Law also plays in here: LFP batteries internal resistance rises with voltage, so current will drop as voltage rises).
I haven't yet taken another test drive after these tweaks, but I'll be keeping an eye on things this week.
(The finally install is the one with the black felt on top and the wires wrapped in loom).
View attachment 181094
View attachment 181093
View attachment 181096View attachment 181095
jimothy
Ram Guru
I know. How much time is the question.heat will destroy that battery over time.
Insanity
Ram Guru
- Joined
- Apr 14, 2023
- Messages
- 818
- Reaction score
- 1,075
- Points
- 93
- Age
- 41
Truck did a lot of work hauling stones and rock to my back yard for my retaining wall build. Handles half a scoop of #57 rock like a champ.
View attachment 181079
I have shoveled and will continue to shovel LOTS of 57. That wall looks great good job man!
HEMIJAKE
Ram Guru
Brought the camper out from winter storage at my old man's place, after getting the truck back from the dealership. So.... apparently I did do the tsb on the leaking fenders correctly as it was no longer leaking there. The technician called me and said they sprayed water at the back window to rule things out, and that is where this leak is coming from. They said it's going down into the door channel and traveling forward into the front footwell. I'm sure I had the fender leak as well, but this explains why it hasn't been as bad now afterwards. Now the fun part. I'm slightly out of warranty, so they said they would complain to ram on my behalf, and that I need to as well, to hopefully get them to cover the repair. If anyone has any tips, I'm all ears.

Dogpatch
Ram Guru
You won’t be sorry you did! Awesome tire!Switched out the stock Nexem tires for Michelin Defender LTX M/S2, same size. Nicer ride.
The dealer can request, and it's normally approved, for a one time courtesy repair, if you are just out of warranty. I think they have like a 12 month or 10000 mile grave period for the request after warranty expiresBrought the camper out from winter storage at my old man's place, after getting the truck back from the dealership. So.... apparently I did do the tsb on the leaking fenders correctly as it was no longer leaking there. The technician called me and said they sprayed water at the back window to rule things out, and that is where this leak is coming from. They said it's going down into the door channel and traveling forward into the front footwell. I'm sure I had the fender leak as well, but this explains why it hasn't been as bad now afterwards. Now the fun part. I'm slightly out of warranty, so they said they would complain to ram on my behalf, and that I need to as well, to hopefully get them to cover the repair. If anyone has any tips, I'm all ears.
View attachment 181126
HEMIJAKE
Ram Guru
Perfect! Thank you! Yeah they didn't seem to worried about it when I talked to the shop.The dealer can request, and it's normally approved, for a one time courtesy repair, if you are just out of warranty. I think they have like a 12 month or 10000 mile grave period for the request after warranty expires
Just had the vapor canister on my fuel tank done with a courtesy repair, and mine was a 2020 with 43k miles.Perfect! Thank you! Yeah they didn't seem to worried about it when I talked to the shop.
HEMIJAKE
Ram Guru
Good to know, thanks fella!Just had the vapor canister on my fuel tank done with a courtesy repair, and mine was a 2020 with 43k miles.
aprez
Active Member
- Joined
- Jan 31, 2024
- Messages
- 38
- Reaction score
- 70
- Points
- 18
- Age
- 57
Did a few things this weekend with the new Ram. Towed my camper to the shop to get some work done, and the hitch needs lowering (my gladiator was a bit higher).

Then installed an Auxbeam switch panel using the Vise Designs cab mount, engine mount for the control box didn't work on my Limited so I used 2 sided tape and mounted it to the fuse box under the hood. Will clean up the wiring, had to get the kid to hockey practice.


Also installed some Weather Tech side window deflectors

Next up, dual ARB in the RamBox.
Then installed an Auxbeam switch panel using the Vise Designs cab mount, engine mount for the control box didn't work on my Limited so I used 2 sided tape and mounted it to the fuse box under the hood. Will clean up the wiring, had to get the kid to hockey practice.
Also installed some Weather Tech side window deflectors
Next up, dual ARB in the RamBox.
Users who are viewing this thread
Total: 6 (members: 0, guests: 6)
Site Vendors


