Csjumper2003
Active Member
What is that black on the tailgate?
What is that black on the tailgate?

I almost decided to do lights like this. I kinda wish I did, it looks good.
Nice that’s awesome! I wish mine were bright and shined that far! Even if I put them there I don’t think these little lights have enough power to shine like yours do.I may steal your idea, my problem is mine shine too far. I need more light up close.
If you haven't installed your other 2, may I suggest this location when you do?
View attachment 115357
View attachment 115358
View attachment 115359
View attachment 115360
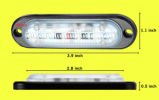
SUNPIE Pure White LED Rock Lights... https://www.amazon.com/dp/B019ODAK26?ref=ppx_pop_mob_ap_shareThat looks pretty good. Do you by any chance have a link to those lights?
How did you mount those? Did you take the lights apart? They almost look like they are factory. They aren't very noticable which is what I wantSUNPIE Pure White LED Rock Lights... https://www.amazon.com/dp/B019ODAK26?ref=ppx_pop_mob_ap_share
I gotta admit I definitely wish they were brighter. They don’t do a whole lot until you’re close to an object
Thanks that’s what I was going for!How did you mount those? Did you take the lights apart? They almost look like they are factory. They aren't very noticable which is what I want
You stuck them on the back side of that plastic piece right?Thanks that’s what I was going for!
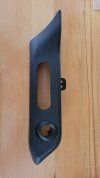
Used a 3/4” hole saw and then sanded the edges smooth. Honestly I just stuck them on with strong epoxy lol. I figured why get all crazy making brackets for $5 lights. Been driving it in the rain and snow and they’re sticking just fine!
That looks awesome!Spent some time last night cutting out the holes in the filler panel below the bumper. Mounted the lights into the panel with epoxy. Now, just need to install these on the truck and wire them in.
I plan on filling the gap between the lens and the filler piece with a black RTV or caulking. The light lens is angled from the base to visual part, so unless I cut the opening with an angle to it, I wouldn't get a tight fit. That was too much work to get perfect, so I just did a straight cut which is leaving me with a small gap between the filler piece and the lens.
Yep!You stuck them on the back side of that plastic piece right?

Well damn, now I like yours than mine

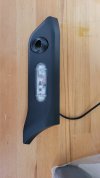
Any night shots from backup camera?Well, it's finally dark and I went out to see how they look. Being installed to follow the angle of the rear fillers does put the focal point not far from the rear of the truck. It will help when backing into a parking space and being able to see parking lot lines and whatever is behind the truck, but it does NOT illuminate the area like some of the others posted above. Since they are just epoxied in place, I could always release them, add some spacers at the top and re-glue them in. I don't want to light up the entire neighborhood, so just a little angle is all I think it needs.
I just got my lights this week and I also ordered the replacement bumper filler panels. Instead of installing the lights to the filler panel (as seen in post 1), I'm thinking about cutting an opening the size of the lens only, and mounting them on the backside with with only the light exposed. I could still drill the holes for the screws, but I was going for a more finished look. Anybody know how I can secure the light to the backside of the panel? Will a 2 part epoxy hold it there?
Quick someone find the part # for the replacement filler piece