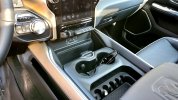
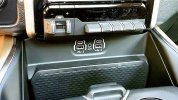
From what I have been reading on this and other forums is that the center console harness would need to be replaced with one that matches your vehicle option wise as it has the CD player connection to the bus. Then the computer gets flashed to add the CD player.
5thGenRams Forums
You are using an out of date browser. It may not display this or other websites correctly.
You should upgrade or use an alternative browser.
You should upgrade or use an alternative browser.
No CD player in my 2020 1500
- Thread starter diamondmi
- Start date
CMil527
Spends too much time on here
RETROFITTING THE 8 TRACK!!
turkeybird56
Well-Known Member
MY 19 Bighorn came stock with "single" CD, LOL, got a Janis Joplin CD in there, LOL.....
Having Janis in there puts you at least one step ahead of the game!MY 19 Bighorn came stock with "single" CD, LOL, got a Janis Joplin CD in there, LOL.....
HandyCruiser
Well-Known Member
- Joined
- Jun 28, 2021
- Messages
- 285
- Reaction score
- 345
- Points
- 63
- Age
- 60
moosem
Ram Guru
After reading through this thread, I actually played a CD in my truck today! It’s the one and only CD in my truck and it’s been in the CD player for the past two years! Sammy Hagar and the Circle which came with the tickets to the show back in the summer of 2019. Listened to it once on the way to the show, and now a second time..
GKIII
Ram Guru
This truck is the third MOPAR vehicle I've owned since 2012 (First being a Grand Cherokee and the second a Charger) and none have had a CD player, I honesty didn't know they put them in Ram/Jeep/Dodge vehicles anymore...
I was shocked to see one in my wife's '17 Honda (though it's really a BluRay player for the in-car entertainment).
I was shocked to see one in my wife's '17 Honda (though it's really a BluRay player for the in-car entertainment).
Last edited:
turkeybird56
Well-Known Member
The CD players are in the 2019's, I dunno about any other. I have level II Bighorn.
turkeybird56
Well-Known Member
BOIRD dunno, LOL... Happy I have mine so I can play my Janis Joplin, LOL.
I have a 2021 Laramie. Build date is May 2021. I have the cubby hole where the CD player use to be. What's you build date?When I saw this thread, I got excited about adding the cubby as a better place to put a cell phone. But it appears that in the 2021 Laramie, there is no place for the CD player nor the cubby.
View attachment 101390
View attachment 101391
HandyCruiser
Well-Known Member
- Joined
- Jun 28, 2021
- Messages
- 285
- Reaction score
- 345
- Points
- 63
- Age
- 60
Mine is September 2020. It's an early batch 2021 with Level 1 rather than Level/Group A.I have a 2021 Laramie. Build date is May 2021. I have the cubby hole where the CD player use to be. What's you build date?
A couple of updates and some new pictures as I just finally went through the install process.
There are, as pictured below, six total bolts that need to be removed to then be able to literally slide the console back (at least on my 19 Limited). They are all under trim pieces in the following locations:
Front of the console (left and right):
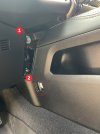
Rear of the console (slide your seat all the way forward):
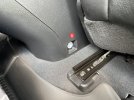
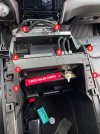
While this next part may not be technically required, I found it infinitely easier to remove the CD player this way. I removed six total screws in the order shown below.
1 and 2 allowed the back of the CD player to be free.
3 and 4 allowed the thin trim along the console sides to be lifted up and removed (pro tip, lift your center console first or it will gouge your leather).
5 and 6 allow the ram charger plastic piece to be lifted up.
7 and 8 (on the bottom side of the plastic) allow the CD player to be removed and then the cubby to be installed.
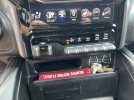
I'm still waiting on the plastic mat to come into the dealer, (yes, it a separate part you need to order) but I'm calling this one 99% complete:
Hope this helps anyone looking to complete this, I'm extremely happy with the results and the ease of install.
There are, as pictured below, six total bolts that need to be removed to then be able to literally slide the console back (at least on my 19 Limited). They are all under trim pieces in the following locations:
Front of the console (left and right):

Rear of the console (slide your seat all the way forward):

While this next part may not be technically required, I found it infinitely easier to remove the CD player this way. I removed six total screws in the order shown below.
1 and 2 allowed the back of the CD player to be free.
3 and 4 allowed the thin trim along the console sides to be lifted up and removed (pro tip, lift your center console first or it will gouge your leather).
5 and 6 allow the ram charger plastic piece to be lifted up.
7 and 8 (on the bottom side of the plastic) allow the CD player to be removed and then the cubby to be installed.

I'm still waiting on the plastic mat to come into the dealer, (yes, it a separate part you need to order) but I'm calling this one 99% complete:

Hope this helps anyone looking to complete this, I'm extremely happy with the results and the ease of install.
Last edited:
Awesome write up!!!A couple of updates and some new pictures as I just finally went through the install process.
There are, as pictured below, six total bolts that need to be removed to then be able to literally slide the console back (at least on my 19 Limited). They are all under trim pieces in the following locations:
Front of the console (left and right):
View attachment 101978
Rear of the console (slide your seat all the way forward):
View attachment 101980
While this next part may not be technically required, I found it infinitely easier to remove the CD player this way. I removed six total screws in the order shown below.
1 and 2 allowed the back of the CD player to be free.
3 and 4 allowed the thin trim along the console sides to be lifted up and removed (pro tip, lift your center console first or it will gouge your leather).
5 and 6 allow the ram charger plastic piece to be lifted up.
7 and 8 (on the bottom side of the plastic) allow the CD player to be removed and then the cubby to be installed.
View attachment 101981
I'm still waiting on the plastic mat to come into the dealer, (yes, it a separate part you need to order) but I'm calling this one 99% complete:
View attachment 101982
Hope this helps anyone looking to complete this, I'm extremely happy with the results and the ease of install.
The connector for the CD player was part of which harness? The dash or center console?A couple of updates and some new pictures as I just finally went through the install process.
There are, as pictured below, six total bolts that need to be removed to then be able to literally slide the console back (at least on my 19 Limited). They are all under trim pieces in the following locations:
Front of the console (left and right):
View attachment 101978
Rear of the console (slide your seat all the way forward):
View attachment 101980
While this next part may not be technically required, I found it infinitely easier to remove the CD player this way. I removed six total screws in the order shown below.
1 and 2 allowed the back of the CD player to be free.
3 and 4 allowed the thin trim along the console sides to be lifted up and removed (pro tip, lift your center console first or it will gouge your leather).
5 and 6 allow the ram charger plastic piece to be lifted up.
7 and 8 (on the bottom side of the plastic) allow the CD player to be removed and then the cubby to be installed.
View attachment 101981
I'm still waiting on the plastic mat to come into the dealer, (yes, it a separate part you need to order) but I'm calling this one 99% complete:
View attachment 101982
Hope this helps anyone looking to complete this, I'm extremely happy with the results and the ease of install.
HandyCruiser
Well-Known Member
- Joined
- Jun 28, 2021
- Messages
- 285
- Reaction score
- 345
- Points
- 63
- Age
- 60
A couple of updates and some new pictures as I just finally went through the install process.
There are, as pictured below, six total bolts that need to be removed to then be able to literally slide the console back (at least on my 19 Limited). They are all under trim pieces in the following locations:
Front of the console (left and right):
View attachment 101978
Rear of the console (slide your seat all the way forward):
View attachment 101980
While this next part may not be technically required, I found it infinitely easier to remove the CD player this way. I removed six total screws in the order shown below.
1 and 2 allowed the back of the CD player to be free.
3 and 4 allowed the thin trim along the console sides to be lifted up and removed (pro tip, lift your center console first or it will gouge your leather).
5 and 6 allow the ram charger plastic piece to be lifted up.
7 and 8 (on the bottom side of the plastic) allow the CD player to be removed and then the cubby to be installed.
View attachment 101981
I'm still waiting on the plastic mat to come into the dealer, (yes, it a separate part you need to order) but I'm calling this one 99% complete:
View attachment 101982
Hope this helps anyone looking to complete this, I'm extremely happy with the results and the ease of install.
If needed, could you have removed or replaced the wireless charger panel this way? I've been considering adding the wireless charger to our truck. But the instructions describe removing the whole stereo first. Your method appears much simpler and much faster.
If needed, could you have removed or replaced the wireless charger panel this way? I've been considering adding the wireless charger to our truck. But the instructions describe removing the whole stereo first. Your method appears much simpler and much faster.
Yes, 100%, 3, 4, 5, and 6 will allow that whole panel to be lifted up and out if you disconnect the cables from the back.
The connector for the CD player was part of which harness? The dash or center console?
I didn't really look at that, unfortunately. Perhaps someone else can chime in on that.
John1kissel
New Member
- Joined
- Oct 11, 2021
- Messages
- 1
- Reaction score
- 0
- Points
- 1
- Age
- 50
Did someone trade you? I want the CD player but can’t find the one that fits that cubby.Thanks. Almost be willing to trade my CD player for someone's cubby insert...
Could you please pm the video to me too, thanksI’ll pm the video
Users who are viewing this thread
Total: 1 (members: 0, guests: 1)
Members online
Total: 1,626 (members: 10, guests: 1,616)

