5thGenRams Forums

Register a free account today to become a member! Once signed in, you'll be able to participate on this site by adding your own topics and posts, as well as connect with other members through your own private inbox!

Multifunction Tailgate Retrofit

Here are the bracelets
We came to the same basic conclusion. I was considering making them with a 1/2" - 3/4" notch to make them adjustable, but I think that's what we're planning.

We're still awaiting some parts - a mid-gate striker, weather caps for the MFT frame, and interior bed liner covers.

Do you have photos of your adaptors in place and functional? I think there's plenty of clearance for the bolts that hold them in - how bad is it to torque them so they don't rotate?

Today's project was mounting the replacement bumper (Chassis Unlimited), and salvaging wiring harnesses. Lost one of the backup sensors, so I am now waiting on a replacement sensor set, and connectors, as well as some weather sealed 2 pin connectors for the license plate lights, since the old ones don't snap into the new bumper.

Once the other parts get in, there will be updates....
 
Has anyone already finished this and how did it go during the process?
 
Has anyone already finished this and how did it go during the process?
I’m at the shop now buttoning up details.

It is fully functional. We are dealing with the Striker pins right now as the last “big” detail (need some trim pieces still).

Except for the striker pins, it’s plug and play as long as your donor is fully functional.
 
I’m at the shop now buttoning up details.

It is fully functional. We are dealing with the Striker pins right now as the last “big” detail (need some trim pieces still).

Except for the striker pins, it’s plug and play as long as your donor is fully functional.
 

Attachments

  • IMG_7475.jpeg
    IMG_7475.jpeg
    306.7 KB · Views: 53
Initial test fitting of the striker relocation brackets
 

Attachments

  • IMG_7474.jpeg
    IMG_7474.jpeg
    365.5 KB · Views: 54
Soooo, almost a year along and many are wondering about how the MFT retrofit project has gone, and most have provided encouragement, and that has been greatly appreciated..

On the other side of the coin others have provided no constructive comments, only negative, snide, and dismissive ones. I guess that's the price you pay for being on a forum such as this. Evidently the naysayers don't grasp the intent of 'Forums'. These are the ones for the whom the following is intended;
Better to remain a fool than to open your mouth and remove all doubt.

Now, all that aside-rant over.

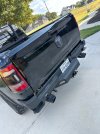
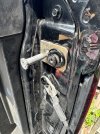
By borrowing a 2020 Rebel from my dealer for a few days, I was able to do a ton of research on how the MFT was engineered, as well as what its impacts would be on the structural integrity of the box. The tailgates are 100% interchangeable, there are just a couple of minor relocations issues for the latch pins that are no big deal, and it only took about an hour to get the wiring figured out, so it is certainly very doable. But, and this is the big one, I wouldn't recommend that anyone try this unless you are quite mechanically inclined, as well as conceptually adept at looking outside the zone!!

Once I had all the mechanicals figured out I had my dealer parts lady do a 'locate' for me, and through both the Canadian and the US parts systems, about 98% of the components required, were readily available, and incredibly almost 3/4 of those were in our regional parts depot in Red Deer, so 90 miles north of Calgary(where I live). Literally overnight service.

Where the difficulty arose was on the remaining 2% of the parts, the exterior panels. They were(are?) colour-matched to the trim code, but there was at least a six(6) month wait on them. Unfortunately at that time, so last spring, Mother MOPAR wasn't offering unpainted panels so that wasn't even an option. In fact, I'm not even sure they are now.

With this in mind I had to put the whole project on hold as I didn't want to have a huge number of bits and pieces sitting in my garage gathering dust waiting on two(2) pieces of tin, very crucial pieces of tin mind you, but tin nonetheless. With that in mind a decision had to be made-forge ahead on a leap of faith that the panels would eventually show up, or go into hold mode. I chose the latter. It just made sense then, and frankly, still does. If I could have had the panels in an expedient time frame, I wouldn't even be writing this little epistle.

As far as the bracing of the whole box was concerned, a point that was raised by many, that's an easy one to deal with. I had actually designed a pair of corner brackets(very similar to but before they had theirs) the ones that rightonebracket.com is now offering. Rather than bent steel mine were to be milled out of T6-6061 billet stock, with the design adjusted slightly to allow for my tonneau cover corners clamps, as well as countersunk fasteners. All in all, the steel ones are far more cost effective, and good for the guys at Right On Bracket for coming up with their design and product. That's what we need-more people like them satisfying a need for a specific product for our hobby.

In the meantime, the pre-introduction information on the '21s was released, and part of that information included initial details on the new technology offerings; digital rear view mirror, Heads Up Display, trailer camera connection, plus a couple of cosmetic items, and not to forget the 10th Anniversary Package.

Armed with that information, as well as waiting to see what offerings the factory might provide at time of formal introduction, I decided to just order a new truck. My '19 Longhorn has just turned ~44,000 Kms(~27,000 miles), and being in flawless condition, the dealer took very good care of me. I've got my VIN, and a tentative ship date, so allowing for the in transit time to Windsor, then hanging around there until the right combination of trucks-dealers-locations is finalized, I hope to see it in the next 3 or so weeks. Fingers crossed on that one.

So, that's the saga. If anyone would like to reach out to me to get some of the more pertinent details on doing the MFT swap, don't hesitate.

And everyone stay safe from the COVID-19.

Later..............
Hi there, i have acquired a whole bed to swap to my truck - so going from standard 5'7'' bed to a rambox + multifunction tailgate bed.

Unfortunately, the bed arrived with the tailgate closed and I was unable to open it, today I finally attempted to connect the tailgate plugs from my truck to the new bed (just took off my tailgate and bumper and reversed up to it) but the tailgate wouldn't open - like nothing was going to the actuators. I even changed the setting in AlfaOBD to Yes for "LIN and Misc: Multi Function Tailgate Module Present" but still no avail.

Any thoughts? I noticed the tailgate pin configuration is different on mine to the new bed (both only have 5 of the 8 pins populated with male pins, but in a different arrangement).
 
My body shop guy ran into this…. Anyone got any idea why the harnesses between the original tailgate and the new one look so vastly different? It’s not just a yellow wire…
I am attempting this myself, sourced a whole new bed to swap and noticed this exact thing. To test out, i backed my truck up and connected the tailgate to try open it on the new bed (it is closed from where i bought it from) but it didn't work. Changed AlfaOBD settings to but no luck - did you get it working on yours? My current truck is a standard bed without ramboxes.
 
the wiring for the tailgate module looks fairly straight forward. power ground and lin bus. it appears non multi function trucks don't have the lin bus wire in the tail gate/ bed harness. it is pin 6 on the tail gate module . orange and dark blue. It is used by a handful of modules in the interior of the truck. (inverter module, wireless charging module, rear seat heater, and steering column control module) i would suggest looking at the harness under the driver seat that goes threw the floor to the rear of truck on the outside underneath.

pin 6 on the module connector
pin 5 on tailgate harness connector
pin 19 on a connector under the seat under carpet
 
Last edited:
the wiring for the tailgate module looks fairly straight forward. power ground and lin bus. it appears non multi function trucks don't have the lin bus wire in the tail gate/ bed harness. it is pin 6 on the tail gate module . orange and dark blue. It is used by a handful of modules in the interior of the truck. (inverter module, wireless charging module, rear seat heater, and steering column control module) i would suggest looking at the harness under the driver seat that goes threw the floor to the rear of truck on the outside underneath.

pin 6 on the module connector
pin 5 on tailgate harness connector
pin 19 on a connector under the seat under carpet
Thanks, I can see all the wires populated at the tailgate harness, so will definitely check the harness below the driver's seat. Do you know the connector number by any chance?
 
Thanks, I can see all the wires populated at the tailgate harness, so will definitely check the harness below the driver's seat. Do you know the connector number by any chance?
xy400a or xy640a
 
I'm glad my truck has the MFT because it sounds like a pain in the you know what other wise.
 

Users who are viewing this thread

Back
Top