
5thGenRams Forums
You are using an out of date browser. It may not display this or other websites correctly.
You should upgrade or use an alternative browser.
You should upgrade or use an alternative browser.
Mopar bed light kit tips
- Thread starter LaRamie
- Start date
jnrbtpy
Member
- Joined
- Jan 22, 2020
- Messages
- 14
- Reaction score
- 11
- Points
- 3
- Age
- 53
Has anyone ever tried to tie a bed light kit, not OEM, into the cargo light? I want LEDs around the bed rails and cab. but thinking of tieing them into the cargo light so when I open the tailgate they come on and go off with it.
jdefoe0424
Ram Guru
Somewhere, I do believe there is someone who did that. They ran the wire in through the factory grommet and tapped into the wires for the cargo light.Has anyone ever tried to tie a bed light kit, not OEM, into the cargo light? I want LEDs around the bed rails and cab. but thinking of tieing them into the cargo light so when I open the tailgate they come on and go off with it.
I intend to do mine the same way when the weather gets nice again and I have some time to do it.
Sent from my Moto Z (2) using Tapatalk
jnrbtpy
Member
- Joined
- Jan 22, 2020
- Messages
- 14
- Reaction score
- 11
- Points
- 3
- Age
- 53
I figured someone had, is seems logical. I plan to pull my cargo light out this weekend and trace the wiring, find the correct wire to tap into and hopefully get it done, if it works out I will let you know.Somewhere, I do believe there is someone who did that. They ran the wire in through the factory grommet and tapped into the wires for the cargo light.
I intend to do mine the same way when the weather gets nice again and I have some time to do it.
Sent from my Moto Z (2) using Tapatalk
Jako
Spends too much time on here
Below is a post on wiring bed lights. This can also be done using a single pole double throw switch (SPDT). One side of the switch would be wired from the white tan wire which would come on when the cargo light comes on and the other with a constant hot which would come on when you wanted the bed lights to work independent of the cargo lights.. The switch has 3 positions on-off-on. In the center you would have no bed lights.
The constant hot can be taken off your trailer harness, some tap in others use a curt harness. Curt 56070 will be 7' long but you can do what you want as it gives you access to all 7 wires. This will also give you availability if you want auxiliary reverse lights.

 5thgenrams.com
5thgenrams.com
The constant hot can be taken off your trailer harness, some tap in others use a curt harness. Curt 56070 will be 7' long but you can do what you want as it gives you access to all 7 wires. This will also give you availability if you want auxiliary reverse lights.
OEM LED reverse lights are absolutely terrible...what have you guys done to address this?
Finished, these are the Rigid Ignite diffused. Made a big difference! Really would like to see how you mount those on bumper in daylight. Thanks.
5thgenrams.com
LED Bedlight Wiring
Hey Guys, I recently installed aftermarket bed lights and they work great. I wired constant power to a switch and then to the positive of the lights. Everything is good and works as expected. After using it for a few weeks, I realized it would be really nice if the LEDs came on automatically...
5thgenrams.com
Last edited:
Thank you for the write up. You clarified a confusing issue and now my lights are working. I did the install and mistakingly assumes the wire positions were as connected vs a top down view. Obviously now I also know the pin locations are numbered. Anyway, great post. Thanks.Never mind everyone. I pulled the C1 connector and they had it wired wrong also. I move the brown/white wire into the correct slot, and whaddya know, it worked.Let there be light!
Apexbasher
Active Member
Just ordered my kit today and am going to go peak underneath to see if I lucked out with the bed being pre-wired (not holding out much hope). I'll probably be back in a few days scratching my head asking pin questions. To be honest I'm not entirely clear on what is being said about all the different colors and positions. Hopefully once I get my hands in there things will begin to clarify, (again, not holding out much hope).
Last edited:
Hey don't sweat it. Its pretty easy, just take note that the pin locations in the directions were wrong. Not sure if they were corrected. But if you plan on having the sales code added from the dealer just leave the wires inside the truck and let them do it. It should be at most a one hour charge for labor, and that is a stretch. I was charged a 1/2 hour about $70. But if you decide to do it all the way be very careful putting the brackets back into the truck very easy to snap the lock if you don't push it in all the way. I broke mine and it was nerve wracking trying to get a new bracket, since Ram doesn't sell them. I found them and it took a while to get the replacement.Just ordered my kit today and am going to go peak underneath to see if I lucked out with the bed being pre-wired (not holding out much hope). I'll probably be back in a few days scratching my head asking pin questions. To be honest I'm not entirely clear on what is being said about all the different colors and positions. Hopefully once I get my hands in there things will begin to clarify, (again, not holding out much hope).
Apexbasher
Active Member
Thanks. I plan to do the whole thing myself from start to finish, including the reflash. Can you give some detail on these brackets you speak of, maybe a picture?Hey don't sweat it. Its pretty easy, just take note that the pin locations in the directions were wrong. Not sure if they were corrected. But if you plan on having the sales code added from the dealer just leave the wires inside the truck and let them do it. It should be at most a one hour charge for labor, and that is a stretch. I was charged a 1/2 hour about $70. But if you decide to do it all the way be very careful putting the brackets back into the truck very easy to snap the lock if you don't push it in all the way. I broke mine and it was nerve wracking trying to get a new bracket, since Ram doesn't sell them. I found them and it took a while to get the replacement.
There is a picture of them in the first posting of this thread, the third picture. Also scroll down or look in the instructions and you will see it. The trick i found was that it had to be pushed all the way in before you lock it down. Very easy to break as I and a few others did. I found out that Ram /Mopar doesn't carry a replacement. I somehow found it here....https://ecat.aptiv.com/product/13687849
Apexbasher
Active Member
So let me make sure I'm seeing this correctly:There is a picture of them in the first posting of this thread, the third picture. Also scroll down or look in the instructions and you will see it. The trick i found was that it had to be pushed all the way in before you lock it down. Very easy to break as I and a few others did. I found out that Ram /Mopar doesn't carry a replacement. I somehow found it here....https://ecat.aptiv.com/product/13687849
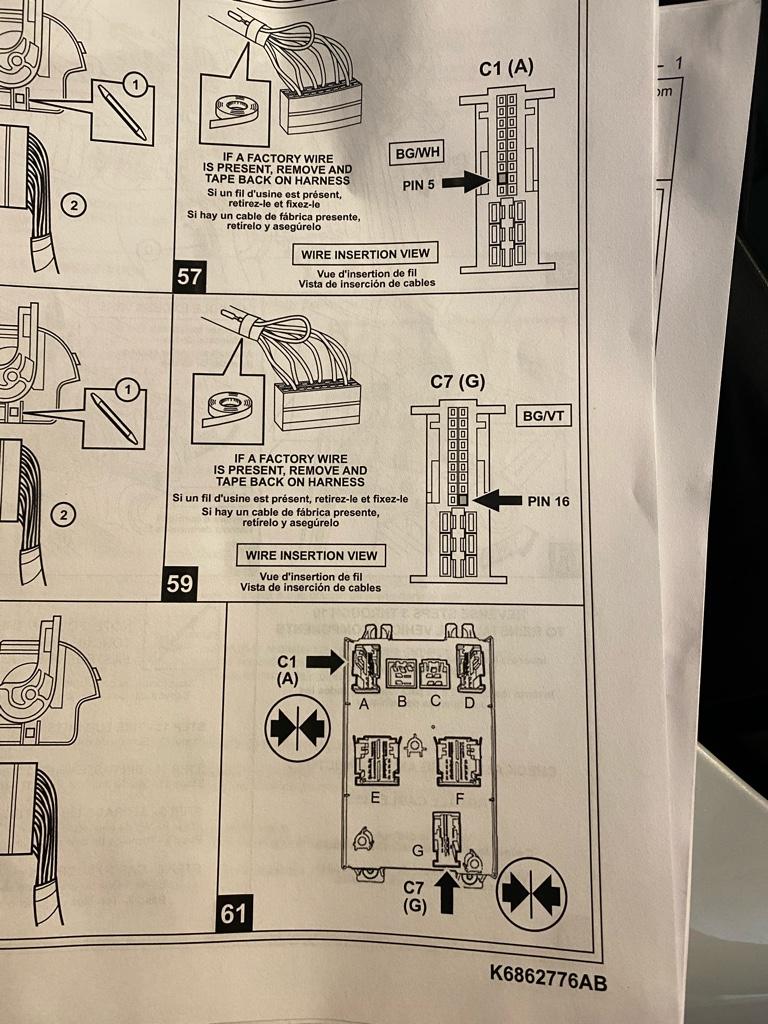
The instructions are CORRECTLY stating the desired PIN position NUMBERS, but are INCORRECTLY pointing out that position on the images of the plugs.
(i.e. I do want to put the biege/violet wire into C7's PIN 16, but the image in step 59 is mistakenly pointing at PIN 21)
It has been a long time since I did this, but I believe your lat sentence is correct (i.e. I do want to put the biege/violet wire into C7's PIN 16, but the image in step 59 is mistakenly pointing at PIN 21).If you look closely at the markings on the clip/bracket they will show you numbers. In post 6 of this thread, photo of instructions box 59, the instructions incorrectly show the wrong space. I believe the they counted from the top when they should have counted from the bottom in the second column. I am pretty sure the instructions are correct except for the photo, pretty bad screwup from the manufacturer, and I can't believe they haven't fixed it yet. I did it not knowing the mistake and at first the dealer couldn't make it work. I went back reread it and changed the placement and it works as designed. Unfortunately though that is when the bracket broke, and caused major anxiety when the dealer told me that the part wasn't available. I imagined a literally brand new truck with the clip constantly falling out from vibrations. Just be easy on tit, and MAKE SURE IT IS FULLY SEATED before you lock it down. Easy to get to but in a ver tight space.
Apexbasher
Active Member
Okay. NOW I know what you mean by 'bracket'. It's the connector carrier and bale. Yes, you can easily snap the bale off if you have not firmly seated the connector first.
Anyway, I did the whole installation this morning/afternoon and just finished the body computer configuration change using AlfaOBD and everything works great! Couldn't be happier. Many thanks to all who provided the helpful hints along the way (especially that PIN 16 correction).
By the way, in the PC version of AlfaOBD:
1) Connect
2) Go to 'Active Diagnostic' tab
3) Select 'Car configuration change' from the bottom of the drop-down
4) Select 'CBC I/O & Feature: Truck Bed Lighting Feature' in the very long Select option drop-down.
5) Then choose 'Yes' in the Select value pane.
6) Click 'Start' and then 'Next' when prompted.
Done!
Last edited:
I put the kit in today. it took a few hours - front inner fender guard was the hardest to take on and put back on. Otherwise it went very smooth.
No need to remove the wheels or the storage box... Wiring was easy enough with the quick change recommended in this thread, although like anything, it is never fun to crawl around under the dash.
Bottom line, the lights work great and I could not be happier...
No need to remove the wheels or the storage box... Wiring was easy enough with the quick change recommended in this thread, although like anything, it is never fun to crawl around under the dash.
Bottom line, the lights work great and I could not be happier...
So I am in the middle of doing the installation. This is the instructions that came with the kit. So I think it’s safe to say that the factory DID update the Booklet. Correct?
Sent from my iPhone using Tapatalk
ServoFides35
Member
Yea looks like it. I got everything in minus the pinning a couple days ago. My instructions look the same as yours. Was gonna have the dealer do it when they did the sales code add, but now reading through everything I feel pretty confident to roll on and probably add the code myself with AlphaOBD.
So I am in the middle of doing the installation. This is the instructions that came with the kit. So I think it’s safe to say that the factory DID update the Booklet. Correct?
Sent from my iPhone using Tapatalk
Yea looks like it. I got everything in minus the pinning a couple days ago. My instructions look the same as yours. Was gonna have the dealer do it when they did the sales code add, but now reading through everything I feel pretty confident to roll on and probably add the code myself with AlphaOBD.
What a PIA to get to those plugs. I’m left handed so it was a challenge with my dumb right hand.
Sent from my iPhone using Tapatalk
ServoFides35
Member
I’m right handed and still had to reach over my head with my left like I was doing the ymca dance stuck in the “c” position. Got it though.What a PIA to get to those plugs. I’m left handed so it was a challenge with my dumb right hand.
Sent from my iPhone using Tapatalk
Just be careful putting the block back in. Some of us (me) broke it when the block wasn't fully seated before locking it in. It should lock easily, if any resistance it probably isn't in far enough.
Users who are viewing this thread
Total: 1 (members: 0, guests: 1)


