
do you have a link to that? I did a quick search but didn't see it, thanksAnother choice is to run a wire down to the fuse box under the steering wheel. I did a write up on that when I put my dash cam in.
5thGenRams Forums
You are using an out of date browser. It may not display this or other websites correctly.
You should upgrade or use an alternative browser.
You should upgrade or use an alternative browser.
Hardwire radar detector to rear view mirror?
- Thread starter GM convert
- Start date
securityguy
Legendary member
I am happy to help you and talk you through it if you want to call my cell. PM me and I will provide it to you.do you have a link to that? I did a quick search but didn't see it, thanks
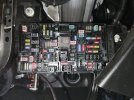
I have the blendmount up, and have the escort wire ran down to the fusebox under steering column. Im not sure where this lug goes, don't want to screw to up.I am happy to help you and talk you through it if you want to call my cell. PM me and I will provide it to you.
Attachments
securityguy
Legendary member
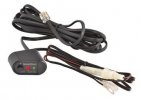
You need a FUSE TAP to make the connection to the fuse panel. This or equivalent.I have the blendmount up, and have the escort wire ran down to the fusebox under steering column. Im not sure where this lug goes, don't want to screw to up.
Amazon.com: Evanno Micro2 Fuse Kit with Micro2 Fuse Tap, 70pcs Micro2 Blade Fuses (5A 7.5A 10A 15A 20A 25A 30A) with 3 Car Add-A-Circuit Micro2 Fuse Tap,1 Fuse Puller for Car Vehicle Automotive : Automotive
Amazon.com: Evanno Micro2 Fuse Kit with Micro2 Fuse Tap, 70pcs Micro2 Blade Fuses (5A 7.5A 10A 15A 20A 25A 30A) with 3 Car Add-A-Circuit Micro2 Fuse Tap,1 Fuse Puller for Car Vehicle Automotive : Automotive
www.amazon.com
Chemesherpa
Member
- Joined
- Nov 10, 2021
- Messages
- 6
- Reaction score
- 2
- Points
- 3
- Age
- 38
Alright, so I completed an install today using 20" PowerTap & the Blendmount. The upper plastic housing is pretty easy, but the lower is an absolute pain to remove!
Here is the upper plastic housing piece removed.
View attachment 1892
Upper Plastic Housing Trim Piece
View attachment 1893
Back of the upper trim piece. This is held on by plastic molded in clips.
View attachment 1907
Lower Plastic Housing Piece (Those clips are a bear! I used a plastic trim removal tool.) Notice the 4 rectangular clip receiver holes)
View attachment 1894
Here is a closeup of the passenger side metal clips for lower plastic housing
View attachment 1908
The mirror harness is small, and removes easily
View attachment 1909
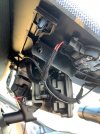
If you flip over the harness, you can easily see the power wire (red w/stripe) in corner with black ground next to that. These are the two I tapped.
View attachment 1911
Harness with pins tapped.
View attachment 1913
COMPLETED INSTALL in next comment
How did you get these two green circled clips to release without breaking or breaking this whole triangle piece in half?
Attachments
securityguy
Legendary member
If you pull away the larger shroud from the windshield, and then gently pry from the top of the center piece, it actually comes out quite nice with zero damage. Just be patient, have the right tools and pull away from the top gently. I've done it like 5 times on my truck and other members trucks that had me do their installations.How did you get these two green circled clips to release without breaking or breaking this whole triangle piece in half?
Chemesherpa
Member
- Joined
- Nov 10, 2021
- Messages
- 6
- Reaction score
- 2
- Points
- 3
- Age
- 38
Ok got the bigger shroud off the windshield easily with a flat trim stick from bottom passenger side. Once the bigger shroud was off I was able to get my finger behind the smaller piece and release the top clips from the back side. (The two red ones that I have marked easy) I'm still not understanding about the green ones. My finger isn't long enough to reach from behind to release the clip. How do those bottom clips release or do you just pull them out? Seems like the whole piece wants to bend in half if I just pull from the top after the top two clips are released.If you pull away the larger shroud from the windshield, and then gently pry from the top of the center piece, it actually comes out quite nice with zero damage. Just be patient, have the right tools and pull away from the top gently. I've done it like 5 times on my truck and other members trucks that had me do their installations.
securityguy
Legendary member
You don't "release" the clips. They are just pressure clips and if you pull away from the main shroud from the top of the center piece at an angle downward they will just release without breaking...or they shouldOk got the bigger shroud off the windshield easily with a flat trim stick from bottom passenger side. Once the bigger shroud was off I was able to get my finger behind the smaller piece and release the top clips from the back side. (The two red ones that I have marked easy) I'm still not understanding about the green ones. My finger isn't long enough to reach from behind to release the clip. How do those bottom clips release or do you just pull them out? Seems like the whole piece wants to bend in half if I just pull from the top after the top two clips are released.
") It does take a bit of pressure, but like I said, I've done it 5 times without breaking anyones center piece tabs.
It does take a bit of pressure, but like I said, I've done it 5 times without breaking anyones center piece tabs.Chemesherpa
Member
- Joined
- Nov 10, 2021
- Messages
- 6
- Reaction score
- 2
- Points
- 3
- Age
- 38
I will try, but I'll admit I already bought a replacement for it anticipating that I'm going to break it lolYou don't "release" the clips. They are just pressure clips and if you pull away from the main shroud from the top of the center piece at an angle downward they will just release without breaking...or they should
If you look at the direct wire picture, you have two leads. One is for the fuse tap and the other is for ground. The LUG is just a ground connection.I have the blendmount up, and have the escort wire ran down to the fusebox under steering column. Im not sure where this lug goes, don't want to screw to up.
securityguy
Legendary member
And to add to that, when you remove the kick panel under the steering column, at the top left side, after it's removed, there is a philips head screw that provides an excellent ground!If you look at the direct wire picture, you have two leads. One is for the fuse tap and the other is for ground. The LUG is just a ground connection.
Chemesherpa
Member
- Joined
- Nov 10, 2021
- Messages
- 6
- Reaction score
- 2
- Points
- 3
- Age
- 38
Ok so I did it, although a little modified. I did the thing where I "released" the top two clips by removing the bigger shroud from the window and then reaching my finger over the top and behind the smaller center piece to release the top two clips. Then I pressed the big shroud back on to the window so that it was held still while I worked on those 2 bottom clips. I tried bending and pulling down from top but I noticed one of the bottom clips tearing away (plastic started to turn white with stress) so I stopped. What I did was bend it down just enough to stick my finger behind to support it. I then used a combination of pressing it outward from behind and pulling down from top and it finally popped out. Install is complete now and is pretty professional looking if I must say so myself,!You don't "release" the clips. They are just pressure clips and if you pull away from the main shroud from the top of the center piece at an angle downward they will just release without breaking...or they should
Attachments
securityguy
Legendary member
Awesome!Ok so I did it, although a little modified. I did the thing where I "released" the top two clips by removing the bigger shroud from the window and then reaching my finger over the top and behind the smaller center piece to release the top two clips. Then I pressed the big shroud back on to the window so that it was held still while I worked on those 2 bottom clips. I tried bending and pulling down from top but I noticed one of the bottom clips tearing away (plastic started to turn white with stress) so I stopped. What I did was bend it down just enough to stick my finger behind to support it. I then used a combination of pressing it outward from behind and pulling down from top and it finally popped out. Install is complete now and is pretty professional looking if I must say so myself,!
Domt1775
Active Member
- Joined
- Nov 1, 2021
- Messages
- 98
- Reaction score
- 29
- Points
- 18
- Age
- 29
Hello,
@securityguy or anyone else. About to install my radar detector and my 750x 2ch dash cam - would you be able to post a pic or describe where to pry from using the automotive trim tools. I would hate pry from the wrong area and snap one of the fasteners.
@securityguy or anyone else. About to install my radar detector and my 750x 2ch dash cam - would you be able to post a pic or describe where to pry from using the automotive trim tools. I would hate pry from the wrong area and snap one of the fasteners.
securityguy
Legendary member
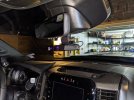
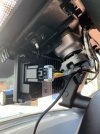
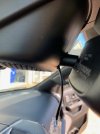
If you look closely, there are two clips at the top and two at the bottom right and left. If you look at the bottom right side, you will see a small notch, just stick a flat blade screwdriver in that notch and twist and it will unlatch. You can then pull the others off my hand. There is a center piece above the mirror stalk that clips in from the top R & L of that piece. Can be a royal PITA to get it out or it may just pop right out. I hope this help and feel free to ping me for more info if you need it. The last pic is where I routed my radar detector wire for my R7 on a Blendmount.Hello,
@securityguy or anyone else. About to install my radar detector and my 750x 2ch dash cam - would you be able to post a pic or describe where to pry from using the automotive trim tools. I would hate pry from the wrong area and snap one of the fasteners.

Attachments
Duran
Well-Known Member
- Joined
- Jul 17, 2020
- Messages
- 428
- Reaction score
- 119
- Points
- 43
- Age
- 41
Did you splice into a wire for the power. Or did you run it to a boxIf you look closely, there are two clips at the top and two at the bottom right and left. If you look at the bottom right side, you will see a small notch, just stick a flat blade screwdriver in that notch and twist and it will unlatch. You can then pull the others off my hand. There is a center piece above the mirror stalk that clips in from the top R & L of that piece. Can be a royal PITA to get it out or it may just pop right out. I hope this help and feel free to ping me for more info if you need it. The last pic is where I routed my radar detector wire for my R7 on a Blendmount.
View attachment 122725
securityguy
Legendary member
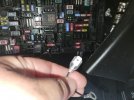
Ran all wires to the fuse box...takes like 5 minutes to run the cable. Happy to chat via cell if want to talk about more specifics.Did you splice into a wire for the power. Or did you run it to a box
Users who are viewing this thread
Total: 1 (members: 0, guests: 1)


